深度梦
作者: fchollet
创建日期: 2016/01/13
最后修改: 2020/05/02
描述: 使用 Keras 生成深度梦。
介绍
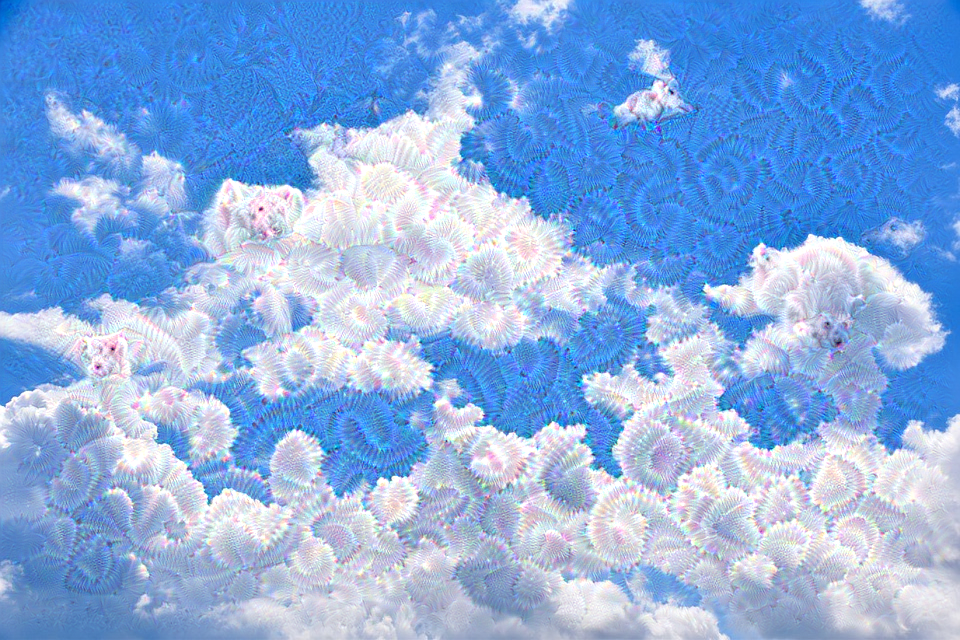
“深度梦”是一种图像过滤技术,它通过对输入图像进行梯度上升,以最大化特定层(有时是特定层中特定单元)的激活,来生成幻觉般的视觉效果。
它是在 2015 年 7 月由谷歌的亚历山大·莫尔德文采夫首次提出的。
过程:
- 加载原始图像。
- 定义多个处理尺度(“八度”),从最小到最大。
- 将原始图像调整为最小尺度。
- 对于每个尺度,从最小尺度开始(即当前尺度): - 运行梯度上升 - 将图像上采样到下一个尺度 - 重新注入在上采样时丢失的细节
- 当我们回到原始大小时停止。 为了获得在上采样过程中丢失的细节,我们只是将原始图像缩小,再上采样,并将结果与(调整大小的)原始图像进行比较。
设置
import os

os.environ["KERAS_BACKEND"] = "tensorflow"

import numpy as np
import tensorflow as tf
import keras
from keras.applications import inception_v3

base_image_path = keras.utils.get_file("sky.jpg", "https://i.imgur.com/aGBdQyK.jpg")
result_prefix = "sky_dream"

# 这些是我们尝试最大化激活的层的名称,
# 以及它们在最终损失中的权重
# 我们尝试最大化这些。
# 您可以调整这些设置以获得新的视觉效果。
layer_settings = {
    "mixed4": 1.0,
    "mixed5": 1.5,
    "mixed6": 2.0,
    "mixed7": 2.5,
}

# 修改这些超参数也可以让你实现新的效果
step = 0.01  # 梯度上升步长
num_octave = 3  # 进行梯度上升的尺度数量
octave_scale = 1.4  # 尺度之间的大小比例
iterations = 20  # 每个尺度上的上升步骤数量
max_loss = 15.0
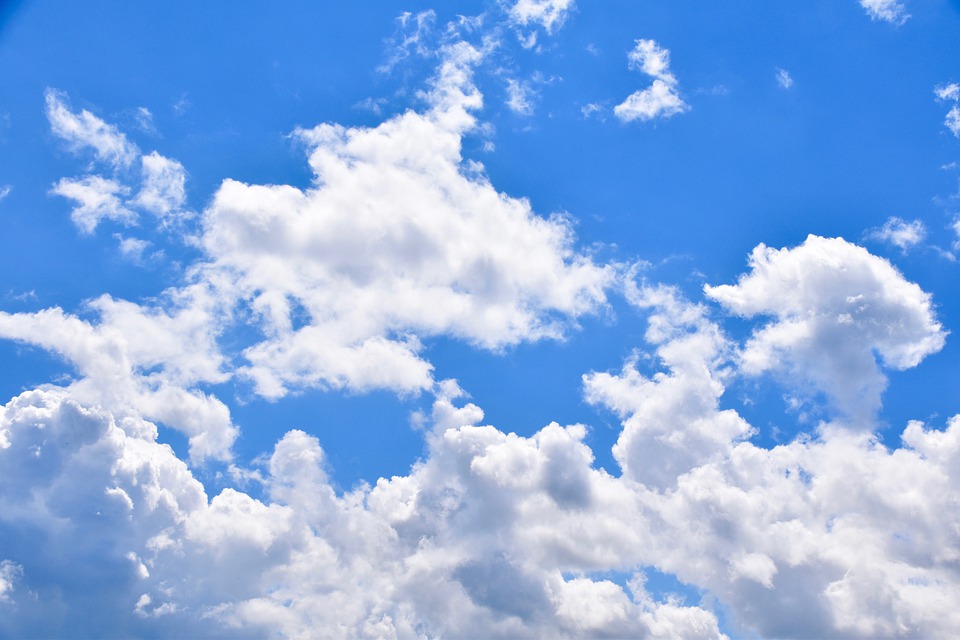
这是我们的基础图像:
from IPython.display import Image, display

display(Image(base_image_path))

让我们设置一些图像预处理/反处理工具:
def preprocess_image(image_path):
    # 工具函数,用于打开、调整大小和格式化图片
    # 成适当的数组。
    img = keras.utils.load_img(image_path)
    img = keras.utils.img_to_array(img)
    img = np.expand_dims(img, axis=0)
    img = inception_v3.preprocess_input(img)
    return img


def deprocess_image(x):
    # 工具函数,将 NumPy 数组转换为有效图像。
    x = x.reshape((x.shape[1], x.shape[2], 3))
    # 撤销 inception v3 预处理
    x /= 2.0
    x += 0.5
    x *= 255.0
    # 转换为 uint8 并限制在有效范围 [0, 255]
    x = np.clip(x, 0, 255).astype("uint8")
    return x
计算深度梦损失
首先,构建一个特征提取模型,以根据输入图像获取目标层的激活。
# 构建一个加载了预训练 ImageNet 权重的 InceptionV3 模型
model = inception_v3.InceptionV3(weights="imagenet", include_top=False)

# 获取每个“关键”层的符号输出(我们为它们赋予了唯一的名称)。
outputs_dict = dict(
    [
        (layer.name, layer.output)
        for layer in [model.get_layer(name) for name in layer_settings.keys()]
    ]
)

# 设置一个模型,返回每个目标层的激活值
# (以字典形式)
feature_extractor = keras.Model(inputs=model.inputs, outputs=outputs_dict)
实际的损失计算非常简单:
def compute_loss(input_image):
    features = feature_extractor(input_image)
    # 初始化损失
    loss = tf.zeros(shape=())
    for name in features.keys():
        coeff = layer_settings[name]
        activation = features[name]
        # 我们通过仅涉及非边界像素计算损失来避免边界伪影。
        scaling = tf.reduce_prod(tf.cast(tf.shape(activation), "float32"))
        loss += coeff * tf.reduce_sum(tf.square(activation[:, 2:-2, 2:-2, :])) / scaling
    return loss
为一个八度设置梯度上升循环
@tf.function
def gradient_ascent_step(img, learning_rate):
    with tf.GradientTape() as tape:
        tape.watch(img)
        loss = compute_loss(img)
    # 计算梯度。
    grads = tape.gradient(loss, img)
    # 归一化梯度。
    grads /= tf.maximum(tf.reduce_mean(tf.abs(grads)), 1e-6)
    img += learning_rate * grads
    return loss, img


def gradient_ascent_loop(img, iterations, learning_rate, max_loss=None):
    for i in range(iterations):
        loss, img = gradient_ascent_step(img, learning_rate)
        if max_loss is not None and loss > max_loss:
            break
        print("... 步骤 %d 的损失值: %.2f" % (i, loss))
    return img
运行训练循环,迭代不同的八度音阶
original_img = preprocess_image(base_image_path)
original_shape = original_img.shape[1:3]

successive_shapes = [original_shape]
for i in range(1, num_octave):
    shape = tuple([int(dim / (octave_scale**i)) for dim in original_shape])
    successive_shapes.append(shape)
successive_shapes = successive_shapes[::-1]
shrunk_original_img = tf.image.resize(original_img, successive_shapes[0])

img = tf.identity(original_img)  # 复制一份
for i, shape in enumerate(successive_shapes):
    print("处理八度音阶 %d,形状 %s" % (i, shape))
    img = tf.image.resize(img, shape)
    img = gradient_ascent_loop(
        img, iterations=iterations, learning_rate=step, max_loss=max_loss
    )
    upscaled_shrunk_original_img = tf.image.resize(shrunk_original_img, shape)
    same_size_original = tf.image.resize(original_img, shape)
    lost_detail = same_size_original - upscaled_shrunk_original_img

    img += lost_detail
    shrunk_original_img = tf.image.resize(original_img, shape)

keras.utils.save_img(result_prefix + ".png", deprocess_image(img.numpy()))
处理八度音阶 0,形状 (326, 489)
... 步骤 0 的损失值: 0.45
... 步骤 1 的损失值: 0.63
... 步骤 2 的损失值: 0.91
... 步骤 3 的损失值: 1.24
... 步骤 4 的损失值: 1.57
... 步骤 5 的损失值: 1.91
... 步骤 6 的损失值: 2.20
... 步骤 7 的损失值: 2.50
... 步骤 8 的损失值: 2.82
... 步骤 9 的损失值: 3.11
... 步骤 10 的损失值: 3.40
... 步骤 11 的损失值: 3.70
... 步骤 12 的损失值: 3.95
... 步骤 13 的损失值: 4.20
... 步骤 14 的损失值: 4.48
... 步骤 15 的损失值: 4.72
... 步骤 16 的损失值: 4.99
... 步骤 17 的损失值: 5.23
... 步骤 18 的损失值: 5.47
... 步骤 19 的损失值: 5.69
处理八度音阶 1,形状 (457, 685)
... 步骤 0 的损失值: 1.11
... 步骤 1 的损失值: 1.77
... 步骤 2 的损失值: 2.35
... 步骤 3 的损失值: 2.82
... 步骤 4 的损失值: 3.25
... 步骤 5 的损失值: 3.67
... 步骤 6 的损失值: 4.05
... 步骤 7 的损失值: 4.44
... 步骤 8 的损失值: 4.79
... 步骤 9 的损失值: 5.15
... 步骤 10 的损失值: 5.50
... 步骤 11 的损失值: 5.84
... 步骤 12 的损失值: 6.18
... 步骤 13 的损失值: 6.49
... 步骤 14 的损失值: 6.82
... 步骤 15 的损失值: 7.12
... 步骤 16 的损失值: 7.42
... 步骤 17 的损失值: 7.71
... 步骤 18 的损失值: 8.01
... 步骤 19 的损失值: 8.30
处理八度音阶 2,形状 (640, 960)
... 步骤 0 的损失值: 1.27
... 步骤 1 的损失值: 2.02
... 步骤 2 的损失值: 2.63
... 步骤 3 的损失值: 3.15
... 步骤 4 的损失值: 3.66
... 步骤 5 的损失值: 4.12
... 步骤 6 的损失值: 4.58
... 步骤 7 的损失值: 5.01
... 步骤 8 的损失值: 5.42
... 步骤 9 的损失值: 5.80
... 步骤 10 的损失值: 6.19
... 步骤 11 的损失值: 6.54
... 步骤 12 的损失值: 6.89
... 步骤 13 的损失值: 7.22
... 步骤 14 的损失值: 7.57
... 步骤 15 的损失值: 7.88
... 步骤 16 的损失值: 8.21
... 步骤 17 的损失值: 8.53
... 步骤 18 的损失值: 8.80
... 步骤 19 的损失值: 9.10
显示结果。
您可以使用托管在 Hugging Face Hub 上的训练模型,并在 Hugging Face Spaces 上尝试演示。
display(Image(result_prefix + ".png"))

