神经风格迁移
作者: fchollet
创建日期: 2016/01/11
最后修改日期: 2020/05/02
描述: 使用梯度下降将参考图像的风格转移到目标图像上。
介绍
风格迁移的目的是生成一张与基图像具有相同“内容”的图像,但具有不同图片(通常是艺术作品)的“风格”。这通过优化一个包含三个部分的损失函数来实现:“风格损失”、“内容损失”和“总变差损失”:
- 总变差损失对组合图像的像素强加局部空间连续性,从而赋予其视觉一致性。
- 风格损失是深度学习发挥作用的地方——这由深度卷积神经网络定义。具体而言,它由基图像和风格参考图像的表示的 Gram 矩阵之间的 L2 距离的总和构成,这些表示来自于一个在 ImageNet 上训练的卷积网络的不同层。总体思路是捕捉不同空间尺度(由所考虑层的深度定义)的颜色/纹理信息(相当大的尺度)。
- 内容损失是基图像(从深层提取)特征和组合图像特征之间的 L2 距离,保持生成图像足够接近原始图像。
参考文献: 一种艺术风格的神经算法
设置
import os

os.environ["KERAS_BACKEND"] = "tensorflow"

import keras
import numpy as np
import tensorflow as tf
from keras.applications import vgg19

base_image_path = keras.utils.get_file("paris.jpg", "https://i.imgur.com/F28w3Ac.jpg")
style_reference_image_path = keras.utils.get_file(
    "starry_night.jpg", "https://i.imgur.com/9ooB60I.jpg"
)
result_prefix = "paris_generated"

# 不同损失组件的权重
total_variation_weight = 1e-6
style_weight = 1e-6
content_weight = 2.5e-8

# 生成图像的尺寸。
width, height = keras.utils.load_img(base_image_path).size
img_nrows = 400
img_ncols = int(width * img_nrows / height)
正在从 https://i.imgur.com/F28w3Ac.jpg 下载数据
 102437/102437 ━━━━━━━━━━━━━━━━━━━━ 0s 0us/step
正在从 https://i.imgur.com/9ooB60I.jpg 下载数据
 935806/935806 ━━━━━━━━━━━━━━━━━━━━ 0s 0us/step
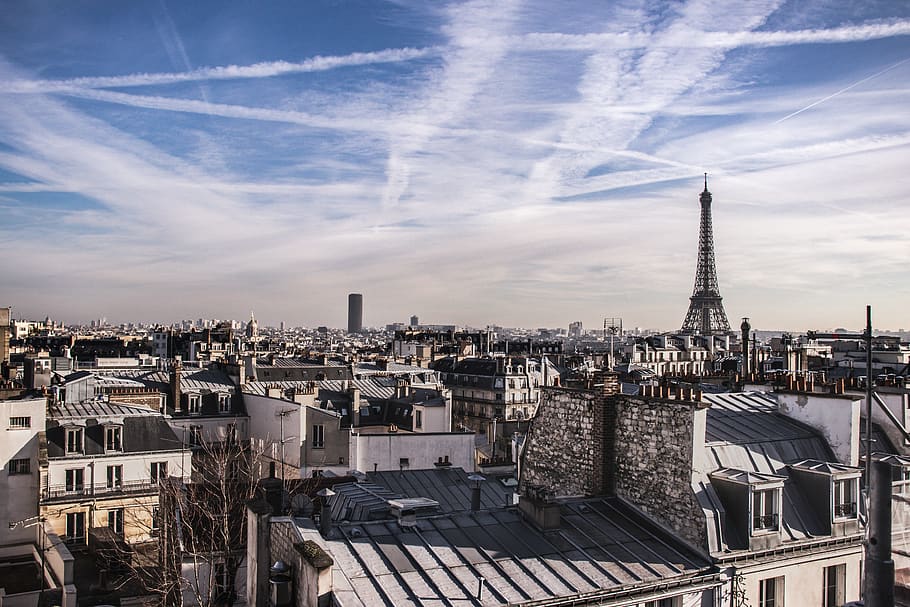
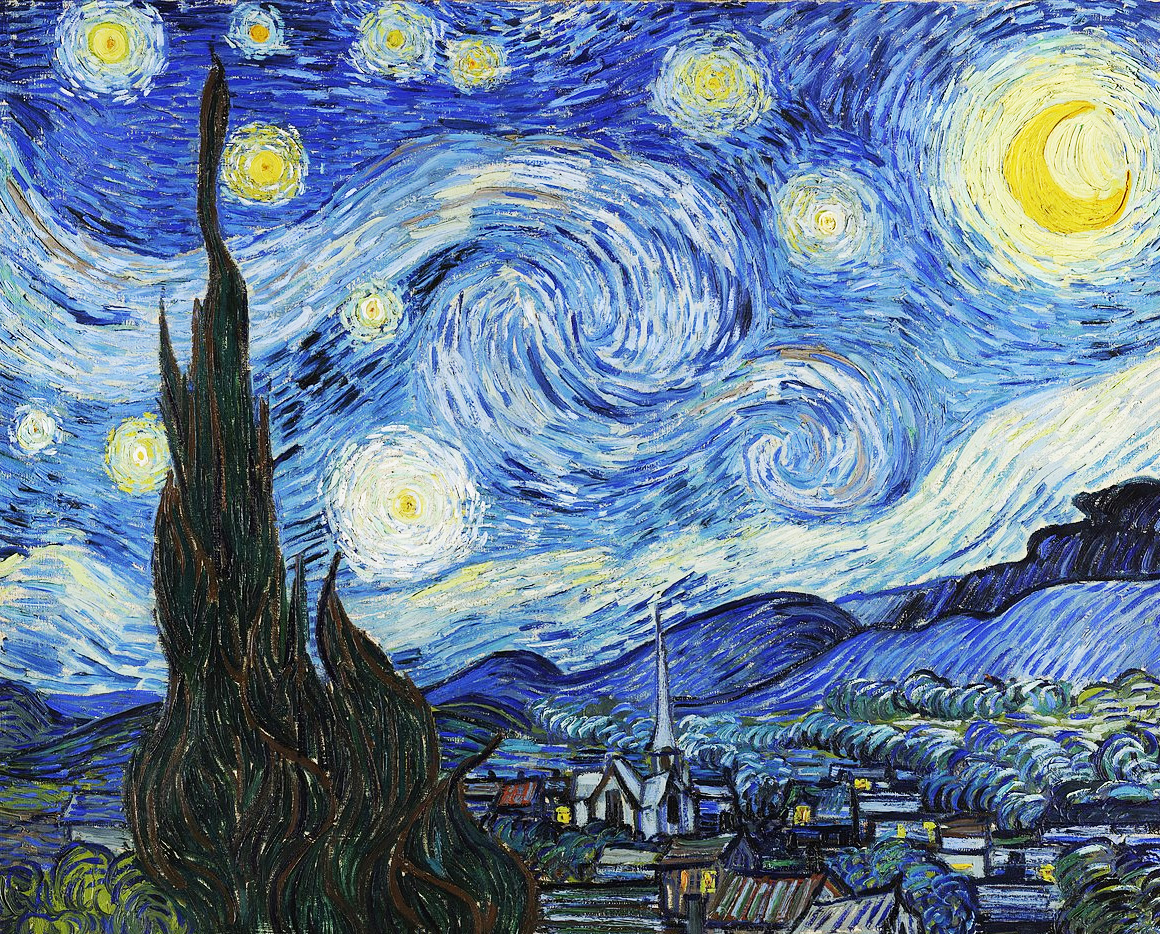
让我们看一下我们的基(内容)图像和我们的风格参考图像
from IPython.display import Image, display

display(Image(base_image_path))
display(Image(style_reference_image_path))


图像预处理 / 还原工具
def preprocess_image(image_path):
    # 工具函数,用于打开、调整大小并将图片格式化为适当的张量
    img = keras.utils.load_img(image_path, target_size=(img_nrows, img_ncols))
    img = keras.utils.img_to_array(img)
    img = np.expand_dims(img, axis=0)
    img = vgg19.preprocess_input(img)
    return tf.convert_to_tensor(img)


def deprocess_image(x):
    # 工具函数,将张量转换为有效图像
    x = x.reshape((img_nrows, img_ncols, 3))
    # 通过均值像素去除零中心
    x[:, :, 0] += 103.939
    x[:, :, 1] += 116.779
    x[:, :, 2] += 123.68
    # 'BGR' -> 'RGB'
    x = x[:, :, ::-1]
    x = np.clip(x, 0, 255).astype("uint8")
    return x
计算风格迁移损失
首先,我们需要定义 4 个工具函数:
gram_matrix(用于计算风格损失)style_loss函数,用于保持生成图像接近风格参考图像的局部纹理content_loss函数,用于保持生成图像的高级表示接近基图像的表示total_variation_loss函数,一种正则化损失,用于保持生成图像的局部一致性
# 图像张量的 Gram 矩阵(特征间的外积)


def gram_matrix(x):
    x = tf.transpose(x, (2, 0, 1))
    features = tf.reshape(x, (tf.shape(x)[0], -1))
    gram = tf.matmul(features, tf.transpose(features))
    return gram


# “风格损失”旨在保持
# 生成图像中参考图像的风格。
# 它基于来自风格参考图像
# 和生成图像的特征图的
# Gram 矩阵(捕捉风格)


def style_loss(style, combination):
    S = gram_matrix(style)
    C = gram_matrix(combination)
    channels = 3
    size = img_nrows * img_ncols
    return tf.reduce_sum(tf.square(S - C)) / (4.0 * (channels**2) * (size**2))


# 辅助损失函数
# 旨在保持生成图像中的
# 基础图像的“内容”


def content_loss(base, combination):
    return tf.reduce_sum(tf.square(combination - base))


# 第三个损失函数,总变差损失,
# 旨在保持生成图像的局部一致性


def total_variation_loss(x):
    a = tf.square(
        x[:, : img_nrows - 1, : img_ncols - 1, :] - x[:, 1:, : img_ncols - 1, :]
    )
    b = tf.square(
        x[:, : img_nrows - 1, : img_ncols - 1, :] - x[:, : img_nrows - 1, 1:, :]
    )
    return tf.reduce_sum(tf.pow(a + b, 1.25))
接下来,让我们创建一个特征提取模型,从 VGG19 中检索中间激活 (以字典形式,按名称)。
# 构建一个加载了预训练 ImageNet 权重的 VGG19 模型
model = vgg19.VGG19(weights="imagenet", include_top=False)

# 获取每个“关键”层的符号输出(我们给它们赋予了唯一名称)。
outputs_dict = dict([(layer.name, layer.output) for layer in model.layers])

# 设置一个模型,返回 VGG19 中
# 每一层的激活值(以字典形式)。
feature_extractor = keras.Model(inputs=model.inputs, outputs=outputs_dict)
正在从 https://storage.googleapis.com/tensorflow/keras-applications/vgg19/vgg19_weights_tf_dim_ordering_tf_kernels_notop.h5 下载数据
 80134624/80134624 ━━━━━━━━━━━━━━━━━━━━ 2s 0us/step
Finally, here's the code that computes the style transfer loss.
# 用于风格损失的层列表。
style_layer_names = [
    "block1_conv1",
    "block2_conv1",
    "block3_conv1",
    "block4_conv1",
    "block5_conv1",
]
# 用于内容损失的层。
content_layer_name = "block5_conv2"


def compute_loss(combination_image, base_image, style_reference_image):
    input_tensor = tf.concat(
        [base_image, style_reference_image, combination_image], axis=0
    )
    features = feature_extractor(input_tensor)

    # 初始化损失
    loss = tf.zeros(shape=())

    # 添加内容损失
    layer_features = features[content_layer_name]
    base_image_features = layer_features[0, :, :, :]
    combination_features = layer_features[2, :, :, :]
    loss = loss + content_weight * content_loss(
        base_image_features, combination_features
    )
    # 添加风格损失
    for layer_name in style_layer_names:
        layer_features = features[layer_name]
        style_reference_features = layer_features[1, :, :, :]
        combination_features = layer_features[2, :, :, :]
        sl = style_loss(style_reference_features, combination_features)
        loss += (style_weight / len(style_layer_names)) * sl

    # 添加总变差损失
    loss += total_variation_weight * total_variation_loss(combination_image)
    return loss
为损失和梯度计算添加 tf.function 装饰器
为了编译它,从而加快速度。
@tf.function
def compute_loss_and_grads(combination_image, base_image, style_reference_image):
    with tf.GradientTape() as tape:
        loss = compute_loss(combination_image, base_image, style_reference_image)
    grads = tape.gradient(loss, combination_image)
    return loss, grads
训练循环
重复运行标准梯度下降步骤以最小化损失,并在每100次迭代后保存结果图像。
我们每100步将学习率衰减0.96。
optimizer = keras.optimizers.SGD(
    keras.optimizers.schedules.ExponentialDecay(
        initial_learning_rate=100.0, decay_steps=100, decay_rate=0.96
    )
)

base_image = preprocess_image(base_image_path)
style_reference_image = preprocess_image(style_reference_image_path)
combination_image = tf.Variable(preprocess_image(base_image_path))

iterations = 4000
for i in range(1, iterations + 1):
    loss, grads = compute_loss_and_grads(
        combination_image, base_image, style_reference_image
    )
    optimizer.apply_gradients([(grads, combination_image)])
    if i % 100 == 0:
        print("Iteration %d: loss=%.2f" % (i, loss))
        img = deprocess_image(combination_image.numpy())
        fname = result_prefix + "_at_iteration_%d.png" % i
        keras.utils.save_img(fname, img)
Iteration 100: loss=11021.63
Iteration 200: loss=8516.82
Iteration 300: loss=7572.36
Iteration 400: loss=7062.23
Iteration 500: loss=6733.57
Iteration 600: loss=6498.27
Iteration 700: loss=6319.11
Iteration 800: loss=6176.94
Iteration 900: loss=6060.49
Iteration 1000: loss=5963.24
Iteration 1100: loss=5880.51
Iteration 1200: loss=5809.23
Iteration 1300: loss=5747.35
Iteration 1400: loss=5692.95
Iteration 1500: loss=5644.84
Iteration 1600: loss=5601.82
Iteration 1700: loss=5563.18
Iteration 1800: loss=5528.38
Iteration 1900: loss=5496.89
Iteration 2000: loss=5468.20
Iteration 2100: loss=5441.97
Iteration 2200: loss=5418.02
Iteration 2300: loss=5396.11
Iteration 2400: loss=5376.00
Iteration 2500: loss=5357.49
Iteration 2600: loss=5340.36
Iteration 2700: loss=5324.49
Iteration 2800: loss=5309.77
Iteration 2900: loss=5296.08
Iteration 3000: loss=5283.33
Iteration 3100: loss=5271.47
Iteration 3200: loss=5260.39
Iteration 3300: loss=5250.02
Iteration 3400: loss=5240.29
Iteration 3500: loss=5231.18
Iteration 3600: loss=5222.65
Iteration 3700: loss=5214.61
Iteration 3800: loss=5207.08
Iteration 3900: loss=5199.98
Iteration 4000: loss=5193.27
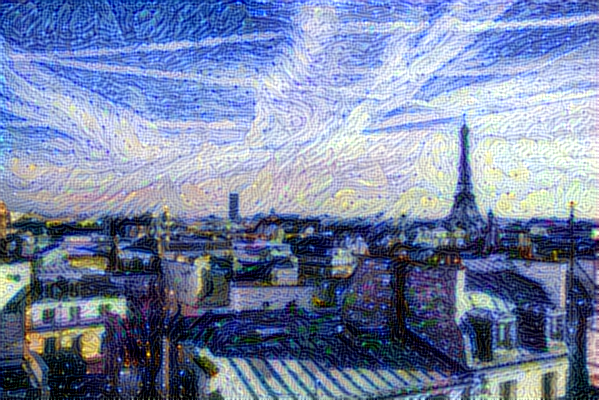
After 4000 iterations, you get the following result:
display(Image(result_prefix + "_at_iteration_4000.png"))

