如何在TFRecord文件上训练Keras模型
作者: Amy MiHyun Jang
创建日期: 2020/07/29
最后修改: 2020/08/07
描述: 加载用于计算机视觉模型的TFRecords。
简介 + 设置
TFRecords存储一系列二进制记录,按顺序读取。它们是一种有用的数据存储格式,因为可以高效读取。了解更多关于TFRecords的信息 这里。
我们将探索如何轻松加载TFRecords用于我们的黑色素瘤分类器。
import tensorflow as tf
from functools import partial
import matplotlib.pyplot as plt

try:
    tpu = tf.distribute.cluster_resolver.TPUClusterResolver.connect()
    print("设备:", tpu.master())
    strategy = tf.distribute.TPUStrategy(tpu)
except:
    strategy = tf.distribute.get_strategy()
print("副本数量:", strategy.num_replicas_in_sync)
副本数量: 8
我们的数据不平衡,因此我们希望更大的批量大小。
AUTOTUNE = tf.data.AUTOTUNE
GCS_PATH = "gs://kds-b38ce1b823c3ae623f5691483dbaa0f0363f04b0d6a90b63cf69946e"
BATCH_SIZE = 64
IMAGE_SIZE = [1024, 1024]
加载数据
FILENAMES = tf.io.gfile.glob(GCS_PATH + "/tfrecords/train*.tfrec")
split_ind = int(0.9 * len(FILENAMES))
TRAINING_FILENAMES, VALID_FILENAMES = FILENAMES[:split_ind], FILENAMES[split_ind:]

TEST_FILENAMES = tf.io.gfile.glob(GCS_PATH + "/tfrecords/test*.tfrec")
print("训练TFRecord文件:", len(TRAINING_FILENAMES))
print("验证TFRecord文件:", len(VALID_FILENAMES))
print("测试TFRecord文件:", len(TEST_FILENAMES))
训练TFRecord文件: 14
验证TFRecord文件: 2
测试TFRecord文件: 16
解码数据
图像必须转换为张量,以便在我们的模型中成为有效的输入。由于图像使用RGB色彩空间,我们指定3个通道。
我们还重塑数据,以确保所有图像具有相同的形状。
def decode_image(image):
    image = tf.image.decode_jpeg(image, channels=3)
    image = tf.cast(image, tf.float32)
    image = tf.reshape(image, [*IMAGE_SIZE, 3])
    return image
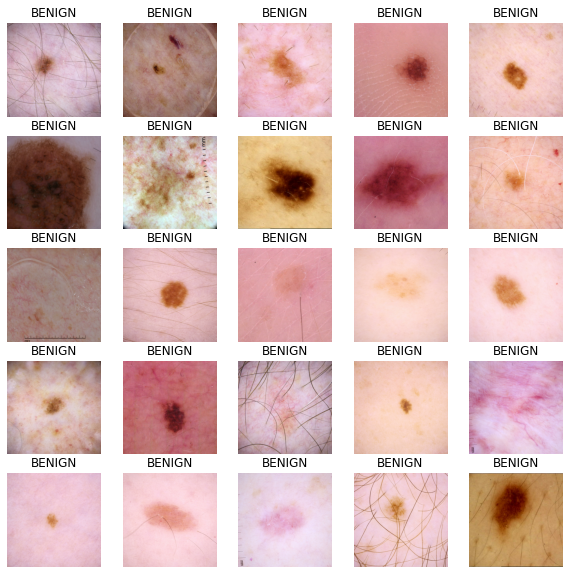
在加载数据时,我们需要我们的X和我们的Y。X是我们的图像;模型将在我们的图像数据集中查找特征和模式。我们想要预测Y,即图像中病变是恶性的概率。我们将遍历我们的TFRecords,解析出图像和目标值。
def read_tfrecord(example, labeled):
    tfrecord_format = (
        {
            "image": tf.io.FixedLenFeature([], tf.string),
            "target": tf.io.FixedLenFeature([], tf.int64),
        }
        if labeled
        else {"image": tf.io.FixedLenFeature([], tf.string),}
    )
    example = tf.io.parse_single_example(example, tfrecord_format)
    image = decode_image(example["image"])
    if labeled:
        label = tf.cast(example["target"], tf.int32)
        return image, label
    return image
定义加载方法
我们的数据集没有有意义的顺序,因此加载数据集时可以忽略顺序。通过忽略顺序并在文件到达时尽快读取,会花更短的时间加载数据。
def load_dataset(filenames, labeled=True):
    ignore_order = tf.data.Options()
    ignore_order.experimental_deterministic = False  # 禁用顺序,提高速度
    dataset = tf.data.TFRecordDataset(
        filenames
    )  # 自动交错从多个文件读取
    dataset = dataset.with_options(
        ignore_order
    )  # 一旦数据流入就立即使用,而不是按其原始顺序
    dataset = dataset.map(
        partial(read_tfrecord, labeled=labeled), num_parallel_calls=AUTOTUNE
    )
    # 如果labeled=True则返回(image, label)对,如果labeled=False则只返回图像
    return dataset
我们定义以下函数来获取不同的数据集。
def get_dataset(filenames, labeled=True):
    dataset = load_dataset(filenames, labeled=labeled)
    dataset = dataset.shuffle(2048)
    dataset = dataset.prefetch(buffer_size=AUTOTUNE)
    dataset = dataset.batch(BATCH_SIZE)
    return dataset
可视化输入图像
train_dataset = get_dataset(TRAINING_FILENAMES)
valid_dataset = get_dataset(VALID_FILENAMES)
test_dataset = get_dataset(TEST_FILENAMES, labeled=False)

image_batch, label_batch = next(iter(train_dataset))


def show_batch(image_batch, label_batch):
    plt.figure(figsize=(10, 10))
    for n in range(25):
        ax = plt.subplot(5, 5, n + 1)
        plt.imshow(image_batch[n] / 255.0)
        if label_batch[n]:
            plt.title("恶性")
        else:
            plt.title("良性")
        plt.axis("off")


show_batch(image_batch.numpy(), label_batch.numpy())

构建我们的模型
定义回调函数
以下函数允许模型在每个周期运行时更改学习率。
我们可以使用回调函数在模型没有改进时停止训练。在训练过程结束时,模型将恢复最佳迭代的权重。
initial_learning_rate = 0.01
lr_schedule = tf.keras.optimizers.schedules.ExponentialDecay(
    initial_learning_rate, decay_steps=20, decay_rate=0.96, staircase=True
)

checkpoint_cb = tf.keras.callbacks.ModelCheckpoint(
    "melanoma_model.h5", save_best_only=True
)

early_stopping_cb = tf.keras.callbacks.EarlyStopping(
    patience=10, restore_best_weights=True
)
构建我们的基础模型
迁移学习是一种利用经过良好训练的模型而无需自己训练模型的好方法。在此笔记本中,我们想要导入 Xception 模型。关于迁移学习的更深入分析可以在 这里 找到。
我们不希望我们的指标是 accuracy,因为我们的数据不平衡。对于我们的示例,我们将关注 ROC 曲线下面积。
def make_model():
    base_model = tf.keras.applications.Xception(
        input_shape=(*IMAGE_SIZE, 3), include_top=False, weights="imagenet"
    )

    base_model.trainable = False

    inputs = tf.keras.layers.Input([*IMAGE_SIZE, 3])
    x = tf.keras.applications.xception.preprocess_input(inputs)
    x = base_model(x)
    x = tf.keras.layers.GlobalAveragePooling2D()(x)
    x = tf.keras.layers.Dense(8, activation="relu")(x)
    x = tf.keras.layers.Dropout(0.7)(x)
    outputs = tf.keras.layers.Dense(1, activation="sigmoid")(x)

    model = tf.keras.Model(inputs=inputs, outputs=outputs)

    model.compile(
        optimizer=tf.keras.optimizers.Adam(learning_rate=lr_schedule),
        loss="binary_crossentropy",
        metrics=tf.keras.metrics.AUC(name="auc"),
    )

    return model
训练模型
with strategy.scope():
    model = make_model()

history = model.fit(
    train_dataset,
    epochs=2,
    validation_data=valid_dataset,
    callbacks=[checkpoint_cb, early_stopping_cb],
)
从 https://storage.googleapis.com/tensorflow/keras-applications/xception/xception_weights_tf_dim_ordering_tf_kernels_notop.h5 下载数据
83689472/83683744 [==============================] - 3s 0us/step
第 1 轮/共 2 轮
454/454 [==============================] - 525s 1s/step - loss: 0.1895 - auc: 0.5841 - val_loss: 0.0825 - val_auc: 0.8109
第 2 轮/共 2 轮
454/454 [==============================] - 118s 260ms/step - loss: 0.1063 - auc: 0.5994 - val_loss: 0.0861 - val_auc: 0.8336
预测结果
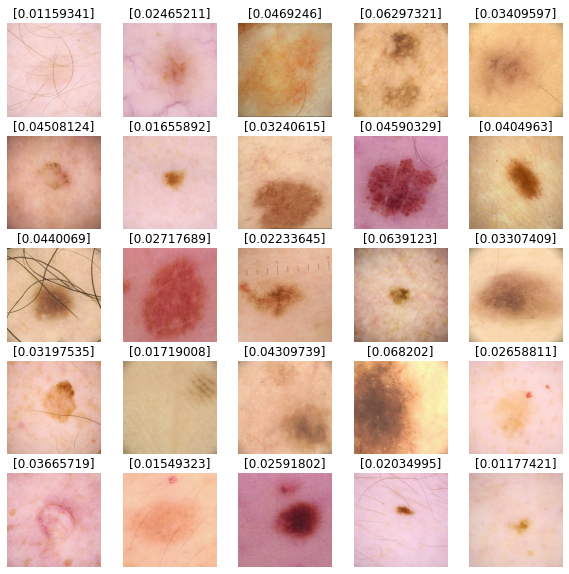
我们将使用我们的模型对测试数据集图像进行预测。值接近 0 的更可能是良性的,而值接近 1 的更可能是恶性的。
def show_batch_predictions(image_batch):
    plt.figure(figsize=(10, 10))
    for n in range(25):
        ax = plt.subplot(5, 5, n + 1)
        plt.imshow(image_batch[n] / 255.0)
        img_array = tf.expand_dims(image_batch[n], axis=0)
        plt.title(model.predict(img_array)[0])
        plt.axis("off")


image_batch = next(iter(test_dataset))

show_batch_predictions(image_batch)

