使用视觉变换器进行物体检测
作者: Karan V. Dave
创建日期: 2022/03/27
最后修改: 2023/11/20
描述: 使用视觉变换器的物体检测简单 Keras 实现。
介绍
本文 视觉变换器 (ViT) 由 Alexey Dosovitskiy 等人提出的架构 证明了可以直接将纯变换器应用于图像 补丁序列,以便在物体检测任务中表现良好。
在这个 Keras 示例中,我们实现了一个物体检测 ViT 并在 加州理工学院 101 数据集 上对其进行了训练,以检测给定图像中的飞机。
导入和设置
import os

os.environ["KERAS_BACKEND"] = "jax"  # @param ["tensorflow", "jax", "torch"]


import numpy as np
import keras
from keras import layers
from keras import ops
import matplotlib.pyplot as plt
import numpy as np
import cv2
import os
import scipy.io
import shutil
准备数据集
我们使用 加州理工学院 101 数据集.
# 图像和注释的路径
path_images = "./101_ObjectCategories/airplanes/"
path_annot = "./Annotations/Airplanes_Side_2/"

path_to_downloaded_file = keras.utils.get_file(
    fname="caltech_101_zipped",
    origin="https://data.caltech.edu/records/mzrjq-6wc02/files/caltech-101.zip",
    extract=True,
    archive_format="zip",  # 下载文件格式
    cache_dir="/",  # 在当前目录中缓存和提取
)
download_base_dir = os.path.dirname(path_to_downloaded_file)

# 解压缩主 zip 文件中的 tar 文件
shutil.unpack_archive(
    os.path.join(download_base_dir, "caltech-101", "101_ObjectCategories.tar.gz"), "."
)
shutil.unpack_archive(
    os.path.join(download_base_dir, "caltech-101", "Annotations.tar"), "."
)

# 图像和注释的路径列表
image_paths = [
    f for f in os.listdir(path_images) if os.path.isfile(os.path.join(path_images, f))
]
annot_paths = [
    f for f in os.listdir(path_annot) if os.path.isfile(os.path.join(path_annot, f))
]

image_paths.sort()
annot_paths.sort()

image_size = 224  # 将输入图像调整为此大小

images, targets = [], []

# 循环访问注释和图像,预处理并存储在列表中
for i in range(0, len(annot_paths)):
    # 访问边界框坐标
    annot = scipy.io.loadmat(path_annot + annot_paths[i])["box_coord"][0]

    top_left_x, top_left_y = annot[2], annot[0]
    bottom_right_x, bottom_right_y = annot[3], annot[1]

    image = keras.utils.load_img(
        path_images + image_paths[i],
    )
    (w, h) = image.size[:2]

    # 调整图像大小
    image = image.resize((image_size, image_size))

    # 将图像转换为数组并附加到列表中
    images.append(keras.utils.img_to_array(image))

    # 根据给定图像相对缩放边界框并附加到列表中
    targets.append(
        (
            float(top_left_x) / w,
            float(top_left_y) / h,
            float(bottom_right_x) / w,
            float(bottom_right_y) / h,
        )
    )

# 将列表转换为 numpy 数组,拆分为训练集和测试集
(x_train), (y_train) = (
    np.asarray(images[: int(len(images) * 0.8)]),
    np.asarray(targets[: int(len(targets) * 0.8)]),
)
(x_test), (y_test) = (
    np.asarray(images[int(len(images) * 0.8) :]),
    np.asarray(targets[int(len(targets) * 0.8) :]),
)
实现多层感知机 (MLP)
我们使用 Keras 示例中的代码 使用视觉变换器进行图像分类 作为参考。
def mlp(x, hidden_units, dropout_rate):
    for units in hidden_units:
        x = layers.Dense(units, activation=keras.activations.gelu)(x)
        x = layers.Dropout(dropout_rate)(x)
    return x
实现补丁创建层
class Patches(layers.Layer):
    def __init__(self, patch_size):
        super().__init__()
        self.patch_size = patch_size

    def call(self, images):
        input_shape = ops.shape(images)
        batch_size = input_shape[0]
        height = input_shape[1]
        width = input_shape[2]
        channels = input_shape[3]
        num_patches_h = height // self.patch_size
        num_patches_w = width // self.patch_size
        patches = keras.ops.image.extract_patches(images, size=self.patch_size)
        patches = ops.reshape(
            patches,
            (
                batch_size,
                num_patches_h * num_patches_w,
                self.patch_size * self.patch_size * channels,
            ),
        )
        return patches

    def get_config(self):
        config = super().get_config()
        config.update({"patch_size": self.patch_size})
        return config
显示输入图像的补丁
patch_size = 32  # 从输入图像中提取的补丁大小

plt.figure(figsize=(4, 4))
plt.imshow(x_train[0].astype("uint8"))
plt.axis("off")

patches = Patches(patch_size)(np.expand_dims(x_train[0], axis=0))
print(f"图像大小: {image_size} X {image_size}")
print(f"补丁大小: {patch_size} X {patch_size}")
print(f"每张图像 {patches.shape[1]} 个补丁 \n每个补丁 {patches.shape[-1]} 个元素")


n = int(np.sqrt(patches.shape[1]))
plt.figure(figsize=(4, 4))
for i, patch in enumerate(patches[0]):
    ax = plt.subplot(n, n, i + 1)
    patch_img = ops.reshape(patch, (patch_size, patch_size, 3))
    plt.imshow(ops.convert_to_numpy(patch_img).astype("uint8"))
    plt.axis("off")
图像大小: 224 X 224
补丁大小: 32 X 32
每张图像 49 个补丁
每个补丁 3072 个元素


实现补丁编码层
PatchEncoder 层通过将补丁投影到大小为 projection_dim 的向量上来线性转换补丁。它还将可学习的位置嵌入添加到投影向量中。
class PatchEncoder(layers.Layer):
    def __init__(self, num_patches, projection_dim):
        super().__init__()
        self.num_patches = num_patches
        self.projection = layers.Dense(units=projection_dim)
        self.position_embedding = layers.Embedding(
            input_dim=num_patches, output_dim=projection_dim
        )

    # 重写函数以避免保存模型时出错
    def get_config(self):
        config = super().get_config().copy()
        config.update(
            {
                "input_shape": input_shape,
                "patch_size": patch_size,
                "num_patches": num_patches,
                "projection_dim": projection_dim,
                "num_heads": num_heads,
                "transformer_units": transformer_units,
                "transformer_layers": transformer_layers,
                "mlp_head_units": mlp_head_units,
            }
        )
        return config

    def call(self, patch):
        positions = ops.expand_dims(
            ops.arange(start=0, stop=self.num_patches, step=1), axis=0
        )
        projected_patches = self.projection(patch)
        encoded = projected_patches + self.position_embedding(positions)
        return encoded
构建ViT模型
ViT模型有多个Transformer块。
MultiHeadAttention 层用于自注意力,
它应用于图像补丁的序列。编码的补丁(跳过连接)
和自注意力层的输出被规范化并传递到一个
多层感知器(MLP)中。
模型输出四个维度,表示
物体的边界框坐标。
def create_vit_object_detector(
    input_shape,
    patch_size,
    num_patches,
    projection_dim,
    num_heads,
    transformer_units,
    transformer_layers,
    mlp_head_units,
):
    inputs = keras.Input(shape=input_shape)
    # 创建补丁
    patches = Patches(patch_size)(inputs)
    # 编码补丁
    encoded_patches = PatchEncoder(num_patches, projection_dim)(patches)

    # 创建多个Transformer块的层。
    for _ in range(transformer_layers):
        # 层归一化 1。
        x1 = layers.LayerNormalization(epsilon=1e-6)(encoded_patches)
        # 创建一个多头注意力层。
        attention_output = layers.MultiHeadAttention(
            num_heads=num_heads, key_dim=projection_dim, dropout=0.1
        )(x1, x1)
        # 跳过连接 1。
        x2 = layers.Add()([attention_output, encoded_patches])
        # 层归一化 2。
        x3 = layers.LayerNormalization(epsilon=1e-6)(x2)
        # MLP
        x3 = mlp(x3, hidden_units=transformer_units, dropout_rate=0.1)
        # 跳过连接 2。
        encoded_patches = layers.Add()([x3, x2])

    # 创建一个 [batch_size, projection_dim] 张量。
    representation = layers.LayerNormalization(epsilon=1e-6)(encoded_patches)
    representation = layers.Flatten()(representation)
    representation = layers.Dropout(0.3)(representation)
    # 添加MLP。
    features = mlp(representation, hidden_units=mlp_head_units, dropout_rate=0.3)

    bounding_box = layers.Dense(4)(
        features
    )  # 输出边界框的最后四个神经元

    # 返回Keras模型。
    return keras.Model(inputs=inputs, outputs=bounding_box)
运行实验
def run_experiment(model, learning_rate, weight_decay, batch_size, num_epochs):
    optimizer = keras.optimizers.AdamW(
        learning_rate=learning_rate, weight_decay=weight_decay
    )

    # 编译模型。
    model.compile(optimizer=optimizer, loss=keras.losses.MeanSquaredError())

    checkpoint_filepath = "vit_object_detector.weights.h5"
    checkpoint_callback = keras.callbacks.ModelCheckpoint(
        checkpoint_filepath,
        monitor="val_loss",
        save_best_only=True,
        save_weights_only=True,
    )

    history = model.fit(
        x=x_train,
        y=y_train,
        batch_size=batch_size,
        epochs=num_epochs,
        validation_split=0.1,
        callbacks=[
            checkpoint_callback,
            keras.callbacks.EarlyStopping(monitor="val_loss", patience=10),
        ],
    )

    return history


input_shape = (image_size, image_size, 3)  # 输入图像形状
learning_rate = 0.001
weight_decay = 0.0001
batch_size = 32
num_epochs = 100
num_patches = (image_size // patch_size) ** 2
projection_dim = 64
num_heads = 4
# transformer层的大小
transformer_units = [
    projection_dim * 2,
    projection_dim,
]
transformer_layers = 4
mlp_head_units = [2048, 1024, 512, 64, 32]  # dense层的大小


history = []
num_patches = (image_size // patch_size) ** 2

vit_object_detector = create_vit_object_detector(
    input_shape,
    patch_size,
    num_patches,
    projection_dim,
    num_heads,
    transformer_units,
    transformer_layers,
    mlp_head_units,
)

# 训练模型
history = run_experiment(
    vit_object_detector, learning_rate, weight_decay, batch_size, num_epochs
)


def plot_history(item):
    plt.plot(history.history[item], label=item)
    plt.plot(history.history["val_" + item], label="val_" + item)
    plt.xlabel("Epochs")
    plt.ylabel(item)
    plt.title("训练和验证 {} 随 Epochs 而变化".format(item), fontsize=14)
    plt.legend()
    plt.grid()
    plt.show()


plot_history("loss")
Epoch 1/100
 18/18 ━━━━━━━━━━━━━━━━━━━━ 9s 109ms/step - loss: 1.2097 - val_loss: 0.3468
Epoch 2/100
 18/18 ━━━━━━━━━━━━━━━━━━━━ 0s 25ms/step - loss: 0.4260 - val_loss: 0.3102
Epoch 3/100
 18/18 ━━━━━━━━━━━━━━━━━━━━ 0s 25ms/step - loss: 0.3268 - val_loss: 0.2727
Epoch 4/100
 18/18 ━━━━━━━━━━━━━━━━━━━━ 0s 25ms/step - loss: 0.2815 - val_loss: 0.2391
Epoch 5/100
 18/18 ━━━━━━━━━━━━━━━━━━━━ 0s 25ms/step - loss: 0.2290 - val_loss: 0.1735
Epoch 6/100
 18/18 ━━━━━━━━━━━━━━━━━━━━ 0s 24ms/step - loss: 0.1870 - val_loss: 0.1055
Epoch 7/100
 18/18 ━━━━━━━━━━━━━━━━━━━━ 0s 25ms/step - loss: 0.1401 - val_loss: 0.0610
Epoch 8/100
 18/18 ━━━━━━━━━━━━━━━━━━━━ 0s 25ms/step - loss: 0.1122 - val_loss: 0.0274
Epoch 9/100
 18/18 ━━━━━━━━━━━━━━━━━━━━ 0s 8ms/step - loss: 0.0924 - val_loss: 0.0296
Epoch 10/100
 18/18 ━━━━━━━━━━━━━━━━━━━━ 0s 24ms/step - loss: 0.0765 - val_loss: 0.0139
Epoch 11/100
 18/18 ━━━━━━━━━━━━━━━━━━━━ 0s 25ms/step - loss: 0.0597 - val_loss: 0.0111
Epoch 12/100
 18/18 ━━━━━━━━━━━━━━━━━━━━ 0s 25ms/step - loss: 0.0540 - val_loss: 0.0101
Epoch 13/100
 18/18 ━━━━━━━━━━━━━━━━━━━━ 0s 24ms/step - loss: 0.0432 - val_loss: 0.0053
Epoch 14/100
 18/18 ━━━━━━━━━━━━━━━━━━━━ 0s 24ms/step - loss: 0.0380 - val_loss: 0.0052
Epoch 15/100
 18/18 ━━━━━━━━━━━━━━━━━━━━ 0s 25ms/step - loss: 0.0334 - val_loss: 0.0030
Epoch 16/100
 18/18 ━━━━━━━━━━━━━━━━━━━━ 0s 25ms/step - loss: 0.0283 - val_loss: 0.0021
Epoch 17/100
 18/18 ━━━━━━━━━━━━━━━━━━━━ 0s 24ms/step - loss: 0.0228 - val_loss: 0.0012
Epoch 18/100
 18/18 ━━━━━━━━━━━━━━━━━━━━ 0s 8ms/step - loss: 0.0244 - val_loss: 0.0017
Epoch 19/100
 18/18 ━━━━━━━━━━━━━━━━━━━━ 0s 8ms/step - loss: 0.0195 - val_loss: 0.0016
Epoch 20/100
 18/18 ━━━━━━━━━━━━━━━━━━━━ 0s 8ms/step - loss: 0.0189 - val_loss: 0.0020
Epoch 21/100
 18/18 ━━━━━━━━━━━━━━━━━━━━ 0s 8ms/step - loss: 0.0191 - val_loss: 0.0019
Epoch 22/100
 18/18 ━━━━━━━━━━━━━━━━━━━━ 0s 8ms/step - loss: 0.0174 - val_loss: 0.0016
Epoch 23/100
 18/18 ━━━━━━━━━━━━━━━━━━━━ 0s 8ms/step - loss: 0.0157 - val_loss: 0.0020
Epoch 24/100
 18/18 ━━━━━━━━━━━━━━━━━━━━ 0s 8ms/step - loss: 0.0157 - val_loss: 0.0015
Epoch 25/100
 18/18 ━━━━━━━━━━━━━━━━━━━━ 0s 8ms/step - loss: 0.0139 - val_loss: 0.0023
Epoch 26/100
 18/18 ━━━━━━━━━━━━━━━━━━━━ 0s 8ms/step - loss: 0.0130 - val_loss: 0.0017
Epoch 27/100
 18/18 ━━━━━━━━━━━━━━━━━━━━ 0s 8ms/step - loss: 0.0157 - val_loss: 0.0014

评估模型
import matplotlib.patches as patches

# 将模型保存到当前路径
vit_object_detector.save("vit_object_detector.keras")


# 计算IoU(交并比,给定两个边界框)
def bounding_box_intersection_over_union(box_predicted, box_truth):
    # 获取边界框交集的 (x, y) 坐标
    top_x_intersect = max(box_predicted[0], box_truth[0])
    top_y_intersect = max(box_predicted[1], box_truth[1])
    bottom_x_intersect = min(box_predicted[2], box_truth[2])
    bottom_y_intersect = min(box_predicted[3], box_truth[3])

    # 计算交集边界框的面积
    intersection_area = max(0, bottom_x_intersect - top_x_intersect + 1) * max(
        0, bottom_y_intersect - top_y_intersect + 1
    )

    # 计算预测边界框和真实边界框的面积
    box_predicted_area = (box_predicted[2] - box_predicted[0] + 1) * (
        box_predicted[3] - box_predicted[1] + 1
    )
    box_truth_area = (box_truth[2] - box_truth[0] + 1) * (
        box_truth[3] - box_truth[1] + 1
    )

    # 通过取交集面积并将其除以预测边界框和真实边界框面积之和减去交集面积来计算交并比

    # 返回ioU
    return intersection_area / float(
        box_predicted_area + box_truth_area - intersection_area
    )


i, mean_iou = 0, 0

# 比较测试集中10张图像的结果
for input_image in x_test[:10]:
    fig, (ax1, ax2) = plt.subplots(1, 2, figsize=(15, 15))
    im = input_image

    # 显示图像
    ax1.imshow(im.astype("uint8"))
    ax2.imshow(im.astype("uint8"))

    input_image = cv2.resize(
        input_image, (image_size, image_size), interpolation=cv2.INTER_AREA
    )
    input_image = np.expand_dims(input_image, axis=0)
    preds = vit_object_detector.predict(input_image)[0]

    (h, w) = (im).shape[0:2]

    top_left_x, top_left_y = int(preds[0] * w), int(preds[1] * h)

    bottom_right_x, bottom_right_y = int(preds[2] * w), int(preds[3] * h)

    box_predicted = [top_left_x, top_left_y, bottom_right_x, bottom_right_y]
    # 创建边界框
    rect = patches.Rectangle(
        (top_left_x, top_left_y),
        bottom_right_x - top_left_x,
        bottom_right_y - top_left_y,
        facecolor="none",
        edgecolor="red",
        linewidth=1,
    )
    # 将边界框添加到图像中
    ax1.add_patch(rect)
    ax1.set_xlabel(
        "预测: "
        + str(top_left_x)
        + ", "
        + str(top_left_y)
        + ", "
        + str(bottom_right_x)
        + ", "
        + str(bottom_right_y)
    )

    top_left_x, top_left_y = int(y_test[i][0] * w), int(y_test[i][1] * h)

    bottom_right_x, bottom_right_y = int(y_test[i][2] * w), int(y_test[i][3] * h)

    box_truth = top_left_x, top_left_y, bottom_right_x, bottom_right_y

    mean_iou += bounding_box_intersection_over_union(box_predicted, box_truth)
    # 创建边界框
    rect = patches.Rectangle(
        (top_left_x, top_left_y),
        bottom_right_x - top_left_x,
        bottom_right_y - top_left_y,
        facecolor="none",
        edgecolor="red",
        linewidth=1,
    )
    # 将边界框添加到图像中
    ax2.add_patch(rect)
    ax2.set_xlabel(
        "目标: "
        + str(top_left_x)
        + ", "
        + str(top_left_y)
        + ", "
        + str(bottom_right_x)
        + ", "
        + str(bottom_right_y)
        + "\n"
        + "IoU"
        + str(bounding_box_intersection_over_union(box_predicted, box_truth))
    )
    i = i + 1

print("mean_iou: " + str(mean_iou / len(x_test[:10])))
plt.show()
 1/1 ━━━━━━━━━━━━━━━━━━━━ 1s 1s/step
 1/1 ━━━━━━━━━━━━━━━━━━━━ 0s 1ms/step
 1/1 ━━━━━━━━━━━━━━━━━━━━ 0s 1ms/step
 1/1 ━━━━━━━━━━━━━━━━━━━━ 0s 2ms/step
 1/1 ━━━━━━━━━━━━━━━━━━━━ 0s 1ms/step
 1/1 ━━━━━━━━━━━━━━━━━━━━ 0s 1ms/step
 1/1 ━━━━━━━━━━━━━━━━━━━━ 0s 1ms/step
 1/1 ━━━━━━━━━━━━━━━━━━━━ 0s 1ms/step
 1/1 ━━━━━━━━━━━━━━━━━━━━ 0s 2ms/step
 1/1 ━━━━━━━━━━━━━━━━━━━━ 0s 1ms/step
mean_iou: 0.9092338486331416

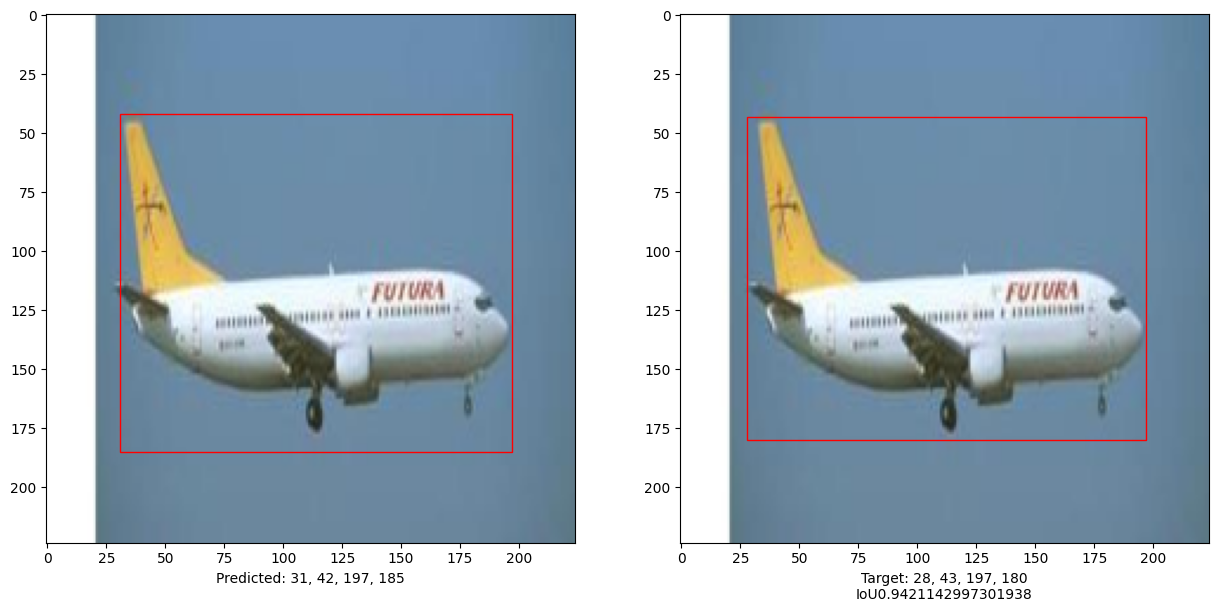

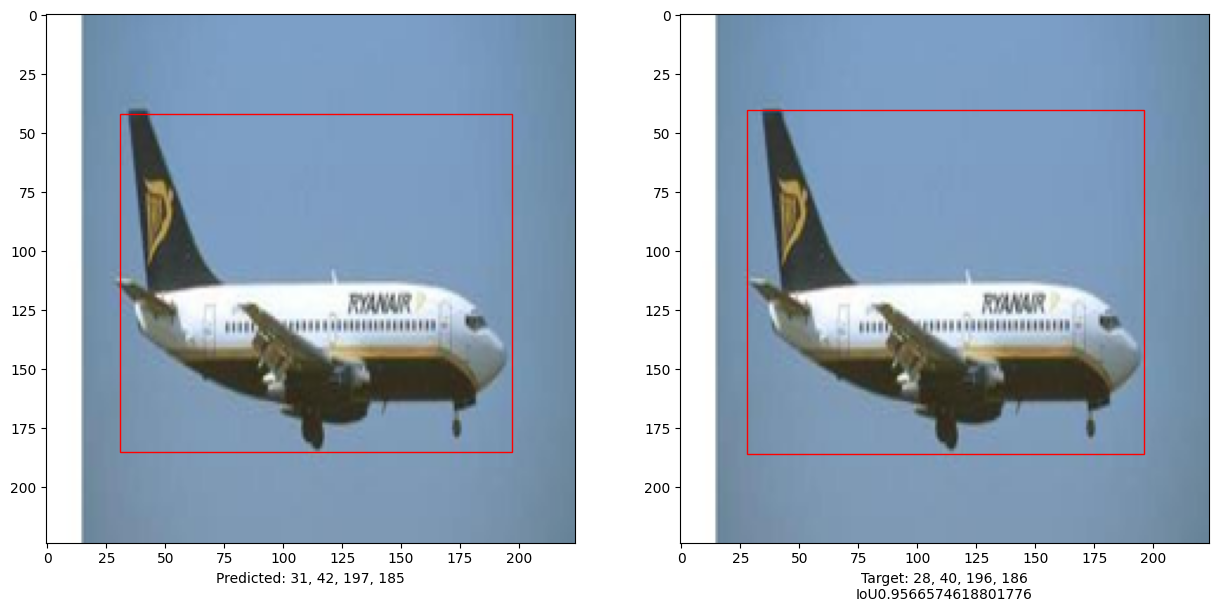


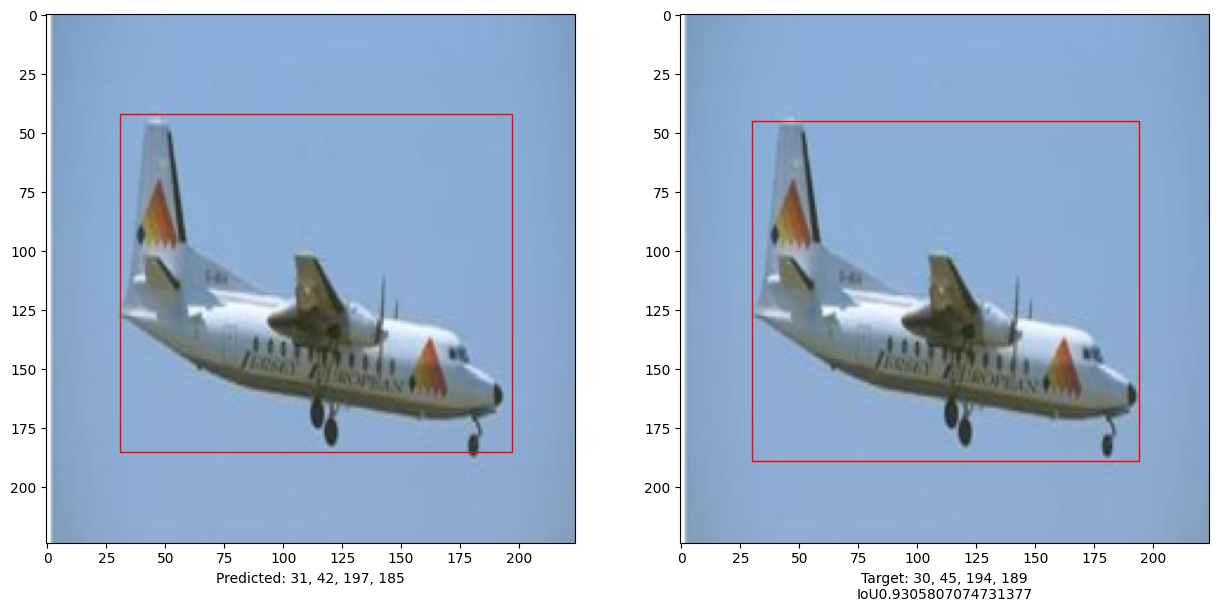

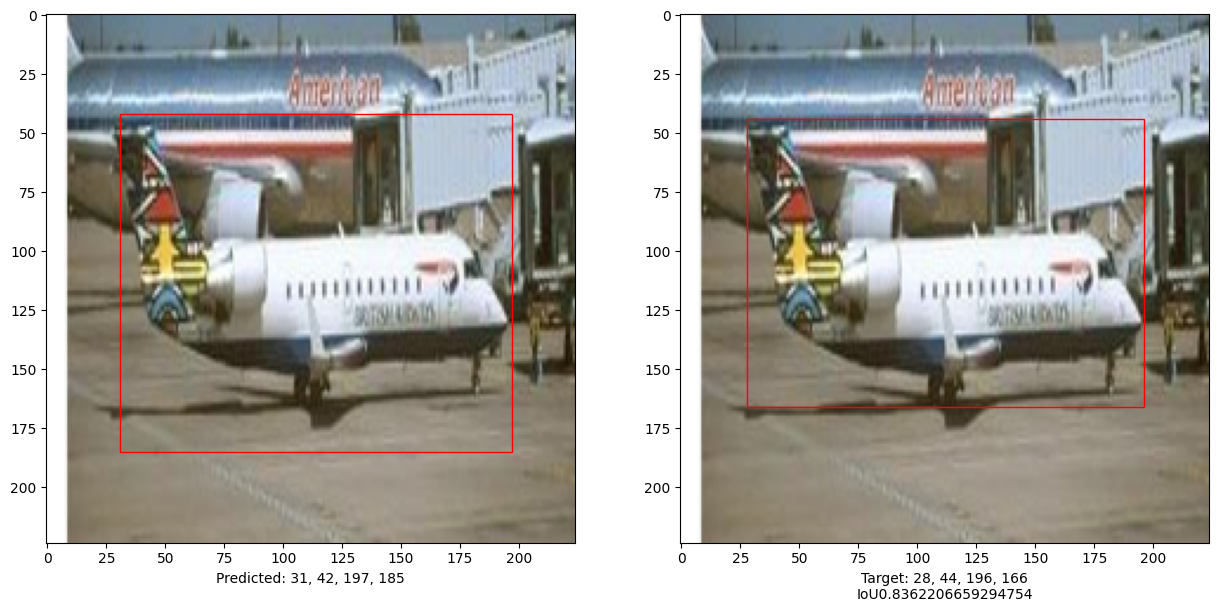
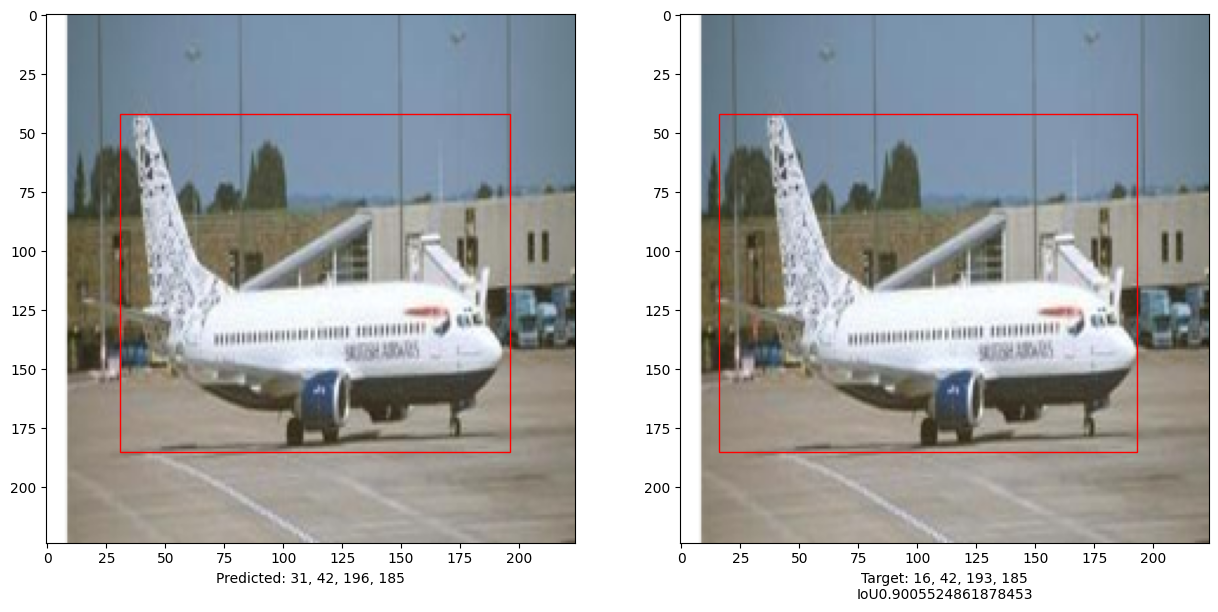
本示例演示了如何训练一个纯Transformer 以预测给定图像中物体的边界框, 从而将Transformer的用途扩展到物体检测任务。 通过调整超参数和预训练,模型可以进一步改进。
