备注
前往结尾 下载完整示例代码。或在 Binder 上通过浏览器运行此示例。
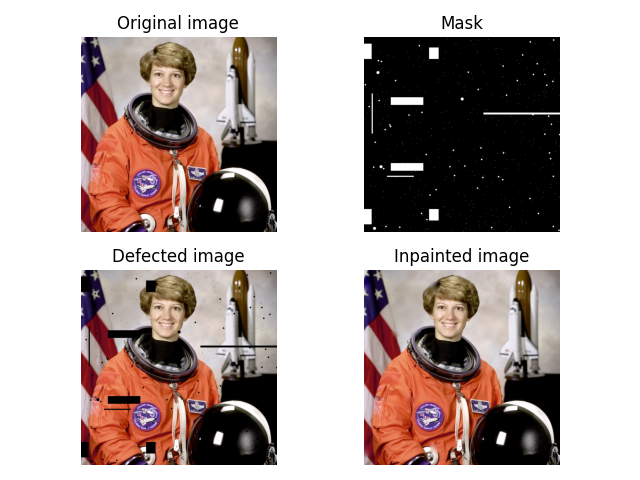
使用修复技术填补缺陷#
修复 [1] 是指重建图像和视频中丢失或损坏部分的过程。
重建(修复)是通过利用未损坏区域中的信息以自动方式进行的。
在这个例子中,我们展示了如何使用基于双调和方程的修复算法对掩码像素进行修复 [2] [3] [4]。
import numpy as np
import matplotlib.pyplot as plt

from skimage import data
from skimage.morphology import disk, binary_dilation
from skimage.restoration import inpaint

image_orig = data.astronaut()

# Create mask with six block defect regions
mask = np.zeros(image_orig.shape[:-1], dtype=bool)
mask[20:60, 0:20] = 1
mask[160:180, 70:155] = 1
mask[30:60, 170:195] = 1
mask[-60:-30, 170:195] = 1
mask[-180:-160, 70:155] = 1
mask[-60:-20, 0:20] = 1

# Add a few long, narrow defects
mask[200:205, -200:] = 1
mask[150:255, 20:23] = 1
mask[365:368, 60:130] = 1

# Add randomly positioned small point-like defects
rstate = np.random.default_rng(0)
for radius in [0, 2, 4]:
    # larger defects are less common
    thresh = 3 + 0.25 * radius  # make larger defects less common
    tmp_mask = rstate.standard_normal(image_orig.shape[:-1]) > thresh
    if radius > 0:
        tmp_mask = binary_dilation(tmp_mask, disk(radius, dtype=bool))
    mask[tmp_mask] = 1

# Apply defect mask to the image over the same region in each color channel
image_defect = image_orig * ~mask[..., np.newaxis]

image_result = inpaint.inpaint_biharmonic(image_defect, mask, channel_axis=-1)

fig, axes = plt.subplots(ncols=2, nrows=2)
ax = axes.ravel()

ax[0].set_title('Original image')
ax[0].imshow(image_orig)

ax[1].set_title('Mask')
ax[1].imshow(mask, cmap=plt.cm.gray)

ax[2].set_title('Defected image')
ax[2].imshow(image_defect)

ax[3].set_title('Inpainted image')
ax[3].imshow(image_result)

for a in ax:
    a.axis('off')

fig.tight_layout()
plt.show()
脚本总运行时间: (0 分钟 0.211 秒)