使用 Milvus 进行图像搜索
在这个页面中,我们将讨论如何使用 Milvus 进行简单的图像搜索示例。我们将搜索的数据集是在 Kaggle 上找到的印象派分类数据集。在这个示例中,我们已经将数据重新托管到了一个公共的 Google Drive 上。
在这个示例中,我们将使用 Torchvision 预训练的 Resnet50 模型来生成嵌入向量。让我们开始吧!
安装所需软件包
在这个示例中,我们将使用 pymilvus 来连接 Milvus,torch 来运行嵌入模型,torchvision 来使用实际模型和预处理,gdown 来下载示例数据集,tqdm 来显示加载进度条。
pip install pymilvus torch gdown torchvision tqdm
获取数据
我们将使用 gdown 从 Google Drive 上获取 zip 文件,然后使用内置的 zipfile 库进行解压。
import gdown
import zipfile

url = 'https://drive.google.com/uc?id=1OYDHLEy992qu5C4C8HV5uDIkOWRTAR1_'
output = './paintings.zip'
gdown.download(url, output)

with zipfile.ZipFile("./paintings.zip","r") as zip_ref:
    zip_ref.extractall("./paintings")
数据集大小为 2.35 GB,下载时间取决于您的网络状况。
全局参数
以下是我们将用于更轻松跟踪和更新的一些主要全局参数。
# Milvus 设置参数
COLLECTION_NAME = 'image_search'  # 集合名称
DIMENSION = 2048  # 在本示例中的嵌入向量大小
MILVUS_HOST = "localhost"
MILVUS_PORT = "19530"

# 推理参数
BATCH_SIZE = 128
TOP_K = 3
设置 Milvus
此时,我们将开始设置 Milvus。步骤如下:
-
使用提供的 URI 连接到 Milvus 实例。
from pymilvus import connections

# 连接到实例
connections.connect(host=MILVUS_HOST, port=MILVUS_PORT) -
如果集合已经存在,则删除它。
from pymilvus import utility

# 删除任何具有相同名称的先前集合
if utility.has_collection(COLLECTION_NAME):
utility.drop_collection(COLLECTION_NAME) -
创建包含 ID、图像文件路径和其嵌入向量的集合。
from pymilvus import FieldSchema, CollectionSchema, DataType, Collection

# 创建包含 ID、图像文件路径和图像嵌入向量的集合
fields = [
    FieldSchema(name='id', dtype=DataType.INT64, is_primary=True, auto_id=True),
    FieldSchema(name='filepath', dtype=DataType.VARCHAR, max_length=200),  # VARCHAR 需要一个最大长度,在这个示例中设置为 200 个字符
        FieldSchema(name='image_embedding', dtype=DataType.FLOAT_VECTOR, dim=DIMENSION)
    ]
    schema = CollectionSchema(fields=fields)
    collection = Collection(name=COLLECTION_NAME, schema=schema)
-
在新创建的集合上创建索引并将其加载到内存中。
# 为集合创建 AutoIndex 索引
index_params = {
'metric_type':'L2',
'index_type':"IVF_FLAT",
'params':{'nlist': 16384}
}
collection.create_index(field_name="image_embedding", index_params=index_params)
collection.load()
完成这些步骤后,集合已准备好用于插入和搜索。任何添加的数据都将自动建立索引,并立即可供搜索。如果数据非常新鲜,则搜索可能会较慢,因为仍在处理索引的数据将使用暴力搜索。
插入数据
在本示例中,我们将使用 torch 提供的 ResNet50 模型及其模型中心。为了获得嵌入,我们去掉了最后的分类层,这样模型会给出 2048 维的嵌入。torch 中的所有视觉模型都使用我们在这里包含的相同预处理。
在接下来的几个步骤中,我们将:
-
加载数据。
import glob

# 获取图像的文件路径
paths = glob.glob('./paintings/paintings/**/*.jpg', recursive=True)
len(paths) -
将数据预处理成批量。
import torch

# 加载嵌入模型并去掉最后一层
model = torch.hub.load('pytorch/vision:v0.10.0', 'resnet50', pretrained=True)
model = torch.nn.Sequential(*(list(model.children())[:-1]))
model.eval() -
对数据进行嵌入。
from torchvision import transforms

# 图像的预处理
preprocess = transforms.Compose([
    transforms.Resize(256),
    transforms.CenterCrop(224),
    transforms.ToTensor(),
    transforms.Normalize(mean=[0.485, 0.456, 0.406], std=[0.229, 0.224, 0.225]),
]) -
插入数据。
from PIL import Image
from tqdm import tqdm

# 嵌入批量数据并插入的函数
def embed(data):
    with torch.no_grad():
        output = model(torch.stack(data[0])).squeeze()
        collection.insert([data[1], output.tolist()])

data_batch = [[],[]]

# 将图像读入批量进行嵌入和插入
for path in tqdm(paths):
    im = Image.open(path).convert('RGB')
    data_batch[0].append(preprocess(im))
    data_batch[1].append(path)
    if len(data_batch[0]) % BATCH_SIZE == 0:
        embed(data_batch)
        data_batch = [[],[]]

# 嵌入并插入剩余数据
if len(data_batch[0]) != 0:
    embed(data_batch)

# 调用 flush 来索引任何未封存的段。
collection.flush()
<div class="alert note">
- 这一步相对耗时,因为嵌入需要时间。喝口咖啡,放松一下。
- PyTorch 可能与 Python 3.9 及更早版本不兼容。考虑改用 Python 3.10 及更高版本。
</div>
## 执行搜索
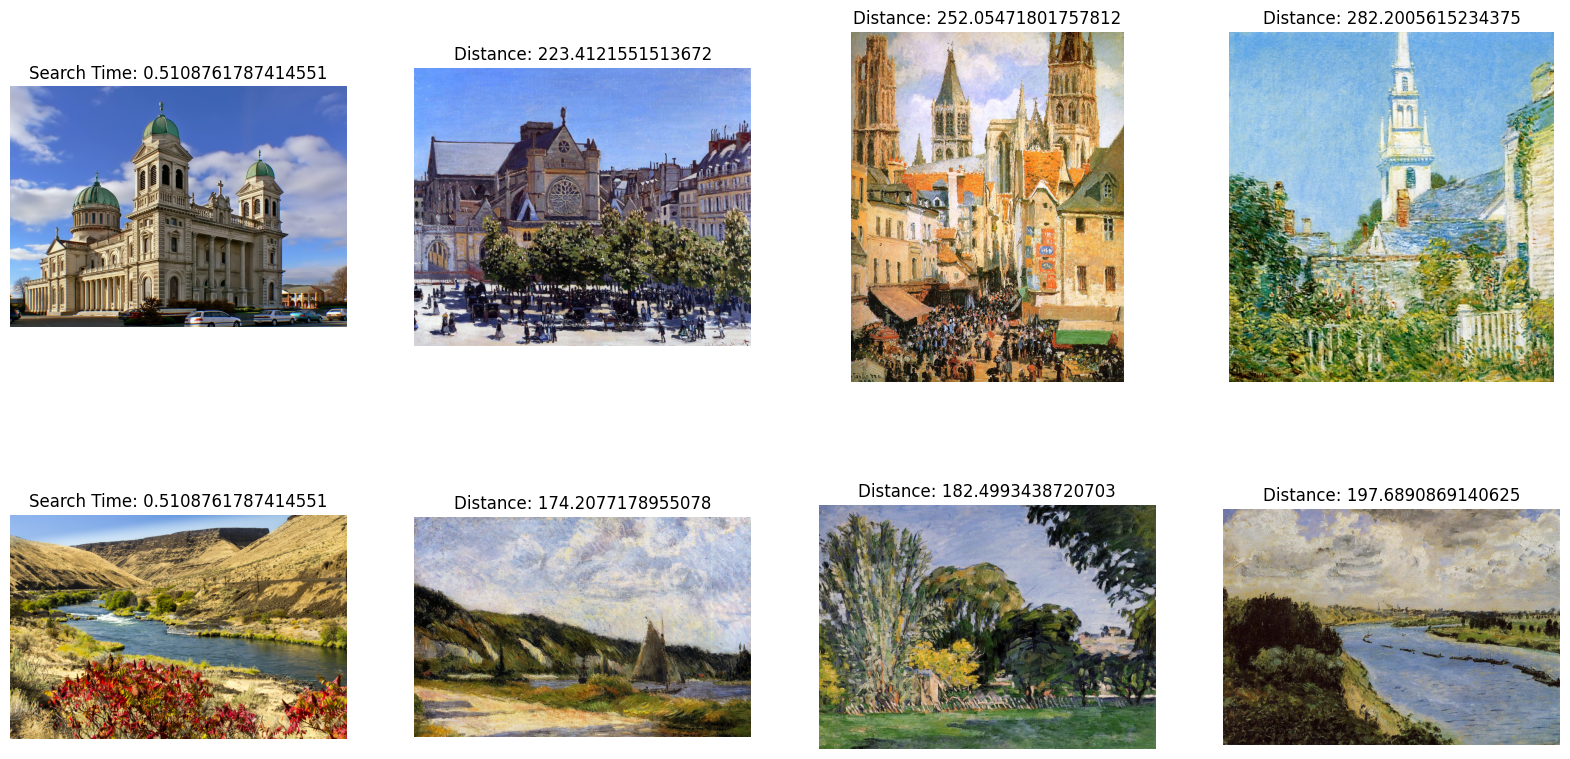
当所有数据插入 Milvus 后,我们可以开始执行搜索。在这个示例中,我们将搜索两幅示例图像。由于我们进行的是批量搜索,搜索时间将在批处理的图像之间共享。
```python
import glob
# 获取搜索图像的文件路径
search_paths = glob.glob('./paintings/test_paintings/**/*.jpg', recursive=True)
len(search_paths)
import time
from matplotlib import pyplot as plt

# 嵌入搜索图像
def embed(data):
    with torch.no_grad():
        ret = model(torch.stack(data))
        # 如果有多个图像,使用 squeeze
        if len(ret) > 1:
            return ret.squeeze().tolist()
        # 对于单个图像,squeeze 会移除批处理,因此使用 flatten
        else:
            return torch.flatten(ret, start_dim=1).tolist()

data_batch = [[],[]]

for path in search_paths:
    im = Image.open(path).convert('RGB')
    data_batch[0].append(preprocess(im))
    data_batch[1].append(path)

embeds = embed(data_batch[0])
start = time.time()
res = collection.search(embeds, anns_field='image_embedding', param={'nprobe': 128}, limit=TOP_K, output_fields=['filepath'])
finish = time.time()
# 显示图像搜索结果
f, axarr = plt.subplots(len(data_batch[1]), TOP_K + 1, figsize=(20, 10), squeeze=False)

for hits_i, hits in enumerate(res):
    axarr[hits_i][0].imshow(Image.open(data_batch[1][hits_i]))
    axarr[hits_i][0].set_axis_off()
    axarr[hits_i][0].set_title('搜索时间: ' + str(finish - start))
    for hit_i, hit in enumerate(hits):
        axarr[hits_i][hit_i + 1].imshow(Image.open(hit.entity.get('filepath')))
        axarr[hits_i][hit_i + 1].set_axis_off()
        axarr[hits_i][hit_i + 1].set_title('距离: ' + str(hit.distance))

# 将搜索结果保存在与您的脚本相邻的单独图像文件中。
plt.savefig('search_result.png')
搜索结果图像应类似于以下内容: