
开始使用 InfluxDB 3 Core
InfluxDB 3核心正在进行公开测试
InfluxDB 3 Core 正在进行公开 alpha 测试,并可供测试和反馈,但不适合用于生产环境。产品和本文件都是进行中的工作。我们欢迎并鼓励您分享您对 alpha 版本的体验,并邀请您加入我们的公共频道以获取更新和分享反馈。
InfluxDB 3 Core 是专为实时数据监控和最近数据而构建的。 InfluxDB 3 Enterprise 在 Core 的基础上增加了对历史数据 查询、高可用性、读取副本等的支持。 Enterprise 很快将解锁 增强的安全性、行级删除、管理用户界面等更多功能。 了解更多关于 InfluxDB 3 Enterprise的信息。
开始使用 InfluxDB 3 Core
InfluxDB是一个旨在收集、处理、转化和存储事件和时间序列数据的数据库,特别适合需要实时摄取和快速查询响应时间,以构建用户界面、监控和自动化解决方案的使用案例。
常见的使用案例包括:
- 监控传感器数据
- 服务器监控
- 应用性能监控
- 网络监控
- 金融市场和交易分析
- 行为分析
InfluxDB针对近实时数据监控至关重要的场景进行了优化,查询需要快速返回,以支持用户体验,如仪表板和交互式用户界面。
InfluxDB 3核心是InfluxDB 3的开源版本。核心的特点亮点包括:
- 无盘架构,支持对象存储(或无依赖的本地磁盘)
- 快速查询响应时间(最后值查询低于10毫秒,或不同元数据30毫秒)
- 用于插件和触发器的嵌入式Python虚拟机
- Parquet文件持久化
- 与 InfluxDB 1.x 和 2.x 写入 API 的兼容性
企业版本在核心功能的基础上增加了:
- 历史查询能力和单系列索引
- 高可用性
- 读取副本
- 增强的安全性(即将推出)
- 行级删除支持(即将推出)
- 集成的管理员用户界面(敬请期待)
欲了解更多信息,请查看如何开始使用企业版。
本指南包含的内容
本指南涵盖了 InfluxDB 3 Core(开源版本),包括以下主题:
安装和启动
InfluxDB 3 Core 在 Linux、macOS 和 Windows 上运行。
要快速入门,下载并运行安装脚本 - 例如,使用 curl:
curl -O https://www.influxdata.com/d/install_influxdb3.sh \
&& sh install_influxdb3.sh
或者,下载并安装 构建工件:
- Linux | x86 | musl • sha256
- Linux | x86 | gnu • sha256
- Linux | ARM | musl • sha256
- Linux | ARM | gnu • sha256
- macOS | Darwin • sha256
macOS Intel 版本即将推出。
下载并安装 InfluxDB 3 Core Windows (x86) binary • sha256
docker pull quay.io/influxdb/influxdb3-core:latest
每次合并到 InfluxDB 3 Core main 分支时,构建的工件和镜像都会更新。
验证安装
安装 InfluxDB 3 Core 后,输入以下命令以验证安装是否成功:
influxdb3 --version
如果您的系统无法找到 influxdb3,那么请 source 配置文件 (例如,.bashrc,.zshrc) 供您的 shell 使用,例如:
source ~/.zshrc
启动 InfluxDB
要启动您的 InfluxDB 实例,请使用 influxdb3 serve 命令并提供以下信息:
--object-store: 指定要使用的对象存储类型。InfluxDB支持以下类型:本地文件系统 (file),memory, S3(以及兼容的服务,如Ceph或Minio) (s3), Google Cloud Storage (google), 和Azure Blob Storage (azure).--writer-id: 一个字符串标识符,决定服务器在配置的存储位置中的存储路径
以下示例展示了如何以不同的对象存储配置启动 InfluxDB 3:
# MEMORY
# Stores data in RAM; doesn't persist data
influxdb3 serve --writer-id=local01 --object-store=memory
# FILESYSTEM
# Provide the filesystem directory
influxdb3 serve \
  --writer-id=local01 \
  --object-store=file \
  --data-dir ~/.influxdb3
要运行Docker镜像并将数据持久化到文件系统,挂载一个卷用于对象存储-例如,传递以下选项:
-v /path/on/host:/path/in/container: 将你的文件系统中的一个目录挂载到容器中--object-store file --data-dir /path/in/container: 使用挂载作为服务器存储
# FILESYSTEM USING DOCKER
# Create a mount
# Provide the mount path
docker run -it \
 -v /path/on/host:/path/in/container \
 quay.io/influxdb/influxdb3-core:latest serve \
 --writer-id my_host \
 --object-store file \
 --data-dir /path/in/container
# S3 (defaults to us-east-1 for region)
# Specify the Object store type and associated options
influxdb3 serve --writer-id=local01 --object-store=s3 --bucket=[BUCKET] --aws-access-key=[AWS ACCESS KEY] --aws-secret-access-key=[AWS SECRET ACCESS KEY]
# Minio/Open Source Object Store (Uses the AWS S3 API, with additional parameters)
# Specify the Object store type and associated options
influxdb3 serve --writer-id=local01 --object-store=s3 --bucket=[BUCKET] --aws-access-key=[AWS ACCESS KEY] --aws-secret-access-key=[AWS SECRET ACCESS KEY] --aws-endpoint=[ENDPOINT] --aws-allow-http
有关服务器选项的更多信息,请运行 influxdb3 serve --help。
停止Docker容器
目前,一个错误阻止使用 Ctrl-c 来停止 InfluxDB 3 容器。 使用 docker kill 命令来停止容器:
- 输入以下命令以查找容器 ID:
docker ps -a - 输入命令以停止容器:
docker kill <CONTAINER_ID>
许可
当第一次启动 InfluxDB 3 Core 时,它会提示您输入电子邮件地址以进行验证。您将收到一封带有验证链接的电子邮件。 完成验证后,许可证的创建、检索和应用将自动进行。
在alpha阶段,许可证有效期至2025年5月7日。
数据模型
数据库服务器包含逻辑数据库,这些数据库有表,这些表有列。与之前版本的InfluxDB相比,您可以将数据库视为v2中的bucket或v1中的db/retention_policy。table相当于measurement,它具有可以是tag(字符串字典)、int64、float64、uint64、bool或string类型的列,最后每个表都有一个time列,它是纳秒精度的时间戳。
在 InfluxDB 3 中,每个表都有一个主键——有序的标签集合和时间——用于其数据。这是所有创建的 Parquet 文件所使用的排序方式。当您通过显式调用或首次向表中写入数据来创建表时,它将主键设置为按到达顺序排列的标签。这个是不可改变的。尽管 InfluxDB 仍然是一个 写时模式 数据库,但表的标签列定义是不可改变的。
标签应该包含唯一的识别信息,如 sensor_id,或 building_id 或 trace_id。所有其他数据应保存在字段中。您将能够在以后为任何列(无论是字段还是标签)添加快速的最近 N 值和唯一值查找。
写入数据
InfluxDB是一个写时模式的数据库。您可以开始写入数据,InfluxDB会即时创建逻辑数据库、表和它们的模式。 在创建模式后,InfluxDB会在接受数据之前验证未来的写入请求。 随后的请求可以即时添加新的字段,但无法添加新的标签。
InfluxDB 3 Core 针对最近的数据进行了优化——它接受来自过去72小时内的数据写入。它将这些数据持久化在Parquet文件中,以便第三方系统进行长期历史分析和查询。如果您需要更长时间的历史查询,并且需要一个优化数据组织的压缩器,请考虑使用 InfluxDB 3 Enterprise。
数据库有三个写入API端点,响应HTTP POST 请求:
/write?db=mydb&precision=ns/api/v2/write?bucket=mydb&precision=ns/api/v3/write_lp?db=mydb&precision=ns&accept_partial=true
InfluxDB 3 Core 提供 /write 和 /api/v2/write 端点,以便与可以将数据写入先前版本的 InfluxDB 的客户端向后兼容。 然而,这些 API 与先前版本中的 API 在以下方面有所不同:
- 表中的标签(测量)是 不可变的
- 标签和字段在一个表中不能有相同的名称。
InfluxDB 3 Core 新增了 /api/v3/write_lp 端点,接受与之前版本相同的行协议语法,并支持 ?accept_partial=<BOOLEAN> 参数,该参数允许您接受或拒绝部分写入(默认值为 true)。
以下代码块是行协议的一个示例,显示了表名后面跟着标签,这些标签是一个有序的、以逗号分隔的键/值对列表,其中值为字符串,后面是一个以逗号分隔的键/值对列表,表示字段,并以一个可选的时间戳结束。默认情况下,时间戳是纳秒纪元,但您可以通过precision查询参数指定不同的精度。
cpu,host=Alpha,region=us-west,application=webserver val=1i,usage_percent=20.5,status="OK"
cpu,host=Bravo,region=us-east,application=database val=2i,usage_percent=55.2,status="OK"
cpu,host=Charlie,region=us-west,application=cache val=3i,usage_percent=65.4,status="OK"
cpu,host=Bravo,region=us-east,application=database val=4i,usage_percent=70.1,status="Warn"
cpu,host=Bravo,region=us-central,application=database val=5i,usage_percent=80.5,status="OK"
cpu,host=Alpha,region=us-west,application=webserver val=6i,usage_percent=25.3,status="Warn"
如果您将前面的行协议保存到一个文件中(例如,server_data),那么您可以使用influxdb3 CLI来写入数据,例如:
influxdb3 write --database=mydb --file=server_data
以下示例显示了如何使用 curl 和 /api/3/write_lp HTTP 端点写入数据。为了显示接受和拒绝部分写入之间的区别,示例中的第 2 行包含了一个 float 字段的 string 值 (temp=hi)。
发生了部分行协议的写入
使用 accept_partial=true:
* upload completely sent off: 59 bytes
< HTTP/1.1 400 Bad Request
< transfer-encoding: chunked
< date: Wed, 15 Jan 2025 19:35:36 GMT
<
* Connection #0 to host localhost left intact
{"error":"partial write of line protocol occurred","data":[{"original_line":"dquote> home,room=Sunroom temp=hi","line_number":2,"error_message":"No fields were provided"}]}%
第 1 行已编写并可查询。
响应是一个HTTP错误 (400) 状态,响应主体包含 partial write of line protocol occurred 和关于问题行的详细信息。
解析失败,写入_lp 端点
使用 accept_partial=false:
> curl -v -XPOST "localhost:8181/api/v3/write_lp?db=sensors&precision=auto&accept_partial=false" \
  --data-raw "home,room=Sunroom temp=96
dquote> home,room=Sunroom temp=hi"
< HTTP/1.1 400 Bad Request
< transfer-encoding: chunked
< date: Wed, 15 Jan 2025 19:28:27 GMT
<
* Connection #0 to host localhost left intact
{"error":"parsing failed for write_lp endpoint","data":{"original_line":"dquote> home,room=Sunroom temp=hi","line_number":2,"error_message":"No fields were provided"}}%
两行都没有写入数据库。 返回的是一个HTTP错误(400)状态,响应主体包含解析失败,针对write_lp端点及问题行的详细信息。
数据持久性
写入的数据进入WAL文件,每秒创建一次,以及一个可查询的内存缓冲区。随后,InfluxDB快照WAL并将数据持久化到对象存储中,作为Parquet文件。 我们在本指南后面会介绍无磁盘架构。
写请求在WAL刷新后返回
写入数据库的请求不会返回,直到WAL文件已经刷新到配置的对象存储中,默认情况下这发生在每秒一次。 单个写入请求可能不会快速完成,但您可以发出许多并发请求以获得更高的总吞吐量。 在未来,我们将添加一个API参数,使请求可以在不等待WAL刷新完成的情况下返回。
创建数据库或表
要创建一个没有写入数据的数据库,请使用create子命令,例如:
influxdb3 create database mydb
要了解有关子命令的更多信息,请使用 -h, --help 标志:
influxdb3 create -h
查询数据库
InfluxDB 3 现在支持原生 SQL 查询,除了 InfluxQL,这是一种为时间序列查询定制的类 SQL 语言。
Flux, 在 InfluxDB 2.0 中引入的语言,在 InfluxDB 3 中不被支持。
开始查询的最快方法是使用 influxdb3 CLI(它通过 HTTP2 使用 Flight SQL API)。
这个 query 子命令包括选项,以帮助确保查询正确的数据库并具有正确的权限。只有 --database 选项是必需的,但根据您的具体设置,您可能需要传递其他选项,例如主机、端口和令牌。
| 选项 | 描述 | 必需 |
|---|---|---|
--host | 要查询的服务器主机URL [默认: http://127.0.0.1:8181] | 否 |
--database | 要操作的数据库名称 | 是 |
--token | InfluxDB 3 Core 服务器的认证令牌 | No |
--language | 提供的查询字符串的查询语言 [默认: sql] [可能值: sql, influxql] | 否 |
--format | 查询输出的格式 [默认: pretty] [可能的值: pretty, json, json_lines, csv, parquet] | 否 |
--output | 输出数据的路径 | 否 |
示例:在servers数据库上查询“SHOW TABLES”:
$ influxdb3 query --database=servers "SHOW TABLES"
+---------------+--------------------+--------------+------------+
| table_catalog | table_schema       | table_name   | table_type |
+---------------+--------------------+--------------+------------+
| public        | iox                | cpu          | BASE TABLE |
| public        | information_schema | tables       | VIEW       |
| public        | information_schema | views        | VIEW       |
| public        | information_schema | columns      | VIEW       |
| public        | information_schema | df_settings  | VIEW       |
| public        | information_schema | schemata     | VIEW       |
+---------------+--------------------+--------------+------------+
示例: 查询 cpu 表,限制为 10 行:
$ influxdb3 query --database=servers "SELECT DISTINCT usage_percent, time FROM cpu LIMIT 10"
+---------------+---------------------+
| usage_percent | time                |
+---------------+---------------------+
| 63.4          | 2024-02-21T19:25:00 |
| 25.3          | 2024-02-21T19:06:40 |
| 26.5          | 2024-02-21T19:31:40 |
| 70.1          | 2024-02-21T19:03:20 |
| 83.7          | 2024-02-21T19:30:00 |
| 55.2          | 2024-02-21T19:00:00 |
| 80.5          | 2024-02-21T19:05:00 |
| 60.2          | 2024-02-21T19:33:20 |
| 20.5          | 2024-02-21T18:58:20 |
| 85.2          | 2024-02-21T19:28:20 |
+---------------+---------------------+
使用CLI查询InfluxQL
InfluxQL 是由 InfluxData 开发的一种类似于 SQL 的语言,具备针对利用和处理 InfluxDB 特定功能的特点。它与所有版本的 InfluxDB 兼容,使其成为不同 InfluxDB 安装之间互操作性的良好选择。
要使用 InfluxQL 查询,请输入 influxdb3 query 子命令,并在语言选项中指定 influxql,例如:
influxdb3 query --database=servers --lang=influxql "SELECT DISTINCT usage_percent FROM cpu WHERE time >= now() - 1d"
使用API查询
InfluxDB 3 支持 Flight (gRPC) API 和 HTTP API。要使用 HTTP API 查询数据库,请向 /api/v3/query_sql 或 /api/v3/query_influxql 端点发送请求。在请求中,在 db 参数中指定数据库名称,在 q 参数中指定查询。您可以在查询字符串中或在 JSON 对象内传递参数。
使用 format 参数来指定响应格式: pretty, jsonl, parquet, csv 和 json。 默认是 json。
示例:查询传递URL编码的参数
以下示例发送一个 HTTP GET 请求,包含一个 URL 编码的 SQL 查询:
curl -v "http://127.0.0.1:8181/api/v3/query_sql?db=servers&q=select+*+from+cpu+limit+5"
示例:传递JSON参数的查询
以下示例发送一个带有JSON负载参数的HTTP POST 请求:
curl http://127.0.0.1:8181/api/v3/query_sql \
  --data '{"db": "server", "q": "select * from cpu limit 5"}'
使用Python客户端查询
使用 InfluxDB 3 Python 库与数据库交互并与您的应用程序集成。我们建议在您特定项目的 Python 虚拟环境中安装所需的包。
要开始,安装 influxdb3-python 包。
pip install influxdb3-python
在这里,您可以仅使用主机和**数据库名称连接到您的数据库。:
from influxdb_client_3 import InfluxDBClient3

client = InfluxDBClient3(
    host='http://127.0.0.1:8181',
    database='servers'
)
下面的示例展示了如何使用 SQL 查询,然后使用 PyArrow 探索模式并处理结果:
from influxdb_client_3 import InfluxDBClient3

client = InfluxDBClient3(
    host='http://127.0.0.1:8181',

    database='servers'
)

# Execute the query and return an Arrow table
table = client.query(
    query="SELECT * FROM cpu LIMIT 10",
    language="sql"
)

print("\n#### View Schema information\n")
print(table.schema)

print("\n#### Use PyArrow to read the specified columns\n")
print(table.column('usage_active'))
print(table.select(['host', 'usage_active']))
print(table.select(['time', 'host', 'usage_active']))

print("\n#### Use PyArrow compute functions to aggregate data\n")
print(table.group_by('host').aggregate([]))
print(table.group_by('cpu').aggregate([('time_system', 'mean')]))
有关Python客户端库的更多信息,请参阅influxdb3-python库在GitHub上的信息。
最后值缓存
InfluxDB 3 Core 支持一个 最后 n 个值缓存,它在内存中存储系列或列层次中的最后 N 个值。这使得数据库能够在不到 10 毫秒的时间内回答这些类型的查询。 你可以使用 influxdb3 CLI 来创建一个最后值缓存。
Usage: $ influxdb3 create last-cache [OPTIONS] -d <DATABASE_NAME> -t <TABLE>

Options:
  -h, --host <HOST_URL>                URL of the running InfluxDB 3 server
  -d, --database <DATABASE_NAME>       The database to run the query against
      --token <AUTH_TOKEN>             The token for authentication
  -t, --table <TABLE>                  The table for which the cache is created
      --cache-name <CACHE_NAME>        Give a name for the cache
      --help                           Print help information
      --key-columns <KEY_COLUMNS>      Columns used as keys in the cache
      --value-columns <VALUE_COLUMNS>  Columns to store as values in the cache
      --count <COUNT>                  Number of entries per unique key:column
      --ttl <TTL>                      The time-to-live for entries (seconds)
您可以为每个时间序列创建一个最后值缓存,但要注意高基数表可能会占用过多内存。
创建此缓存的示例:
| 主机 | 应用程序 | 时间 | 使用百分比 | 状态 |
|---|---|---|---|---|
| Bravo | 数据库 | 2024-12-11T10:00:00 | 55.2 | 成功 |
| 查理 | 缓存 | 2024-12-11T10:00:00 | 65.4 | 正常 |
| 布拉沃 | 数据库 | 2024-12-11T10:01:00 | 70.1 | 警告 |
| Bravo | 数据库 | 2024-12-11T10:01:00 | 80.5 | 正常 |
| 阿尔法 | 网络服务器 | 2024-12-11T10:02:00 | 25.3 | 警告 |
influxdb3 create last-cache --database=servers --table=cpu --cache-name=cpuCache --key-columns=host,application --value-columns=usage_percent,status --count=5
查询最后值缓存
要利用LVC,请在您的查询中使用 last_cache() 函数调用它,例如:
influxdb3 query --database=servers "SELECT * FROM last_cache('cpu', 'cpuCache') WHERE host = 'Bravo;"
仅适用于SQL
最后值缓存只适用于SQL,而不适用于InfluxQL;SQL是默认语言。
删除最后值缓存
要移除最后值缓存,请使用以下命令:
influxdb3 delete last_cache [OPTIONS] -d <DATABASE_NAME> -t <TABLE> --cache-name <CACHE_NAME>

Options:
  -h, --host <HOST_URL>          Host URL of the running InfluxDB 3 server
  -d, --database <DATABASE_NAME> The database to run the query against
      --token <AUTH_TOKEN>       The token for authentication
  -t, --table <TABLE>            The table for which the cache is being deleted
  -n, --cache-name <CACHE_NAME>  The name of the cache being deleted
      --help                     Print help information
不同的值缓存
类似于最近值缓存,数据库可以在RAM中缓存表中单独列或列层级的不同值。这对于快速元数据查找很有用,查找时间可以在30毫秒以内返回。许多选项与最近值缓存类似。有关更多信息,请参见CLI输出:
influxdb3 create distinct_cache -h
Python 插件和处理引擎
处理引擎仅在Docker中工作
处理引擎目前仅在Docker x86环境中受支持。非Docker支持即将推出。引擎、API和开发者体验正在积极演进,可能会发生变化。请加入我们的 Discord 以获取更新和反馈。
InfluxDB 3处理引擎是一个嵌入式Python虚拟机,用于在数据库内运行代码以处理和转换数据。
插件
插件是一个与触发类型兼容的签名的Python函数。 influxdb3 create plugin命令将Python插件文件加载到服务器中。
触发器
在您将插件加载到 InfluxDB 3 服务器后,您可以创建一个或多个与该插件相关的触发器。
当您创建触发器时,您需要指定一个插件、一个数据库、可选的运行时参数,以及一个触发器规格,它指定 all_tables 或 table:my_table_name(用于过滤发送到插件的数据)。
当您 启用 触发器时,服务器会根据插件签名执行插件代码。
触发器类型
InfluxDB 3 提供以下类型的触发器:
- 在WAL刷新时: 每秒将一批写入数据发送到插件(可配置)。
目前仅支持WAL 刷新触发器,但更多功能正在开发中:
- 快照: 发送元数据到插件,以便对Parquet数据进行进一步处理或将信息发送到其他地方(例如,发送到Iceberg目录)。 尚不可用。
- 按计划进行: 按用户配置的计划执行插件,适用于数据收集和死者监控。 尚不可用。
- 按需: 将插件绑定到HTTP端点
/api/v3/plugins/<name>。 尚未可用。 插件接收HTTP请求头和内容,然后可以解析、处理,并将数据发送到数据库或第三方服务。
测试、创建和触发插件代码
处理引擎仅在Docker中工作
处理引擎目前仅在Docker x86环境中受支持。非Docker支持即将推出。引擎、API和开发者体验正在积极演进,可能会发生变化。请加入我们的 Discord 以获取更新和反馈。
示例:用于WAL刷新 的Python插件
# This is the basic structure for Python plugin code that runs in the
# InfluxDB 3 Processing engine.

# When creating a trigger, you can provide runtime arguments to your plugin,
# allowing you to write generic code that uses variables such as monitoring
thresholds, environment variables, and host names.
#
# Use the following exact signature to define a function for the WAL flush
# trigger.
# When you create a trigger for a WAL flush plugin, you specify the database
# and tables that the plugin receives written data from on every WAL flush
# (default is once per second).
def process_writes(influxdb3_local, table_batches, args=None):
    # here you can see logging. for now this won't do anything, but soon
    # we'll capture this so you can query it from system tables
    if args and "arg1" in args:
        influxdb3_local.info("arg1: " + args["arg1"])

    # here we're using arguments provided at the time the trigger was set up
    # to feed into paramters that we'll put into a query
    query_params = {"host": "foo"}
    # here's an example of executing a parameterized query. Only SQL is supported.
    # It will query the database that the trigger is attached to by default. We'll
    # soon have support for querying other DBs.
    query_result = influxdb3_local.query("SELECT * FROM cpu where host = '$host'", query_params)
    # the result is a list of Dict that have the column name as key and value as
    # value. If you run the WAL test plugin with your plugin against a DB that
    # you've written data into, you'll be able to see some results
    influxdb3_local.info("query result: " + str(query_result))

    # this is the data that is sent when the WAL is flushed of writes the server
    # received for the DB or table of interest. One batch for each table (will
    # only be one if triggered on a single table)
    for table_batch in table_batches:
        # here you can see that the table_name is available.
        influxdb3_local.info("table: " + table_batch["table_name"])

        # example to skip the table we're later writing data into
        if table_batch["table_name"] == "some_table":
            continue

        # and then the individual rows, which are Dict with keys of the column names and values
        for row in table_batch["rows"]:
            influxdb3_local.info("row: " + str(row))

    # this shows building a line of LP to write back to the database. tags must go first and
    # their order is important and must always be the same for each individual table. Then
    # fields and lastly an optional time, which you can see in the next example below
    line = LineBuilder("some_table")\
        .tag("tag1", "tag1_value")\
        .tag("tag2", "tag2_value")\
        .int64_field("field1", 1)\
        .float64_field("field2", 2.0)\
        .string_field("field3", "number three")

    # this writes it back (it actually just buffers it until the completion of this function
    # at which point it will write everything back that you put in)
    influxdb3_local.write(line)

    # here's another example, but with us setting a nanosecond timestamp at the end
    other_line = LineBuilder("other_table")
    other_line.int64_field("other_field", 1)
    other_line.float64_field("other_field2", 3.14)
    other_line.time_ns(1302)

    # and you can see that we can write to any DB in the server
    influxdb3_local.write_to_db("mytestdb", other_line)

    # just some log output as an example
    influxdb3_local.info("done")
在服务器上测试插件
安全地测试您的 InfluxDB 3 插件,而不会影响已写入的数据。在插件测试期间:
- 插件执行的查询针对您发送请求的服务器。
- 写入不会发送到服务器,而是返回给你。
要测试一个插件,请执行以下操作:
创建一个 插件目录 –例如,
/path/to/.influxdb/plugins将插件目录提供给Docker容器(例如,使用绑定挂载)
运行Docker命令以 启动服务器,并包含
--plugin-dir选项以及您的插件目录路径。将前面的示例代码保存到插件目录中的一个插件文件中。如果您还没有在示例中向表中写入数据,请注释掉查询的行。
要运行测试,请输入以下命令和选项:
--lp或--file: 要测试的行协议- 可选:
--input-arguments: 用于您的插件代码的逗号分隔的<KEY>=<VALUE>参数列表
influxdb3 test wal_plugin \
  --lp <INPUT_LINE_PROTOCOL> \
  --input-arguments "arg1=foo,arg2=bar"
  --database <DATABASE_NAME> \
  <PLUGIN_FILENAME>
该命令使用测试数据运行插件代码,将数据传递给插件代码,然后返回插件结果。
您可以快速查看插件的行为,它将写入数据库的数据以及任何错误。
然后,您可以编辑插件目录中的Python代码,并重新运行测试。
服务器会为每个对test API的请求重新加载文件。
有关更多信息,请参见 influxdb3 test wal_plugin 或运行 influxdb3 test wal_plugin -h。
在服务器插件目录中有插件代码,并且测试成功后,您准备好创建一个插件和一个触发器在服务器上运行。
示例:测试、创建和运行插件
以下示例展示了如何测试一个插件,然后创建该插件并触发:
# Test and create a plugin
# Requires:
#   - A database named `mydb` with a table named `foo`
#   - A Python plugin file named `test.py`
# Test a plugin
influxdb3 test wal_plugin \
  --lp="my_measure,tag1=asdf f1=1.0 123" \
  -d mydb \
  --input-arguments="arg1=hello,arg2=world" \
  test.py
# Create a plugin to run
influxdb3 create plugin \
  -d mydb \
  --code-filename="/path/to/.influxdb3/plugins/test.py" \
  test_plugin
# Create a trigger that runs the plugin
influxdb3 create trigger \
  -d mydb \
  --plugin=test_plugin \
  --trigger-spec="table:foo" \
  --trigger-arguments="arg1=hello,arg2=world" \
  trigger1
在创建了插件和触发器后,输入以下命令来启用触发器并在您写入数据时运行插件:
influxdb3 enable trigger --database mydb trigger1
有关更多信息,请参见以下内容:
无盘架构
InfluxDB 3能够仅使用对象存储进行操作,而无需本地附加磁盘。尽管它可以仅使用无依赖的磁盘,但在此版本中能够没有磁盘进行操作是一项新功能。下图展示了数据写入数据库的路径。
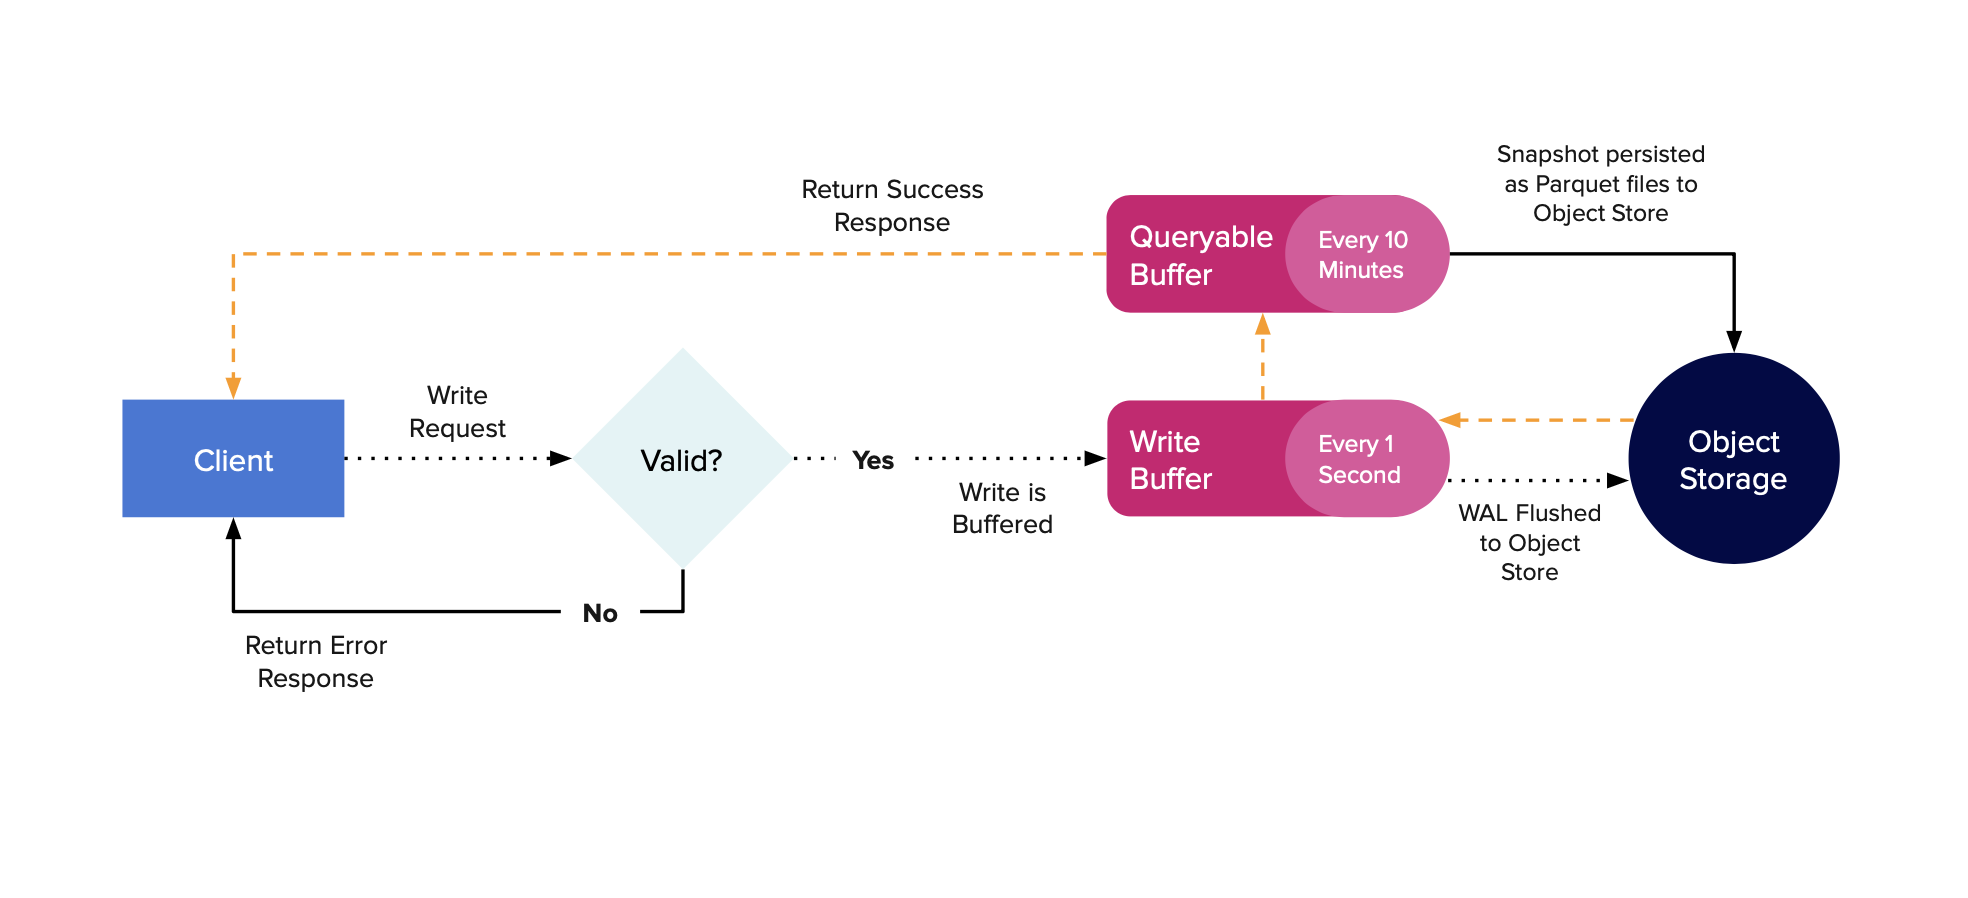
当写请求到达服务器时,它们会被解析、验证,并放入一个内存中的WAL缓冲区。该缓冲区默认每秒刷新一次(可通过配置更改),这将创建一个WAL文件。一旦数据被刷新到磁盘,它会被放入一个可查询的内存缓冲区,然后将响应发送回客户端,表示写入成功。现在该数据将显示在对服务器的查询中。
InfluxDB 定期快照 WAL,以持久化可查询缓冲区中的最旧数据,从而允许服务器删除旧的 WAL 文件。默认情况下,服务器将保留最多 900 个 WAL 文件(15 分钟的数据)并尝试持久化最旧的 10 分钟,保留最近的 5 分钟。
当数据在可查询的缓冲区外被持久化时,它被放入配置的对象存储中作为Parquet文件。这些文件也被放入内存缓存中,以便对最近持久化数据的查询不必去对象存储。