AWQ
尝试使用此notebook进行AWQ量化!
Activation-aware Weight Quantization (AWQ) 不会量化模型中的所有权重,而是保留一小部分对LLM性能重要的权重。这显著减少了量化损失,使得你可以在4位精度下运行模型而不会经历任何性能下降。
有多个库可以使用AWQ算法对模型进行量化,例如 llm-awq, autoawq 或 optimum-intel。Transformers 支持加载使用 llm-awq 和 autoawq 库量化的模型。本指南将向您展示如何加载使用 autoawq 量化的模型,但该过程与加载 llm-awq 量化的模型类似。
确保你已经安装了autoawq:
pip install autoawq
AWQ量化模型可以通过检查模型的config.json文件中的quantization_config属性来识别:
{
  "_name_or_path": "/workspace/process/huggingfaceh4_zephyr-7b-alpha/source",
  "architectures": [
    "MistralForCausalLM"
  ],
  ...
  ...
  ...
  "quantization_config": {
    "quant_method": "awq",
    "zero_point": true,
    "group_size": 128,
    "bits": 4,
    "version": "gemm"
  }
}量化模型是通过from_pretrained()方法加载的。如果你在CPU上加载了模型,请确保首先将其移动到GPU设备上。使用device_map参数来指定模型放置的位置:
from transformers import AutoModelForCausalLM, AutoTokenizer

model_id = "TheBloke/zephyr-7B-alpha-AWQ"
model = AutoModelForCausalLM.from_pretrained(model_id, device_map="cuda:0")出于性能原因,加载AWQ量化模型时,默认会自动将其他权重设置为fp16。如果你想以不同的格式加载这些其他权重,请使用torch_dtype参数:
from transformers import AutoModelForCausalLM, AutoTokenizer

model_id = "TheBloke/zephyr-7B-alpha-AWQ"
model = AutoModelForCausalLM.from_pretrained(model_id, torch_dtype=torch.float32)AWQ量化也可以与FlashAttention-2结合,以进一步加速推理:
from transformers import AutoModelForCausalLM, AutoTokenizer

model = AutoModelForCausalLM.from_pretrained("TheBloke/zephyr-7B-alpha-AWQ", attn_implementation="flash_attention_2", device_map="cuda:0")
融合模块
融合模块提供了更高的准确性和性能,并且对于Llama和Mistral架构的AWQ模块,它是开箱即用的,但你也可以为不支持的架构融合AWQ模块。
融合模块不能与其他优化技术(如FlashAttention-2)结合使用。
要为支持的架构启用融合模块,请创建一个AwqConfig并设置参数fuse_max_seq_len和do_fuse=True。fuse_max_seq_len参数是总序列长度,它应包括上下文长度和预期的生成长度。为了安全起见,您可以将其设置为更大的值。
例如,融合TheBloke/Mistral-7B-OpenOrca-AWQ模型的AWQ模块。
import torch
from transformers import AwqConfig, AutoModelForCausalLM

model_id = "TheBloke/Mistral-7B-OpenOrca-AWQ"

quantization_config = AwqConfig(
    bits=4,
    fuse_max_seq_len=512,
    do_fuse=True,
)

model = AutoModelForCausalLM.from_pretrained(model_id, quantization_config=quantization_config).to(0)
The TheBloke/Mistral-7B-OpenOrca-AWQ 模型在 batch_size=1 的情况下进行了基准测试,包括使用和不使用融合模块。
| 批次大小 | 预填充长度 | 解码长度 | 预填充 tokens/s | 解码 tokens/s | 内存 (VRAM) |
|---|---|---|---|---|---|
| 1 | 32 | 32 | 60.0984 | 38.4537 | 4.50 GB (5.68%) |
| 1 | 64 | 64 | 1333.67 | 31.6604 | 4.50 GB (5.68%) |
| 1 | 128 | 128 | 2434.06 | 31.6272 | 4.50 GB (5.68%) |
| 1 | 256 | 256 | 3072.26 | 38.1731 | 4.50 GB (5.68%) |
| 1 | 512 | 512 | 3184.74 | 31.6819 | 4.59 GB (5.80%) |
| 1 | 1024 | 1024 | 3148.18 | 36.8031 | 4.81 GB (6.07%) |
| 1 | 2048 | 2048 | 2927.33 | 35.2676 | 5.73 GB (7.23%) |
| 批量大小 | 预填充长度 | 解码长度 | 预填充 tokens/秒 | 解码 tokens/秒 | 内存 (VRAM) |
|---|---|---|---|---|---|
| 1 | 32 | 32 | 81.4899 | 80.2569 | 4.00 GB (5.05%) |
| 1 | 64 | 64 | 1756.1 | 106.26 | 4.00 GB (5.05%) |
| 1 | 128 | 128 | 2479.32 | 105.631 | 4.00 GB (5.06%) |
| 1 | 256 | 256 | 1813.6 | 85.7485 | 4.01 GB (5.06%) |
| 1 | 512 | 512 | 2848.9 | 97.701 | 4.11 GB (5.19%) |
| 1 | 1024 | 1024 | 3044.35 | 87.7323 | 4.41 GB (5.57%) |
| 1 | 2048 | 2048 | 2715.11 | 89.4709 | 5.57 GB (7.04%) |
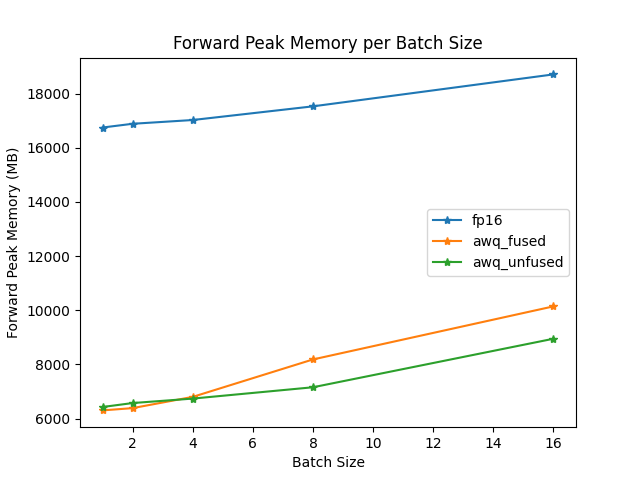
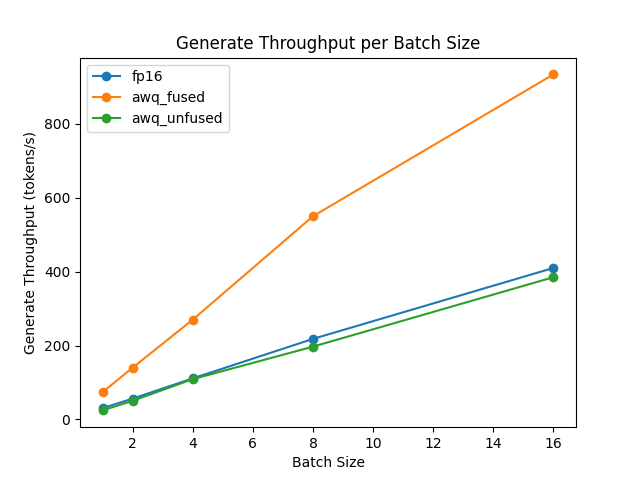
融合和非融合模块的速度和吞吐量也使用optimum-benchmark库进行了测试。
ExLlama-v2 支持
最新版本的 autoawq 支持 ExLlama-v2 内核,以实现更快的预填充和解码。要开始使用,首先通过运行以下命令安装最新版本的 autoawq:
pip install git+https://github.com/casper-hansen/AutoAWQ.git
通过传递一个带有version="exllama"的AwqConfig()来开始。
import torch
from transformers import AutoModelForCausalLM, AutoTokenizer, AwqConfig

quantization_config = AwqConfig(version="exllama")

model = AutoModelForCausalLM.from_pretrained(
    "TheBloke/Mistral-7B-Instruct-v0.1-AWQ",
    quantization_config=quantization_config,
    device_map="auto",
)

input_ids = torch.randint(0, 100, (1, 128), dtype=torch.long, device="cuda")
output = model(input_ids)
print(output.logits)

tokenizer = AutoTokenizer.from_pretrained("TheBloke/Mistral-7B-Instruct-v0.1-AWQ")
input_ids = tokenizer.encode("How to make a cake", return_tensors="pt").to(model.device)
output = model.generate(input_ids, do_sample=True, max_length=50, pad_token_id=50256)
print(tokenizer.decode(output[0], skip_special_tokens=True))
请注意,此功能在AMD GPU上受支持。
CPU 支持
最新版本的 autoawq 支持带有 ipex 操作优化的 CPU。要开始使用,首先通过运行以下命令安装最新版本的 autoawq:
pip install intel-extension-for-pytorch
pip install git+https://github.com/casper-hansen/AutoAWQ.git
通过传递一个带有 version="ipex" 的 AwqConfig() 来开始。
import torch
from transformers import AutoModelForCausalLM, AutoTokenizer, AwqConfig

quantization_config = AwqConfig(version="ipex")

model = AutoModelForCausalLM.from_pretrained(
    "TheBloke/TinyLlama-1.1B-Chat-v0.3-AWQ",
    quantization_config=quantization_config,
    device_map="cpu",
)

input_ids = torch.randint(0, 100, (1, 128), dtype=torch.long, device="cpu")
output = model(input_ids)
print(output.logits)

tokenizer = AutoTokenizer.from_pretrained("TheBloke/TinyLlama-1.1B-Chat-v0.3-AWQ")
input_ids = tokenizer.encode("How to make a cake", return_tensors="pt")
pad_token_id = tokenizer.eos_token_id
output = model.generate(input_ids, do_sample=True, max_length=50, pad_token_id=pad_token_id)
print(tokenizer.decode(output[0], skip_special_tokens=True))
请注意,此功能在Intel CPU上受支持。