零样本目标检测
传统上,用于目标检测的模型需要标注的图像数据集进行训练,并且仅限于检测训练数据中的类别集合。
零样本目标检测由OWL-ViT模型支持,该模型采用了一种不同的方法。OWL-ViT 是一个开放词汇目标检测器。这意味着它可以根据自由文本查询检测图像中的目标,而无需 在标注数据集上微调模型。
OWL-ViT 利用多模态表示来执行开放词汇检测。它将 CLIP 与轻量级的对象分类和定位头结合。开放词汇检测通过使用 CLIP 的文本编码器嵌入自由文本查询,并将其作为对象分类和定位头的输入来实现,这些头将图像与其对应的文本描述关联起来,而 ViT 处理图像块作为输入。OWL-ViT 的作者首先从头训练 CLIP,然后使用二分匹配损失在标准对象检测数据集上对 OWL-ViT 进行端到端的微调。
通过这种方法,模型可以根据文本描述检测对象,而无需事先在标记的数据集上进行训练。
在本指南中,您将学习如何使用OWL-ViT:
- 基于文本提示检测对象
- 用于批量对象检测
- 用于图像引导的目标检测
在开始之前,请确保您已安装所有必要的库:
pip install -q transformers
零样本目标检测管道
尝试使用OWL-ViT进行推理的最简单方法是在pipeline()中使用它。从Hugging Face Hub上的检查点实例化一个用于零样本目标检测的管道:
>>> from transformers import pipeline

>>> checkpoint = "google/owlv2-base-patch16-ensemble"
>>> detector = pipeline(model=checkpoint, task="zero-shot-object-detection")接下来,选择一张你想要检测物体的图片。这里我们将使用宇航员艾琳·柯林斯的图片,这是NASA伟大图像数据集的一部分。
>>> import skimage
>>> import numpy as np
>>> from PIL import Image

>>> image = skimage.data.astronaut()
>>> image = Image.fromarray(np.uint8(image)).convert("RGB")

>>> image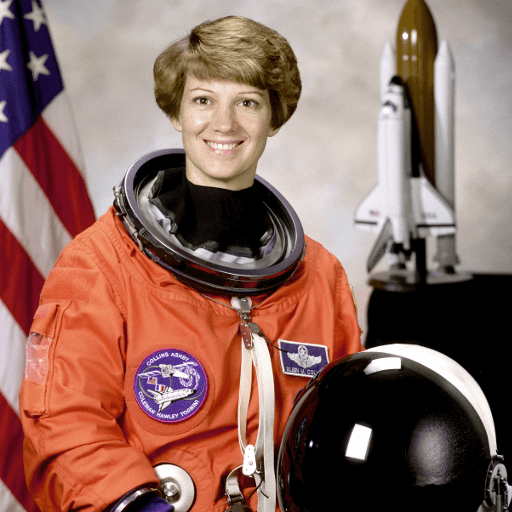
将图像和要查找的候选对象标签传递给管道。 这里我们直接传递图像;其他合适的选项包括图像的本地路径或图像URL。我们还传递了我们想要查询图像的所有项目的文本描述。
>>> predictions = detector(
...     image,
...     candidate_labels=["human face", "rocket", "nasa badge", "star-spangled banner"],
... )
>>> predictions
[{'score': 0.3571370542049408,
  'label': 'human face',
  'box': {'xmin': 180, 'ymin': 71, 'xmax': 271, 'ymax': 178}},
 {'score': 0.28099656105041504,
  'label': 'nasa badge',
  'box': {'xmin': 129, 'ymin': 348, 'xmax': 206, 'ymax': 427}},
 {'score': 0.2110239565372467,
  'label': 'rocket',
  'box': {'xmin': 350, 'ymin': -1, 'xmax': 468, 'ymax': 288}},
 {'score': 0.13790413737297058,
  'label': 'star-spangled banner',
  'box': {'xmin': 1, 'ymin': 1, 'xmax': 105, 'ymax': 509}},
 {'score': 0.11950037628412247,
  'label': 'nasa badge',
  'box': {'xmin': 277, 'ymin': 338, 'xmax': 327, 'ymax': 380}},
 {'score': 0.10649408400058746,
  'label': 'rocket',
  'box': {'xmin': 358, 'ymin': 64, 'xmax': 424, 'ymax': 280}}]
让我们可视化预测结果:
>>> from PIL import ImageDraw

>>> draw = ImageDraw.Draw(image)

>>> for prediction in predictions:
...     box = prediction["box"]
...     label = prediction["label"]
...     score = prediction["score"]

...     xmin, ymin, xmax, ymax = box.values()
...     draw.rectangle((xmin, ymin, xmax, ymax), outline="red", width=1)
...     draw.text((xmin, ymin), f"{label}: {round(score,2)}", fill="white")

>>> image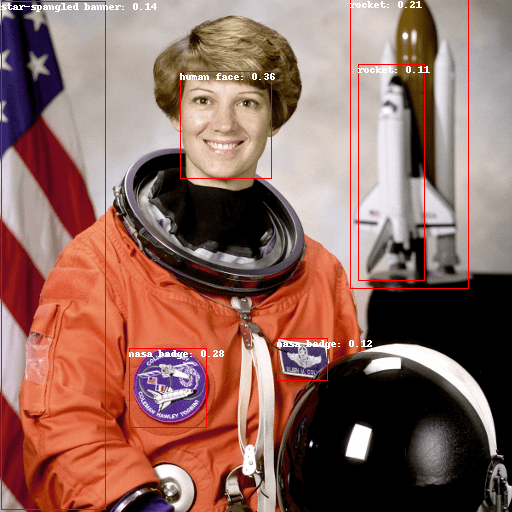
文本提示的零样本目标检测
现在你已经了解了如何使用零样本目标检测管道,让我们手动复制相同的结果。
首先从Hugging Face Hub上的检查点加载模型和相关的处理器。 这里我们将使用与之前相同的检查点:
>>> from transformers import AutoProcessor, AutoModelForZeroShotObjectDetection

>>> model = AutoModelForZeroShotObjectDetection.from_pretrained(checkpoint)
>>> processor = AutoProcessor.from_pretrained(checkpoint)
让我们换一张不同的图片来改变一下。
>>> import requests

>>> url = "https://unsplash.com/photos/oj0zeY2Ltk4/download?ixid=MnwxMjA3fDB8MXxzZWFyY2h8MTR8fHBpY25pY3xlbnwwfHx8fDE2Nzc0OTE1NDk&force=true&w=640"
>>> im = Image.open(requests.get(url, stream=True).raw)
>>> im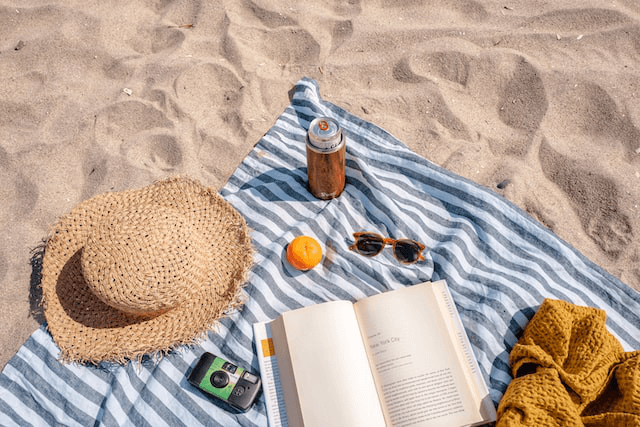
使用处理器为模型准备输入。处理器结合了一个图像处理器,通过调整大小和归一化来为模型准备图像,以及一个CLIPTokenizer,负责处理文本输入。
>>> text_queries = ["hat", "book", "sunglasses", "camera"]
>>> inputs = processor(text=text_queries, images=im, return_tensors="pt")
将输入通过模型传递,进行后处理,并可视化结果。由于图像处理器在将图像输入模型之前调整了图像大小,您需要使用 post_process_object_detection() 方法,以确保预测的边界框相对于原始图像具有正确的坐标:
>>> import torch

>>> with torch.no_grad():
...     outputs = model(**inputs)
...     target_sizes = torch.tensor([im.size[::-1]])
...     results = processor.post_process_object_detection(outputs, threshold=0.1, target_sizes=target_sizes)[0]

>>> draw = ImageDraw.Draw(im)

>>> scores = results["scores"].tolist()
>>> labels = results["labels"].tolist()
>>> boxes = results["boxes"].tolist()

>>> for box, score, label in zip(boxes, scores, labels):
...     xmin, ymin, xmax, ymax = box
...     draw.rectangle((xmin, ymin, xmax, ymax), outline="red", width=1)
...     draw.text((xmin, ymin), f"{text_queries[label]}: {round(score,2)}", fill="white")

>>> im
批处理
您可以传递多组图像和文本查询以在多个图像中搜索不同(或相同)的对象。 让我们同时使用宇航员图像和海滩图像。 对于批处理,您应该将文本查询作为嵌套列表传递给处理器,并将图像作为PIL图像列表、 PyTorch张量或NumPy数组。
>>> images = [image, im]
>>> text_queries = [
...     ["human face", "rocket", "nasa badge", "star-spangled banner"],
...     ["hat", "book", "sunglasses", "camera"],
... ]
>>> inputs = processor(text=text_queries, images=images, return_tensors="pt")之前对于后处理,您将单个图像的大小作为张量传递,但您也可以传递一个元组,或者在多个图像的情况下,传递一个元组列表。让我们为这两个示例创建预测,并可视化第二个示例(image_idx = 1)。
>>> with torch.no_grad():
...     outputs = model(**inputs)
...     target_sizes = [x.size[::-1] for x in images]
...     results = processor.post_process_object_detection(outputs, threshold=0.1, target_sizes=target_sizes)

>>> image_idx = 1
>>> draw = ImageDraw.Draw(images[image_idx])

>>> scores = results[image_idx]["scores"].tolist()
>>> labels = results[image_idx]["labels"].tolist()
>>> boxes = results[image_idx]["boxes"].tolist()

>>> for box, score, label in zip(boxes, scores, labels):
...     xmin, ymin, xmax, ymax = box
...     draw.rectangle((xmin, ymin, xmax, ymax), outline="red", width=1)
...     draw.text((xmin, ymin), f"{text_queries[image_idx][label]}: {round(score,2)}", fill="white")

>>> images[image_idx]
图像引导的目标检测
除了使用文本查询进行零样本目标检测外,OWL-ViT还提供了图像引导的目标检测。这意味着您可以使用图像查询在目标图像中查找相似的对象。与文本查询不同,只允许使用单个示例图像。
让我们以一张沙发上有两只猫的图片作为目标图像,以一张单只猫的图片作为查询:
>>> url = "http://images.cocodataset.org/val2017/000000039769.jpg"
>>> image_target = Image.open(requests.get(url, stream=True).raw)

>>> query_url = "http://images.cocodataset.org/val2017/000000524280.jpg"
>>> query_image = Image.open(requests.get(query_url, stream=True).raw)
让我们快速看一下这些图片:
>>> import matplotlib.pyplot as plt

>>> fig, ax = plt.subplots(1, 2)
>>> ax[0].imshow(image_target)
>>> ax[1].imshow(query_image)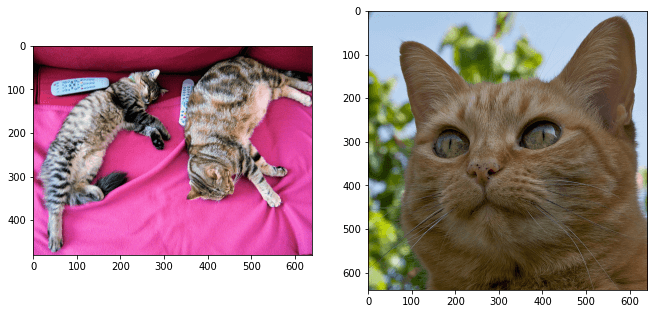
在预处理步骤中,现在需要使用query_images而不是文本查询:
>>> inputs = processor(images=image_target, query_images=query_image, return_tensors="pt")对于预测,不要将输入传递给模型,而是将它们传递给image_guided_detection()。像以前一样绘制预测结果,只是现在没有标签。
>>> with torch.no_grad():
...     outputs = model.image_guided_detection(**inputs)
...     target_sizes = torch.tensor([image_target.size[::-1]])
...     results = processor.post_process_image_guided_detection(outputs=outputs, target_sizes=target_sizes)[0]

>>> draw = ImageDraw.Draw(image_target)

>>> scores = results["scores"].tolist()
>>> boxes = results["boxes"].tolist()

>>> for box, score in zip(boxes, scores):
...     xmin, ymin, xmax, ymax = box
...     draw.rectangle((xmin, ymin, xmax, ymax), outline="white", width=4)

>>> image_target