自适应层
嵌入模型通常是具有多层的编码器模型,例如12层(例如all-mpnet-base-v2)或6层(例如all-MiniLM-L6-v2)。为了获取嵌入,必须遍历每一层。2D Matryoshka Sentence Embeddings(2DMSE)预印本重新审视了这一概念,提出了一种训练嵌入模型的方法,该模型在使用部分所有层时表现良好。这导致了在相对较低的性能成本下推理速度更快。
备注
2DMSE 预印本后来进行了更新并更名为 ESE: Espresso Sentence Embeddings。Sentence Transformers 对 Adaptive Layers 和 Matryoshka2d(自适应层 + Matryoshka 嵌入)的实现基于最初的预印本,我们接受实现更新后的 ESE 论文的贡献。
使用场景
2DMSE 论文提到,使用通过自适应层和 Matryoshka 表示学习训练的大型模型的几层,可以优于像标准嵌入模型那样训练的小型模型。
结果
让我们看看自适应层嵌入模型与常规嵌入模型的性能可能会有怎样的差异。在这个实验中,我训练了两个模型:
tomaarsen/mpnet-base-nli-adaptive-layer:通过运行 adaptive_layer_nli.py 并使用 microsoft/mpnet-base 进行训练。
tomaarsen/mpnet-base-nli:与前一个模型几乎相同,但仅使用
MultipleNegativesRankingLoss而不是在MultipleNegativesRankingLoss之上使用AdaptiveLayerLoss。我也使用 microsoft/mpnet-base 作为基础模型。
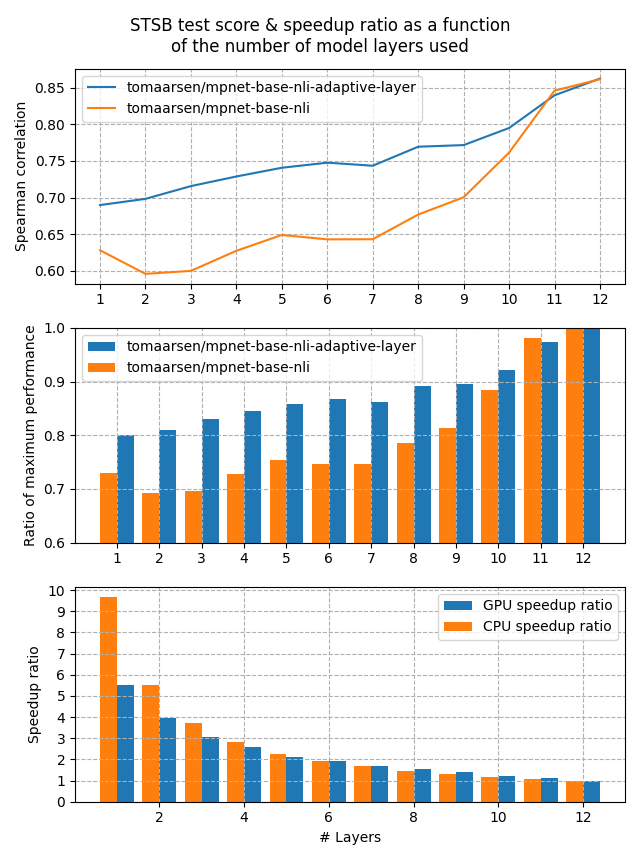
这两个模型都在 AllNLI 数据集上进行了训练,该数据集是 SNLI 和 MultiNLI 数据集的拼接。我在 STSBenchmark 测试集上使用多个不同的嵌入维度评估了这些模型。结果绘制在以下图中:

第一张图显示,当减少模型中的层数时,自适应层模型的性能保持得更好。这在第二张图中也得到了清楚的展示,第二张图显示,当层数减少到1时,保留了80%的性能。
最后,第三张图显示了在我的测试中GPU和CPU设备的预期加速比。如你所见,移除一半的层数大约会导致2倍的加速,但代价是在 STSB 上损失约15%的性能(~86 -> ~75 Spearman 相关性)。当移除更多层数时,CPU上的性能提升更大,并且在性能损失20%的情况下,5倍到10倍的加速非常可行。
训练
使用自适应层支持进行训练非常简单:我们不仅在最后一层应用某种损失函数,还在前几层的池化嵌入上应用相同的损失函数。此外,我们使用一个 KL-散度损失,旨在使非最后一层的嵌入与最后一层的嵌入匹配。这可以看作是一种有趣的知识蒸馏方法,但最后一层作为教师模型,前面的层作为学生模型。
例如,对于12层的 microsoft/mpnet-base,现在将训练模型使得每一层都能产生有意义的嵌入。
from sentence_transformers import SentenceTransformer
from sentence_transformers.losses import CoSENTLoss, AdaptiveLayerLoss

model = SentenceTransformer("microsoft/mpnet-base")

base_loss = CoSENTLoss(model=model)
loss = AdaptiveLayerLoss(model=model, loss=base_loss)
请注意,使用 AdaptiveLayerLoss 进行训练并不比不使用它显著更慢。
此外,这可以与MatryoshkaLoss结合使用,从而使得生成的模型不仅在层数上减少,而且在输出维度的大小上也能减少。有关减少输出维度的更多信息,请参阅Matryoshka Embeddings。在Sentence Transformers中,这两种损失的组合被称为Matryoshka2dLoss,并提供了一个简写形式以便于更简单的训练。
from sentence_transformers import SentenceTransformer
from sentence_transformers.losses import CoSENTLoss, Matryoshka2dLoss

model = SentenceTransformer("microsoft/mpnet-base")

base_loss = CoSENTLoss(model=model)
loss = Matryoshka2dLoss(model=model, loss=base_loss, matryoshka_dims=[768, 512, 256, 128, 64])
参考:
Matryoshka2dLoss
推理
在使用自适应层损失训练模型后,您可以截断模型层,使其达到所需的层数。请注意,这需要对模型本身进行一些手术操作,并且每个模型的结构略有不同,因此步骤会因模型而异。
首先,我们将加载模型并访问底层的transformers模型,如下所示:
from sentence_transformers import SentenceTransformer

model = SentenceTransformer("tomaarsen/mpnet-base-nli-adaptive-layer")

# 我们可以通过`model[0].auto_model`访问底层模型
print(model[0].auto_model)
MPNetModel(
  (embeddings): MPNetEmbeddings(
    (word_embeddings): Embedding(30527, 768, padding_idx=1)
    (position_embeddings): Embedding(514, 768, padding_idx=1)
    (LayerNorm): LayerNorm((768,), eps=1e-05, elementwise_affine=True)
    (dropout): Dropout(p=0.1, inplace=False)
  )
  (encoder): MPNetEncoder(
    (layer): ModuleList(
      (0-11): 12 x MPNetLayer(
        (attention): MPNetAttention(
          (attn): MPNetSelfAttention(
            (q): Linear(in_features=768, out_features=768, bias=True)
            (k): Linear(in_features=768, out_features=768, bias=True)
            (v): Linear(in_features=768, out_features=768, bias=True)
            (o): Linear(in_features=768, out_features=768, bias=True)
            (dropout): Dropout(p=0.1, inplace=False)
          )
          (LayerNorm): LayerNorm((768,), eps=1e-05, elementwise_affine=True)
          (dropout): Dropout(p=0.1, inplace=False)
        )
        (intermediate): MPNetIntermediate(
          (dense): Linear(in_features=768, out_features=3072, bias=True)
          (intermediate_act_fn): GELUActivation()
        )
        (output): MPNetOutput(
          (dense): Linear(in_features=3072, out_features=768, bias=True)
          (LayerNorm): LayerNorm((768,), eps=1e-05, elementwise_affine=True)
          (dropout): Dropout(p=0.1, inplace=False)
        )
      )
    )
    (relative_attention_bias): Embedding(32, 12)
  )
  (pooler): MPNetPooler(
    (dense): Linear(in_features=768, out_features=768, bias=True)
    (activation): Tanh()
  )
)
此输出会因模型而异。我们将在编码器中寻找重复的层。对于这个MPNet模型,它存储在model[0].auto_model.encoder.layer下。然后我们可以对模型进行切片,只保留前几层以加快模型速度:
new_num_layers = 3
model[0].auto_model.encoder.layer = model[0].auto_model.encoder.layer[:new_num_layers]
然后我们可以使用SentenceTransformers.encode进行推理。
from sentence_transformers import SentenceTransformer

model = SentenceTransformer("tomaarsen/mpnet-base-nli-adaptive-layer")
new_num_layers = 3
model[0].auto_model.encoder.layer = model[0].auto_model.encoder.layer[:new_num_layers]

embeddings = model.encode(
    [
        "The weather is so nice!",
        "It's so sunny outside!",
        "He drove to the stadium.",
    ]
)
# 第一个句子与其他两个句子的相似度
similarities = model.similarity(embeddings[0], embeddings[1:])
# => tensor([[0.7761, 0.1655]])
# 与完整模型的tensor([[ 0.7547, -0.0162]])相比
如您所见,尽管只使用了3层,相关句子之间的相似度远高于不相关句子的相似度。欢迎将此脚本复制到本地,修改new_num_layers,并观察相似度的差异。
代码示例
请参阅以下脚本,了解如何在实践中应用AdaptiveLayerLoss的示例:
adaptive_layer_nli.py: 此示例使用
MultipleNegativesRankingLoss与AdaptiveLayerLoss,结合自然语言推理(NLI)数据训练一个强大的嵌入模型。它是NLI文档的一个改编版本。adaptive_layer_sts.py: 此示例使用CoSENTLoss与AdaptiveLayerLoss,在STSBenchmark数据集的训练集上训练一个嵌入模型。它是STS文档的一个改编版本。
以及以下脚本,展示如何应用Matryoshka2dLoss:
2d_matryoshka_nli.py: 此示例使用
MultipleNegativesRankingLoss与Matryoshka2dLoss,结合自然语言推理(NLI)数据训练一个强大的嵌入模型。它是NLI文档的一个改编版本。2d_matryoshka_sts.py: 此示例使用
CoSENTLoss与Matryoshka2dLoss,在STSBenchmark数据集的训练集上训练一个嵌入模型。它是STS文档的一个改编版本。