语法高亮中的优化
2017年2月8日 - Alexandru Dima
Visual Studio Code 1.9版本包含了一个我们一直在努力的酷炫性能改进,我想讲述它的故事。
TL;DR 在VS Code 1.9中,TextMate主题将更接近其作者的预期外观,同时渲染速度更快,内存消耗更少。
语法高亮
语法高亮通常包括两个阶段。首先,将标记分配给源代码,然后通过主题为它们分配颜色,瞧,你的源代码就带颜色渲染出来了。这是将文本编辑器转变为代码编辑器的关键功能。
在VS Code(以及Monaco Editor)中,标记化是逐行进行的,从上到下,一次性完成。标记器可以在标记化一行的末尾存储一些状态,这些状态将在标记化下一行时传递回来。这是许多标记化引擎使用的技术,包括TextMate语法,它允许编辑器在用户进行编辑时仅重新标记一小部分行。
大多数情况下,在一行上输入只会导致该行被重新标记化,因为标记器返回相同的结束状态,编辑器可以假设以下行不会获得新的标记:
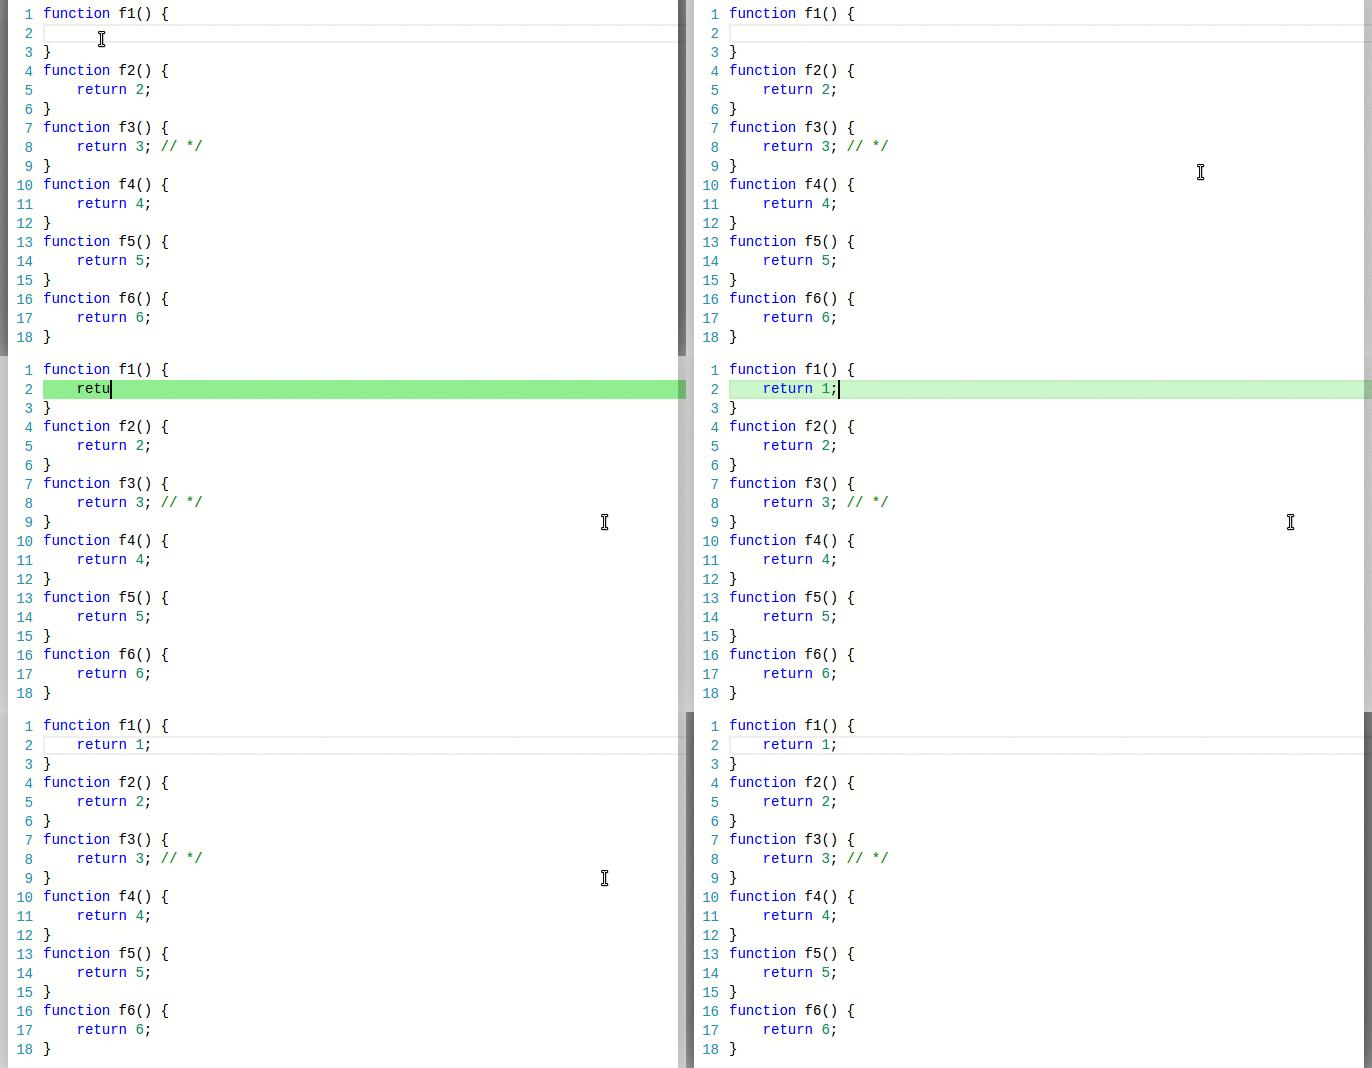
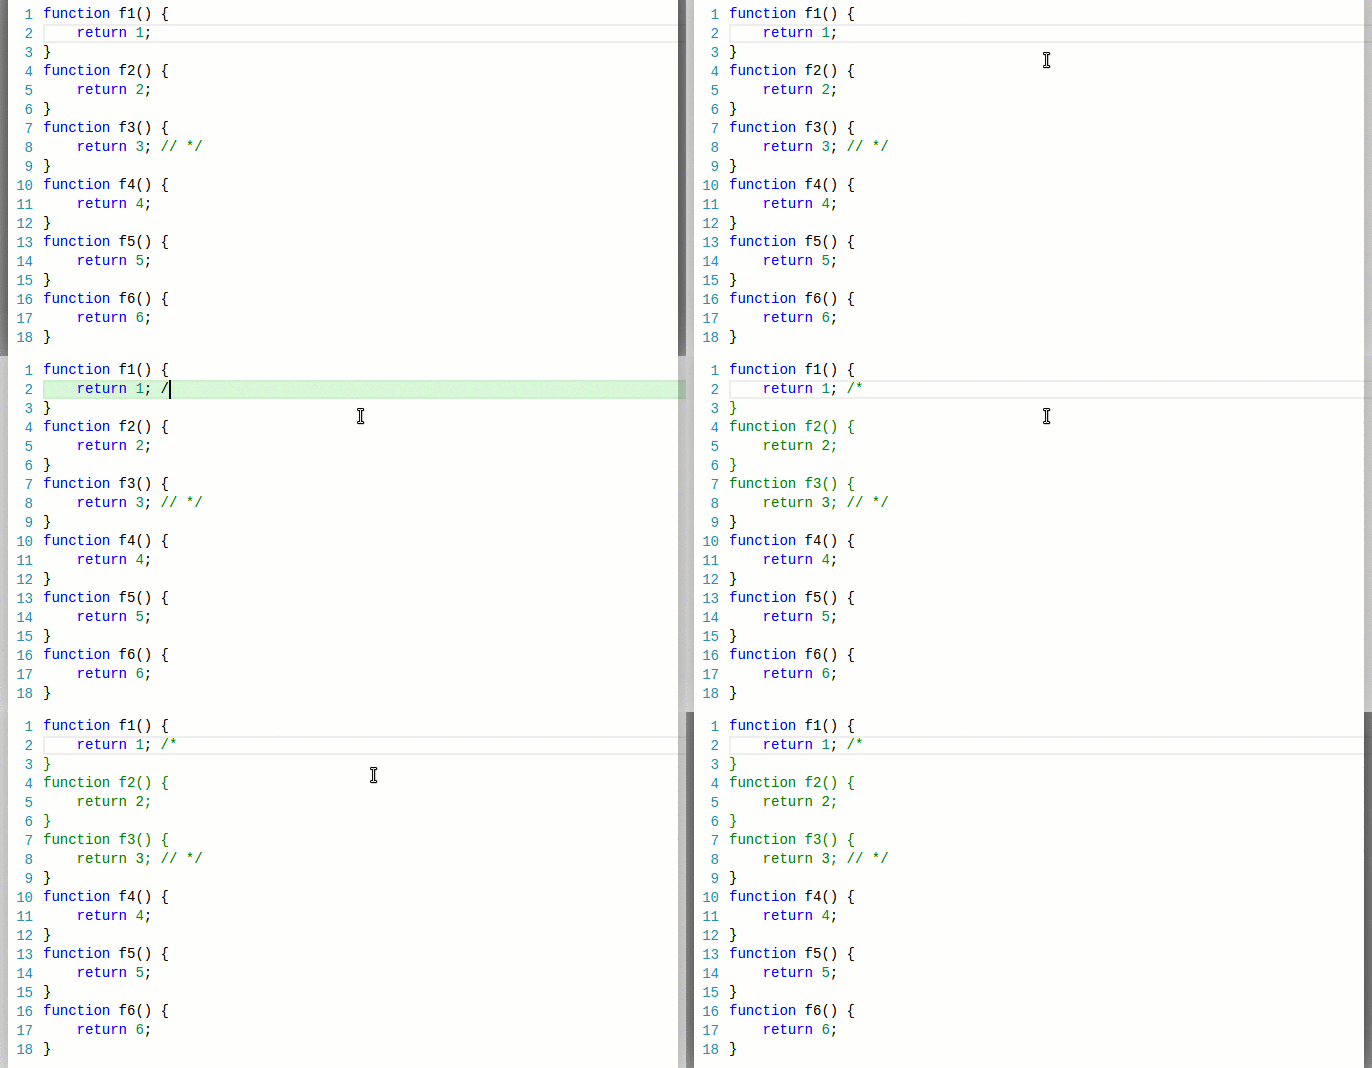
更罕见的是,在一行上输入会导致当前行及下面的一些行重新标记/重新绘制(直到遇到相同的结束状态):
我们过去如何表示令牌
VS Code 中的编辑器代码在 VS Code 存在之前就已经编写好了。它以 Monaco Editor 的形式在多个 Microsoft 项目中发布,包括 Internet Explorer 的 F12 工具。我们的一个要求是减少内存使用。
过去,我们手动编写分词器(即使在今天,也没有可行的方法在浏览器中解释TextMate语法,但那是另一个故事)。对于下面这行代码,我们会从手动编写的分词器中得到以下标记:

tokens = [
  { startIndex: 0, type: 'keyword.js' },
  { startIndex: 8, type: '' },
  { startIndex: 9, type: 'identifier.js' },
  { startIndex: 11, type: 'delimiter.paren.js' },
  { startIndex: 12, type: 'delimiter.paren.js' },
  { startIndex: 13, type: '' },
  { startIndex: 14, type: 'delimiter.curly.js' }
];
在Chrome中,保留那个tokens数组占用了648字节,因此存储这样的对象在内存方面是相当昂贵的(每个对象实例必须为其原型、属性列表等预留空间)。我们当前的机器确实有很多RAM,但为15个字符的行存储648字节是不可接受的。
因此,当时我们提出了一种二进制格式来存储令牌,这种格式一直使用到并包括VS Code 1.8。考虑到会有重复的令牌类型,我们将它们收集在一个单独的映射中(每个文件),并执行类似以下的操作:
//     0        1               2                  3                      4
map = ['', 'keyword.js', 'identifier.js', 'delimiter.paren.js', 'delimiter.curly.js'];
tokens = [
  { startIndex: 0, type: 1 },
  { startIndex: 8, type: 0 },
  { startIndex: 9, type: 2 },
  { startIndex: 11, type: 3 },
  { startIndex: 12, type: 3 },
  { startIndex: 13, type: 0 },
  { startIndex: 14, type: 4 }
];
然后我们会在JavaScript数字的53位尾数中编码startIndex(32位)和type(16位)。我们的tokens数组最终会看起来像这样,而map数组将在整个文件中重复使用:
tokens = [
  //       type                 startIndex
  4294967296, // 0000000000000001 00000000000000000000000000000000
  8, // 0000000000000000 00000000000000000000000000001000
  8589934601, // 0000000000000010 00000000000000000000000000001001
  12884901899, // 0000000000000011 00000000000000000000000000001011
  12884901900, // 0000000000000011 00000000000000000000000000001100
  13, // 0000000000000000 00000000000000000000000000001101
  17179869198 // 0000000000000100 00000000000000000000000000001110
];
在Chrome中,保留这个tokens数组占用了104字节。元素本身应该只占用56字节(7个64位数字),其余部分可能是由于v8存储了与数组相关的其他元数据,或者可能是以2的幂次方分配后备存储。然而,内存节省是显而易见的,并且每行有更多tokens时效果更好。我们对这种方法感到满意,并且从那时起一直在使用这种表示方式。
注意:可能有更紧凑的方式来存储令牌,但将它们存储在可进行二分搜索的线性格式中,在内存使用和访问性能方面为我们提供了最佳的折衷方案。
Tokens <-> 主题匹配
我们认为遵循浏览器最佳实践是一个好主意,例如将样式留给CSS处理,因此在渲染上述行时,我们将使用map解码二进制令牌,然后使用令牌类型进行渲染,如下所示:
<span class="token keyword js">function</span>
<span class="token"> </span>
<span class="token identifier js">f1</span>
<span class="token delimiter paren js">(</span>
<span class="token delimiter paren js">)</span>
<span class="token"> </span>
<span class="token delimiter curly js">{</span>
我们会用CSS来编写我们的主题(例如Visual Studio主题):
...
.monaco-editor.vs .token.delimiter          { color: #000000; }
.monaco-editor.vs .token.keyword            { color: #0000FF; }
.monaco-editor.vs .token.keyword.flow       { color: #AF00DB; }
...
结果相当不错,我们可以在某个地方切换一个类名,并立即将新主题应用到编辑器中。
TextMate 语法
为了推出VS Code,我们大约有10个手写的分词器,主要用于网络语言,这对于一个通用的桌面代码编辑器来说显然是不够的。于是我们引入了TextMate语法,这是一种描述性的形式,用于指定分词规则,已被众多编辑器采用。不过有一个问题,TextMate语法的工作方式与我们手写的分词器不太一样。
TextMate 语法通过使用开始/结束状态或 while 状态,可以推送跨越多个标记的作用域。以下是在 JavaScript TextMate 语法下的相同示例(为简洁起见,忽略空格):

VS Code 1.8 中的 TextMate 语法
如果我们要对作用域堆栈进行切片,每个标记基本上都会获得一个作用域名称数组,我们会从标记器中得到类似以下内容:

tokens = [
  { startIndex: 0, scopes: ['source.js', 'meta.function.js', 'storage.type.function.js'] },
  { startIndex: 8, scopes: ['source.js', 'meta.function.js'] },
  {
    startIndex: 9,
    scopes: [
      'source.js',
      'meta.function.js',
      'meta.definition.function.js',
      'entity.name.function.js'
    ]
  },
  {
    startIndex: 11,
    scopes: [
      'source.js',
      'meta.function.js',
      'meta.parameters.js',
      'punctuation.definition.parameters.js'
    ]
  },
  { startIndex: 13, scopes: ['source.js', 'meta.function.js'] },
  {
    startIndex: 14,
    scopes: [
      'source.js',
      'meta.function.js',
      'meta.block.js',
      'punctuation.definition.block.js'
    ]
  }
];
所有的令牌类型都是字符串,而我们的代码尚未准备好处理字符串数组,更不用说对令牌的二进制编码的影响了。因此,我们决定采用以下策略将范围数组“近似”为单个字符串:
- 忽略最不具体的范围(即
source.js);它很少增加任何价值。 - 在每个剩余的作用域上按
"."进行分割。 - 去重唯一的部分。
- 使用稳定的排序函数对剩余的部分进行排序(不一定是字典排序)。
- 将片段连接在
"."上。
tokens = [
  { startIndex: 0, type: 'meta.function.js.storage.type' },
  { startIndex: 9, type: 'meta.function.js' },
  { startIndex: 9, type: 'meta.function.js.definition.entity.name' },
  { startIndex: 11, type: 'meta.function.js.definition.parameters.punctuation' },
  { startIndex: 13, type: 'meta.function.js' },
  { startIndex: 14, type: 'meta.function.js.definition.punctuation.block' }
];
*: 我们所做的事情完全是错误的,用“近似”这个词来形容它已经是非常客气了 :)。
这些标记将“适应”并遵循与手动编写的标记器相同的代码路径(获取二进制编码),然后也会以相同的方式呈现:
<span class="token meta function js storage type">function</span>
<span class="token meta function js"> </span>
<span class="token meta function js definition entity name">f1</span>
<span class="token meta function js definition parameters punctuation">()</span>
<span class="token meta function js"> </span>
<span class="token meta function js definition punctuation block">{</span>
TextMate 主题
TextMate 主题与范围选择器一起工作,这些选择器选择具有特定范围的标记,并将主题信息(如颜色、加粗等)应用于它们。
给定一个具有以下范围的令牌:
//            C                     B                             A
scopes = ['source.js', 'meta.definition.function.js', 'entity.name.function.js'];
以下是一些简单的选择器,它们会匹配,并按它们的排名(降序)排序:
| Selector | C | B | A |
|---|---|---|---|
| source | source.js | meta.definition.function.js | entity.name.function.js |
| source.js | source.js | meta.definition.function.js | entity.name.function.js |
| meta | source.js | meta.definition.function.js | entity.name.function.js |
| meta.definition | source.js | meta.definition.function.js | entity.name.function.js |
| meta.definition.function | source.js | meta.definition.function.js | entity.name.function.js |
| entity | source.js | meta.definition.function.js | entity.name.function.js |
| entity.name | source.js | meta.definition.function.js | entity.name.function.js |
| entity.name.function | source.js | meta.definition.function.js | entity.name.function.js |
| entity.name.function.js | source.js | meta.definition.function.js | entity.name.function.js |
观察:
entity胜过meta.definition.function,因为它匹配了一个更具体的范围(分别是A胜过B)。
观察:
entity.name胜过entity,因为它们都匹配相同的范围(A),但entity.name比entity更具体。
父选择器
为了使事情稍微复杂一些,TextMate主题还支持父选择器。以下是一些使用简单选择器和父选择器的示例(再次按它们的排名降序排列):
| Selector | C | B | A |
|---|---|---|---|
| meta | source.js | meta.definition.function.js | entity.name.function.js |
| source meta | source.js | meta.definition.function.js | entity.name.function.js |
| source.js meta | source.js | meta.definition.function.js | entity.name.function.js |
| meta.definition | source.js | meta.definition.function.js | entity.name.function.js |
| source meta.definition | source.js | meta.definition.function.js | entity.name.function.js |
| entity | source.js | meta.definition.function.js | entity.name.function.js |
| source entity | source.js | meta.definition.function.js | entity.name.function.js |
| meta.definition entity | source.js | meta.definition.function.js | entity.name.function.js |
| entity.name | source.js | meta.definition.function.js | entity.name.function.js |
| source entity.name | source.js | meta.definition.function.js | entity.name.function.js |
观察:
source entity胜过entity,因为它们都匹配相同的范围(A),但source entity还匹配一个父范围(C)。
观察:
entity.name胜过source entity,因为它们都匹配相同的范围(A),但entity.name比entity更具体。
注意:还有第三种选择器,涉及排除范围的选择器,我们在这里不讨论。我们没有添加对这种选择器的支持,并且我们注意到它在实际使用中很少见。
VS Code 1.8 中的 TextMate 主题
以下是两个Monokai主题规则(为了简洁起见,这里以JSON格式展示;原始格式为XML):
...
// Function name
{ "scope": "entity.name.function", "fontStyle": "", "foreground":"#A6E22E" }
...
// Class name
{ "scope": "entity.name.class", "fontStyle": "underline", "foreground":"#A6E22E" }
...
在 VS Code 1.8 中,为了匹配我们的“近似”范围,我们将生成以下动态 CSS 规则:
...
/* Function name */
.entity.name.function { color: #A6E22E; }
...
/* Class name */
.entity.name.class { color: #A6E22E; text-decoration: underline; }
...
然后我们会让CSS来匹配“近似”的范围与“近似”的规则。但CSS的匹配规则与TextMate选择器的匹配规则不同,特别是在排名方面。CSS排名基于匹配的类名数量,而TextMate选择器排名则有明确的规则关于范围特异性。
这就是为什么在VS Code中的TextMate主题看起来还不错,但从未完全像其作者预期的那样。有时,差异会很小,但有时这些差异会完全改变主题的感觉。
一些星星排成一行
随着时间的推移,我们已经逐步淘汰了手写的分词器(最后一个用于HTML的分词器仅在几个月前被淘汰)。因此,在今天的VS Code中,所有文件都使用TextMate语法进行分词。对于Monaco Editor,我们已经迁移到使用Monarch(一种描述性分词引擎,本质上与TextMate语法相似,但更具表现力并且可以在浏览器中运行)来处理大多数支持的语言,并且我们为手动分词器添加了一个包装器。总的来说,这意味着支持一种新的分词格式需要更改3个分词提供者(TextMate、Monarch和手动包装器),而不会超过10个。
几个月前,我们审查了VS Code核心中所有读取令牌类型的代码,我们注意到这些消费者只关心字符串、正则表达式或注释。例如,括号匹配逻辑会忽略包含范围"string"、"comment"或"regex"的令牌。
最近,我们得到了内部合作伙伴(微软内部使用Monaco Editor的其他团队)的确认,他们不再需要在Monaco Editor中支持IE9和IE10。
可能最重要的是,编辑器中投票最多的功能是minimap支持。为了在合理的时间内渲染minimap,我们不能使用DOM节点和CSS匹配。我们可能会使用canvas,并且我们需要知道JavaScript中每个标记的颜色,这样我们就可以用正确的颜色绘制那些小字母。
也许我们最大的突破是,我们不需要存储令牌,也不需要它们的范围,因为令牌仅在主题匹配它们或括号匹配跳过字符串方面产生效果。
最后,VS Code 1.9 的新功能
表示一个TextMate主题
这是一个非常简单的主题可能看起来的样子:
theme = [
  {                                  "foreground": "#F8F8F2"                           },
  { "scope": "var",                  "foreground": "#F8F8F2"                           },
  { "scope": "var.identifier",       "foreground": "#00FF00", "fontStyle": "bold"      },
  { "scope": "meta var.identifier",  "foreground": "#0000FF"                           },
  { "scope": "constant",             "foreground": "#100000", "fontStyle": "italic"    },
  { "scope": "constant.numeric",     "foreground": "#200000"                           },
  { "scope": "constant.numeric.hex",                          "fontStyle": "bold"      },
  { "scope": "constant.numeric.oct",                          "fontStyle": "underline" },
  { "scope": "constant.numeric.dec", "foreground": "#300000"                           },
];
加载时,我们将为主题中出现的每种独特颜色生成一个ID,并将其存储到颜色映射中(类似于我们上面为令牌类型所做的操作):
//                          1          2          3          4          5           6
colorMap = ["reserved", "#F8F8F2", "#00FF00", "#0000FF", "#100000", "#200000", "#300000"]
theme = [
  {                                  "foreground": 1                           },
  { "scope": "var",                  "foreground": 1,                          },
  { "scope": "var.identifier",       "foreground": 2, "fontStyle": "bold"      },
  { "scope": "meta var.identifier",  "foreground": 3                           },
  { "scope": "constant",             "foreground": 4, "fontStyle": "italic"    },
  { "scope": "constant.numeric",     "foreground": 5                           },
  { "scope": "constant.numeric.hex",                  "fontStyle": "bold"      },
  { "scope": "constant.numeric.oct",                  "fontStyle": "underline" },
  { "scope": "constant.numeric.dec", "foreground": 6                           },
];
然后我们将从主题规则生成一个Trie数据结构,其中每个节点都持有已解析的主题选项:
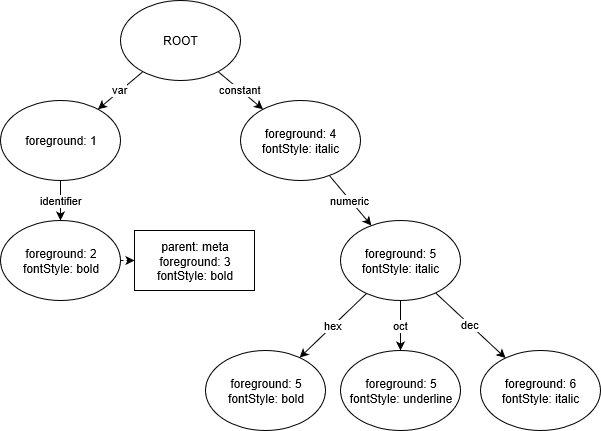
观察:
constant.numeric.hex和constant.numeric.oct的节点包含将前景色更改为5的指令,因为它们从constant.numeric继承 了这一指令。
观察:
var.identifier的节点保留了额外的父规则meta var.identifier,并将相应地回答查询。
当我们想要找出一个范围应该如何主题化时,我们可以查询这个trie。
例如:
| Query | Results |
|---|---|
| constant | set foreground to 4, fontStyle to italic |
| constant.numeric | set foreground to 5, fontStyle to italic |
| constant.numeric.hex | set foreground to 5, fontStyle to bold |
| var | set foreground to 1 |
| var.baz | set foreground to 1 (matches var) |
| baz | do nothing (no match) |
| var.identifier | if there is a parent scope meta, then set foreground to 3, fontStyle to bold, otherwise, set foreground to 2, fontStyle to bold |
分词的变化
VS Code 中使用的所有 TextMate 标记化代码都存在于一个独立的项目中,vscode-textmate,该项目可以独立于 VS Code 使用。我们已经改变了在 vscode-textmate 中表示作用域堆栈的方式,改为使用不可变的链表,该链表还存储了完全解析的 metadata。
当将新作用域推入作用域堆栈时,我们将在主题树中查找新作用域。然后,我们可以立即根据我们从作用域堆栈继承的内容以及主题树返回的内容,计算作用域列表的完全解析的所需前景或字体样式。
一些示例:
| Scope Stack | Metadata |
|---|---|
| ["source.js"] | foreground is 1, font style is regular (the default rule without a scope selector) |
| ["source.js","constant"] | foreground is 4, fontStyle is italic |
| ["source.js","constant","baz"] | foreground is 4, fontStyle is italic |
| ["source.js","var.identifier"] | foreground is 2, fontStyle is bold |
| ["source.js","meta","var.identifier"] | foreground is 3, fontStyle is bold |
从作用域堆栈弹出时,无需计算任何内容,因为我们可以直接使用与先前作用域列表元素一起存储的元数据。
这是表示范围列表中元素的TypeScript类:
export class ScopeListElement {
    public readonly parent: ScopeListElement;
    public readonly scope: string;
    public readonly metadata: number;
    ...
}
我们存储32位的元数据:
/**
 * - -------------------------------------------
 *     3322 2222 2222 1111 1111 1100 0000 0000
 *     1098 7654 3210 9876 5432 1098 7654 3210
 * - -------------------------------------------
 *     xxxx xxxx xxxx xxxx xxxx xxxx xxxx xxxx
 *     bbbb bbbb bfff ffff ffFF FTTT LLLL LLLL
 * - -------------------------------------------
 *  - L = LanguageId (8 bits)
 *  - T = StandardTokenType (3 bits)
 *  - F = FontStyle (3 bits)
 *  - f = foreground color (9 bits)
 *  - b = background color (9 bits)
 */
最后,而不是从标记化引擎发出标记作为对象:
// These are generated using the Monokai theme.
tokens_before = [
  { startIndex: 0, scopes: ['source.js', 'meta.function.js', 'storage.type.function.js'] },
  { startIndex: 8, scopes: ['source.js', 'meta.function.js'] },
  {
    startIndex: 9,
    scopes: [
      'source.js',
      'meta.function.js',
      'meta.definition.function.js',
      'entity.name.function.js'
    ]
  },
  {
    startIndex: 11,
    scopes: [
      'source.js',
      'meta.function.js',
      'meta.parameters.js',
      'punctuation.definition.parameters.js'
    ]
  },
  { startIndex: 13, scopes: ['source.js', 'meta.function.js'] },
  {
    startIndex: 14,
    scopes: [
      'source.js',
      'meta.function.js',
      'meta.block.js',
      'punctuation.definition.block.js'
    ]
  }
];

// Every even index is the token start index, every odd index is the token metadata.
// We get fewer tokens because tokens with the same metadata get collapsed
tokens_now = [
  // bbbbbbbbb fffffffff FFF TTT LLLLLLLL
  0,
  16926743, // 000000010 000001001 001 000 00010111
  8,
  16793623, // 000000010 000000001 000 000 00010111
  9,
  16859159, // 000000010 000000101 000 000 00010111
  11,
  16793623 // 000000010 000000001 000 000 00010111
];
它们通过以下方式渲染:
<span class="mtk9 mtki">function</span>
<span class="mtk1"> </span>
<span class="mtk5">f1</span>
<span class="mtk1">() {</span>

令牌直接从分词器返回为Uint32Array。我们保留了底层的ArrayBuffer,对于上面的例子,在Chrome中占用了96字节。元素本身应该只占用32字节(8个32位数字),但我们可能再次观察到一些v8元数据的开销。
一些数字
为了获取以下测量结果,我选择了三个具有不同特征和不同语法的文件:
| File name | File size | Lines | Language | Observation |
|---|---|---|---|---|
| checker.ts | 1.18 MB | 22,253 | TypeScript | Actual source file used in TypeScript compiler |
| bootstrap.min.css | 118.36 KB | 12 | CSS | Minified CSS file |
| sqlite3.c | 6.73 MB | 200,904 | C | Concatenated distribution file of SQLite |
我已经在一台性能较强的Windows桌面机器上运行了测试(使用的是32位的Electron)。
为了进行公平的比较,我不得不对源代码进行一些更改,例如确保在两个VS Code版本中使用完全相同的语法,关闭两个版本中的丰富语言功能,或者解除VS Code 1.8中不再存在的100层堆栈深度限制等。我还必须将bootstrap.min.css拆分为多行,以使每行不超过20k字符。
分词时间
分词操作在UI线程上以异步方式运行,因此我不得不添加一些代码来强制其同步运行,以便测量以下时间(展示的是10次运行的中位数):
| File name | File size | VS Code 1.8 | VS Code 1.9 | Speed-up |
|---|---|---|---|---|
| checker.ts | 1.18 MB | 4606.80 ms | 3939.00 ms | 14.50% |
| bootstrap.min.css | 118.36 KB | 776.76 ms | 416.28 ms | 46.41% |
| sqlite3.c | 6.73 MB | 16010.42 ms | 10964.42 ms | 31.52% |
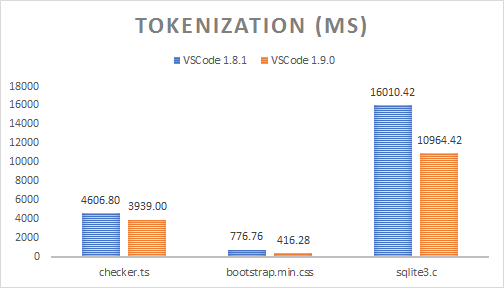
尽管现在分词也进行主题匹配,但时间的节省可以通过对每一行进行单次遍历来解释。以前,会有一个分词遍历,一个二次遍历来“近似”范围到字符串,以及一个第三次遍历来对分词进行二进制编码,而现在分词直接从TextMate分词引擎以二进制编码的方式生成。需要垃圾回收的生成对象的数量也大幅减少。
内存使用情况
折叠功能消耗了大量内存,特别是对于大文件(这是另一个优化的时机),因此我收集了以下关闭折叠功能时的堆快照数据。这显示了模型占用的内存,不包括原始文件字符串的内存:
| File name | File size | VS Code 1.8 | VS Code 1.9 | Memory savings |
|---|---|---|---|---|
| checker.ts | 1.18 MB | 3.37 MB | 2.61 MB | 22.60% |
| bootstrap.min.css | 118.36 KB | 267.00 KB | 201.33 KB | 24.60% |
| sqlite3.c | 6.73 MB | 27.49 MB | 21.22 MB | 22.83% |
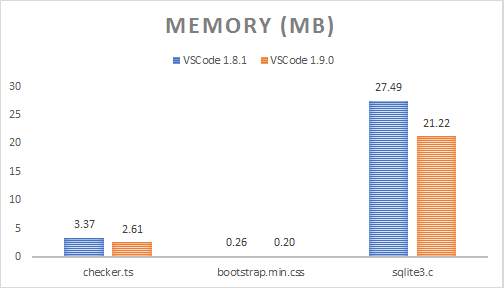
内存使用量的减少可以解释为不再保留令牌映射、具有相同元数据的连续令牌的合并,以及使用
ArrayBuffer作为后备存储。我们可以通过始终将仅包含空格的令牌合并到前一个令牌中来进一步改进,因为空格呈现的颜色无关紧要(空格是不可见的)。
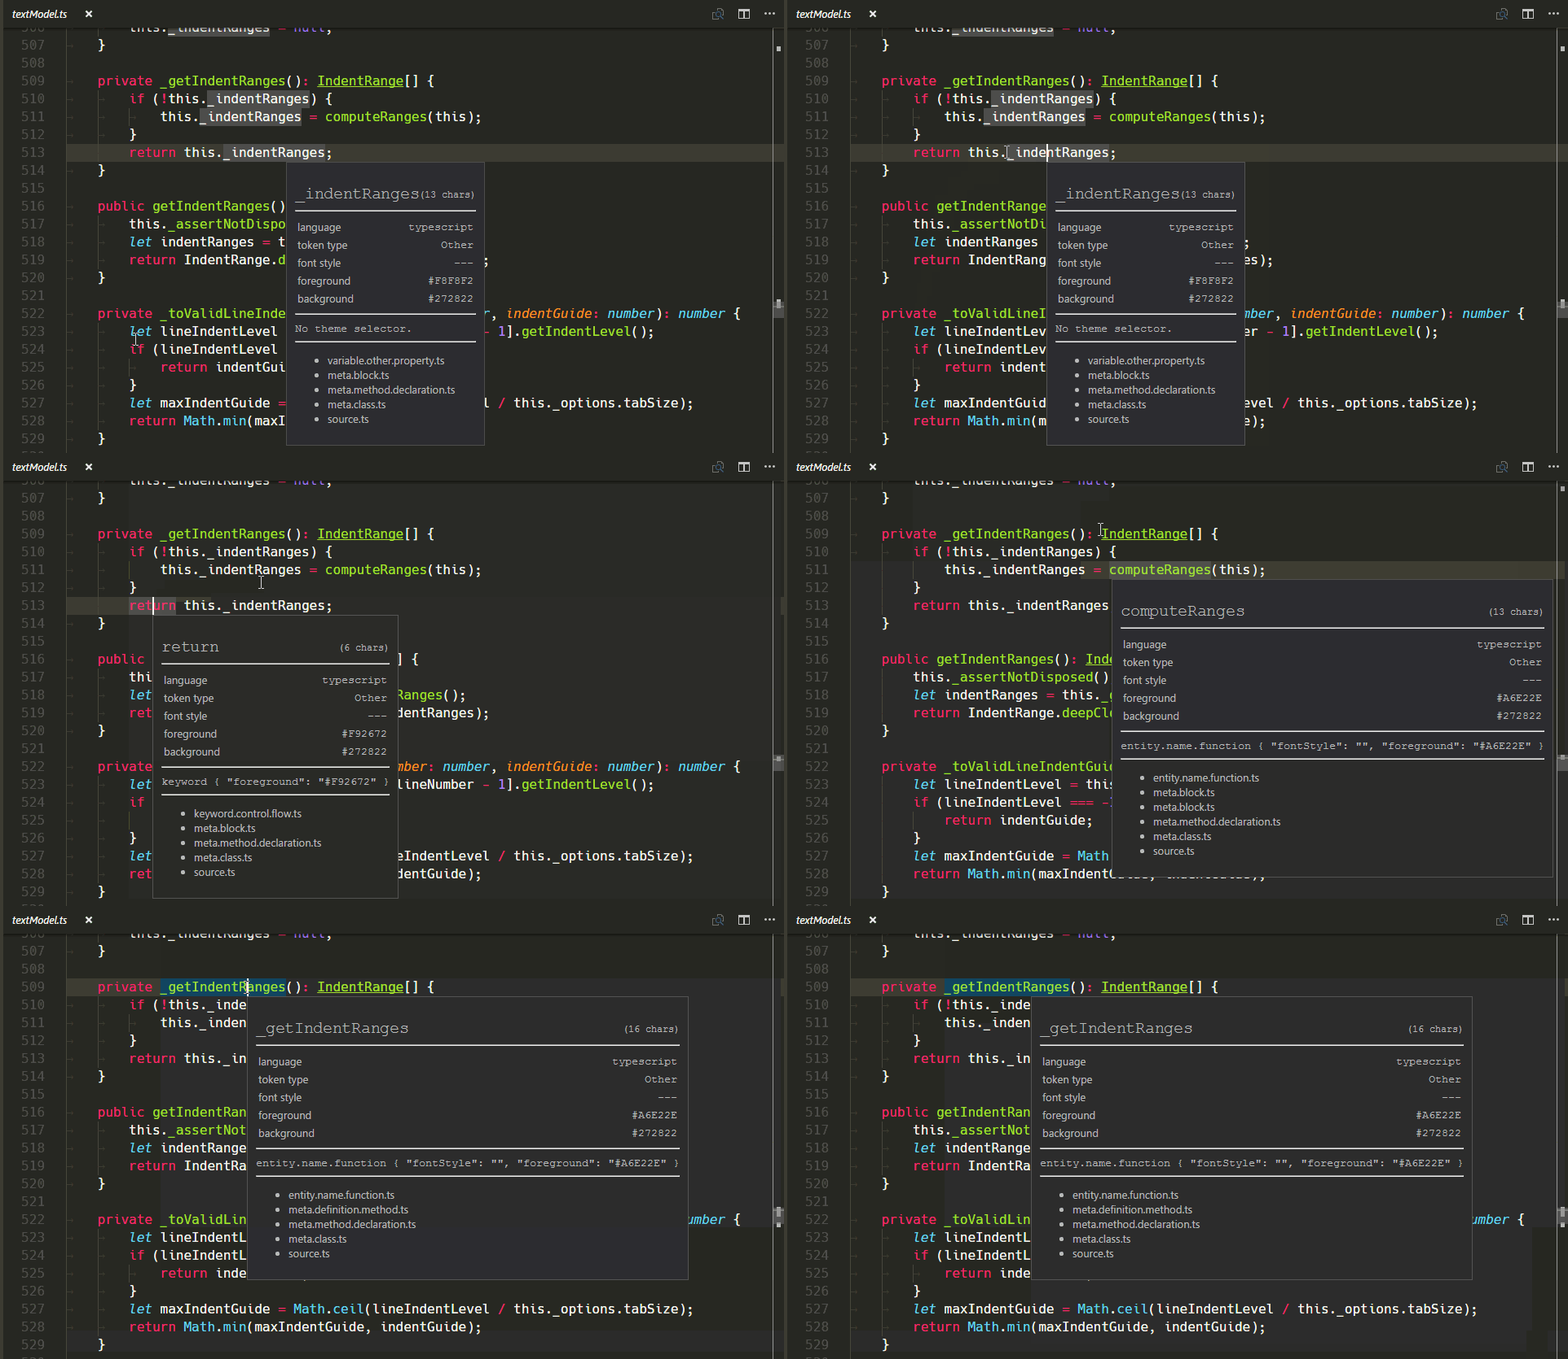
新的TextMate范围检查器小部件
我们添加了一个新的小部件来帮助编写和调试主题或语法:您可以在命令面板中使用开发者:检查编辑器标记和作用域来运行它(⇧⌘P (Windows, Linux Ctrl+Shift+P))。
验证更改
在编辑器的这个组件中进行更改存在一些严重的风险,因为我们的方法中的任何错误(在新的trie创建代码中,在新的二进制编码格式中等)可能会导致用户可见的巨大差异。
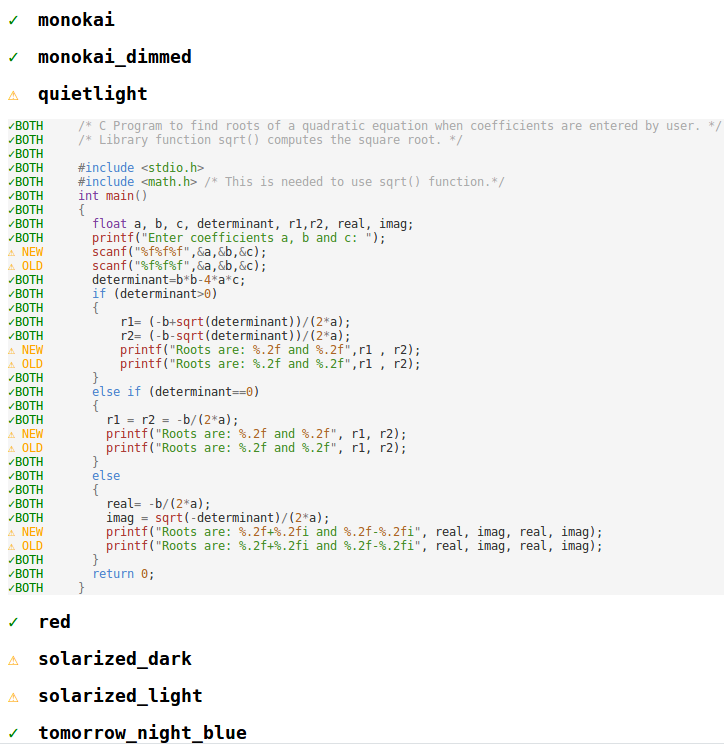
在 VS Code 中,我们有一个集成测试套件,用于断言我们提供的所有编程语言在我们编写的五个主题(Light、Light+、Dark、Dark+、High Contrast)中的颜色。这些测试在我们对其中一个主题进行更改或更新某个语法时非常有用。每个73个集成测试都由一个固定文件(例如 test.c)和五个主题的预期颜色(test_c.json)组成,并且它们在我们每次提交时在我们的 CI 构建 上运行。
为了验证标记化的更改,我们使用旧的基于CSS的方法收集了这些测试的着色结果,涵盖了所有我们提供的14个主题(不仅仅是我们编写的五个主题)。然后,在每次更改后,我们使用新的基于trie的逻辑运行相同的测试,并使用自定义构建的视觉差异(和补丁)工具,我们会查看每一个颜色差异,并找出颜色变化的根本原因。我们使用这种技术至少发现了2个错误,并且我们能够更改我们的五个主题,以在VS Code版本之间实现最小的颜色变化:
之前和之后
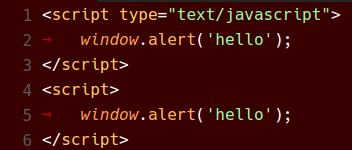
以下是VS Code 1.8和现在VS Code 1.9中出现的各种颜色主题:
Monokai主题


安静的光线主题


红色主题
总结
我希望您会欣赏从升级到VS Code 1.9中获得的额外CPU时间和RAM,并且我们可以继续使您能够以高效和愉快的方式编写代码。
编程愉快!
Alexandru Dima, VS Code 团队成员 @alexdima123