如何使用DALL·E和Segment Anything创建动态遮罩
Segment Anything是Meta推出的一个模型,可用于选择图像的部分。结合DALL·E的能力,可以修补图像的指定部分,您可以使用Segment Anything轻松选择要修改的图像的任何部分。
在这个笔记本中,我们将使用�这些工具成为时尚设计师,并动态地用定制的原创作品替换我们数字模特的服装。该笔记本遵循以下流程: - 设置: 初始化您的库和任何位置目录。 - 生成原始图像: 创建一个我们将从中创建动态遮罩的原始图像。 - 生成遮罩: 使用Segment Anything创建一个动态遮罩。 - 创建新图像: 生成一个新图像,其中遮罩区域被修补为一个新的提示。
设置
要开始使用,我们需要按照 Meta 开源的 Segment Anything (SAM)
模型的说明进行操作。截至2023年5月,关键步骤包括: -
安装 Pytorch(版本1.7+)。 -
使用
pip install git+https://github.com/facebookresearch/segment-anything.git
安装库。 - 使用
pip install opencv-python pycocotools matplotlib onnxruntime onnx
安装依赖项。 - 下载要使用的model
checkpoint(默认大小为2.4
GB)。
!pip install torch torchvision torchaudio
!pip install git+https://github.com/facebookresearch/segment-anything.git
!pip install opencv-python pycocotools matplotlib onnxruntime onnx
!pip install requests
!pip install openai
!pip install numpy
!wget https://dl.fbaipublicfiles.com/segment_anything/sam_vit_h_4b8939.pth
import cv2
import matplotlib.pyplot as plt
import matplotlib.image as mpimg
from matplotlib import rcParams
import numpy as np
from openai import OpenAI
import os
from PIL import Image
import requests
from segment_anything import sam_model_registry, SamAutomaticMaskGenerator, SamPredictor
import torch

# 设置生成图像和编辑图像的目录
base_image_dir = os.path.join("images", "01_generations")
mask_dir = os.path.join("images", "02_masks")
edit_image_dir = os.path.join("images", "03_edits")

# 指向你下载的SAM模型
sam_model_filepath = "./sam_vit_h_4b8939.pth"

# 启动SAM模型
sam = sam_model_registry["default"](checkpoint=sam_model_filepath)

# 启动OpenAI客户端
client = OpenAI(api_key=os.environ.get("OPENAI_API_KEY", "<your OpenAI API key if not set as env var>"))
生成原始图像
首先,我们将创建一个原始图像,然后我们将从中生成蒙版。
def process_dalle_images(response, filename, image_dir):
    # 保存图像
    urls = [datum.url for datum in response.data]  # 提取网址
    images = [requests.get(url).content for url in urls]  # 下载图片
    image_names = [f"{filename}_{i + 1}.png" for i in range(len(images))]  # 创建名称
    filepaths = [os.path.join(image_dir, name) for name in image_names]  # 创建文件路径
    for image, filepath in zip(images, filepaths):  # 遍历所有变体
        with open(filepath, "wb") as image_file:  # 打开文件
            image_file.write(image)  # 将图像写入文件

    return filepaths
dalle_prompt = '''
Full length, zoomed out photo of our premium Lederhosen-inspired jumpsuit.
Showcase the intricate hand-stitched details and high-quality leather, while highlighting the perfect blend of Austrian heritage and modern fashion.
This piece appeals to a sophisticated, trendsetting audience who appreciates cultural fusion and innovative design.
'''
# 生成您的图像
generation_response = client.images.generate(
    model = "dall-e-3",
    prompt=dalle_prompt,
    n=3,
    size="1024x1024",
    response_format="url",
)
filepaths = process_dalle_images(generation_response, "generation", base_image_dir)
# 打印新一代
for filepath in filepaths:
    print(filepath)
    display(Image.open(filepath))
生成掩模
接下来,我们将加载其中一张图片并生成掩模。
在这个演示中,我们选择了一种用户体验,在图像上“点击”一个点来生成掩模。然而,Meta提供了一些示例笔记本,展示了如何为图像生成所有可能的掩模,绘制框以及其他一些有用的方法。
# 选择一张你生成的图片
chosen_image = "images/01_generations/generation_2.png"
# 使用matplotlib显示掩码的函数
def show_mask(mask, ax):
    color = np.array([30 / 255, 144 / 255, 255 / 255, 0.6])
    h, w = mask.shape[-2:]
    mask_image = mask.reshape(h, w, 1) * color.reshape(1, 1, -1)
    ax.imshow(mask_image)


# 显示我们曾经去过的地方的功能 "clicked"
def show_points(coords, labels, ax, marker_size=375):
    pos_points = coords[labels == 1]
    neg_points = coords[labels == 0]
    ax.scatter(
        pos_points[:, 0],
        pos_points[:, 1],
        color="green",
        marker="*",
        s=marker_size,
        edgecolor="white",
        linewidth=1.25,
    )
    ax.scatter(
        neg_points[:, 0],
        neg_points[:, 1],
        color="red",
        marker="*",
        s=marker_size,
        edgecolor="white",
        linewidth=1.25,
    )
# 使用OpenCV加载选定的图像
image = cv2.imread(chosen_image)
image = cv2.cvtColor(image, cv2.COLOR_BGR2RGB)

# 展示我们选定的图像
plt.figure(figsize=(10, 10))
plt.imshow(image)
plt.axis("on")
plt.show()
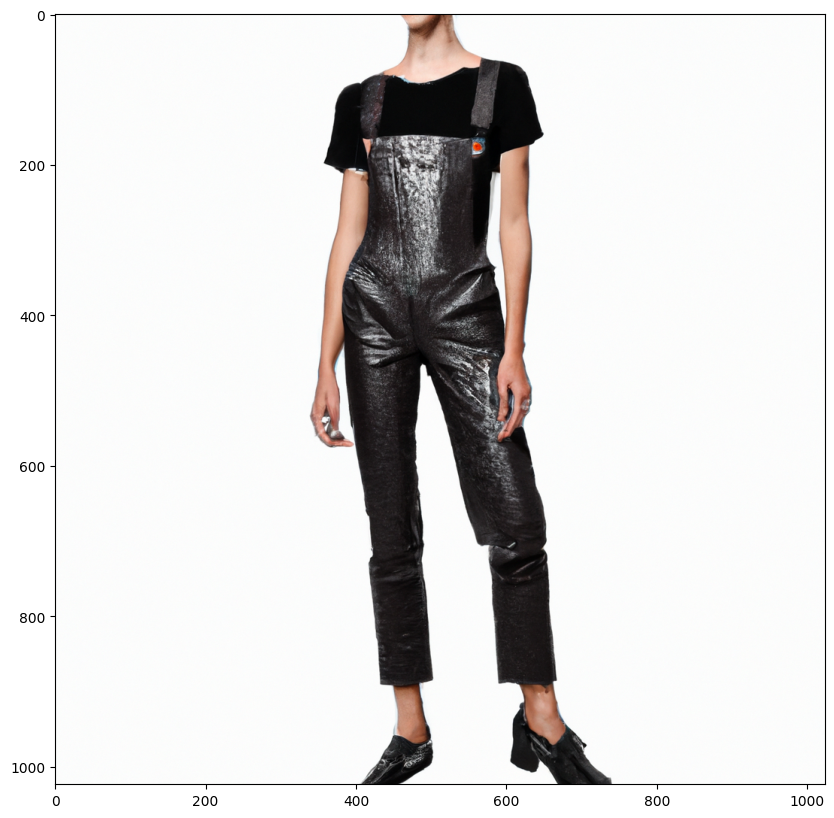
# Set the pixel coordinates for our "click" to assign masks
input_point = np.array([[525, 325]])
input_label = np.array([1])

# 显示我们点击的点
plt.figure(figsize=(10, 10))
plt.imshow(image)
show_points(input_point, input_label, plt.gca())
plt.axis("on")
plt.show()

# 使用Segment Anything模型初始化预测器
predictor = SamPredictor(sam)
predictor.set_image(image)

# 使用预测器来收集我们点击点的遮罩。
masks, scores, logits = predictor.predict(
    point_coords=input_point,
    point_labels=input_label,
    multimask_output=True,
)

# 检查形状——应该是与我们的图像尺寸相同的三张掩膜。
masks.shape
(3, 1024, 1024)
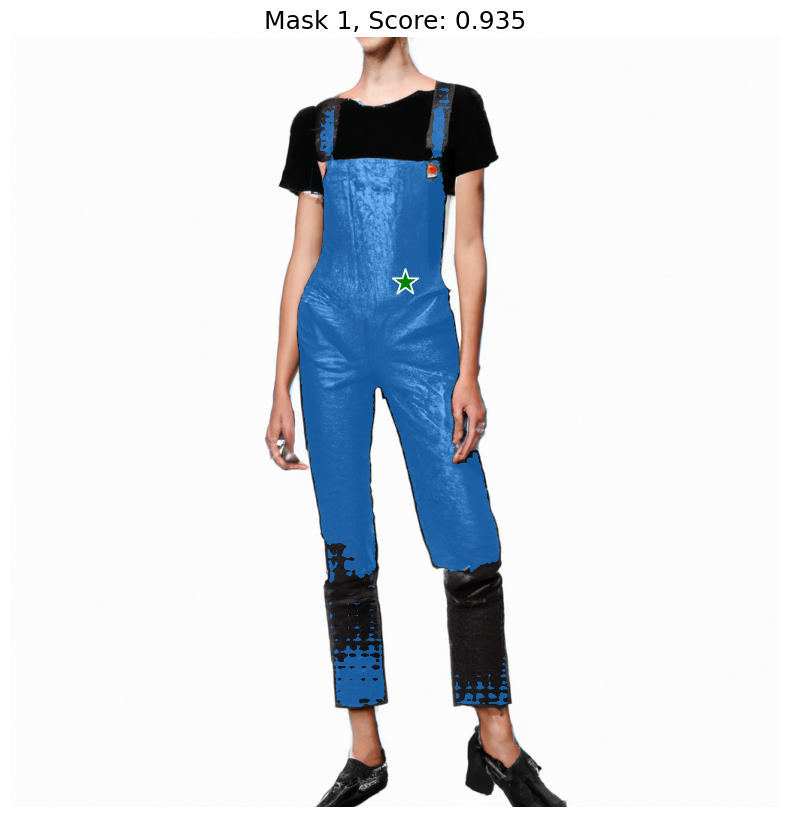
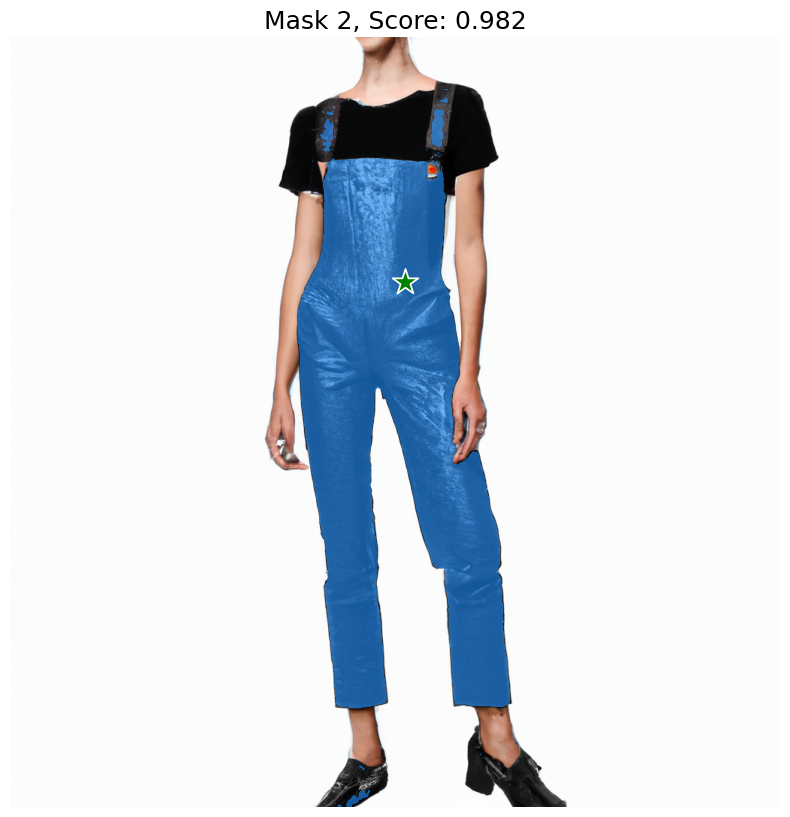
# 显示我们可以选择的可能掩码及其置信度
for i, (mask, score) in enumerate(zip(masks, scores)):
    plt.figure(figsize=(10, 10))
    plt.imshow(image)
    show_mask(mask, plt.gca())
    show_points(input_point, input_label, plt.gca())
    plt.title(f"Mask {i+1}, Score: {score:.3f}", fontsize=18)
    plt.axis("off")
    plt.show()
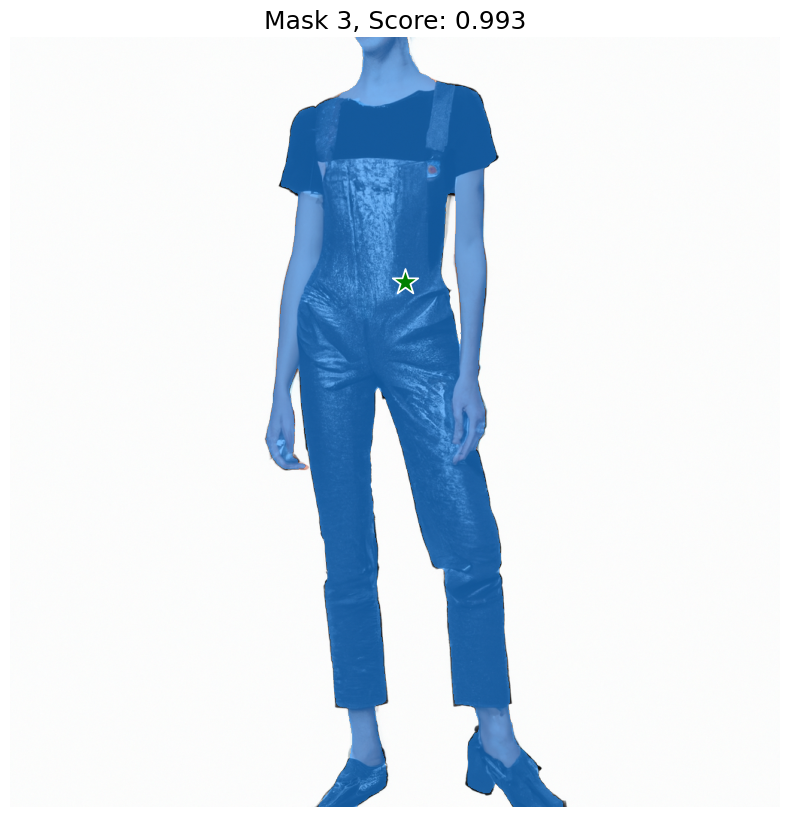
# Choose which mask you'd like to use
chosen_mask = masks[1]

# We'll now reverse the mask so that it is clear and everything else is white
chosen_mask = chosen_mask.astype("uint8")
chosen_mask[chosen_mask != 0] = 255
chosen_mask[chosen_mask == 0] = 1
chosen_mask[chosen_mask == 255] = 0
chosen_mask[chosen_mask == 1] = 255
# 创建一个基础空白掩膜
width = 1024
height = 1024
mask = Image.new("RGBA", (width, height), (0, 0, 0, 1))  # 创建一个不透明的图像蒙版

# 将掩码转换回像素,以替换第三维度
pix = np.array(mask)
pix[:, :, 3] = chosen_mask

# 将像素转换回RGBA图像并显示
new_mask = Image.fromarray(pix, "RGBA")
new_mask

# 我们将保留这个遮罩,以便在后续编辑中重复使用。
new_mask.save(os.path.join(mask_dir, "new_mask.png"))
创建新图像
现在我们将把原始图像与遮罩以及DALLE的编辑端点结合起来,根据一个新的提示来填补透明区域。(截至2024年1月,dall-e-2是唯一支持编辑的模型)
# 编辑图片
edit_response = client.images.edit(
    image=open(chosen_image, "rb"),  # 来自发电部分
    mask=open(os.path.join(mask_dir, "new_mask.png"), "rb"),  # 从正上方
    prompt="Brilliant leather Lederhosen with a formal look, detailed, intricate, photorealistic",  # 提供一个提示来填补空白
    n=3,
    size="1024x1024",
    response_format="url",
)

edit_filepaths = process_dalle_images(edit_response, "edits", edit_image_dir)
# 展示你的美丽创作!
%matplotlib inline
# 图表�尺寸(英寸)[可选]
rcParams["figure.figsize"] = 11 ,8
# 读取图像
img_A = mpimg.imread(edit_filepaths[0])
img_B = mpimg.imread(edit_filepaths[1])
img_C = mpimg.imread(edit_filepaths[2])
# 显示图像
fig, ax = plt.subplots(1,3)
[a.axis("off") for a in ax]
ax[0].imshow(img_A)
ax[1].imshow(img_B)
ax[2].imshow(img_C)
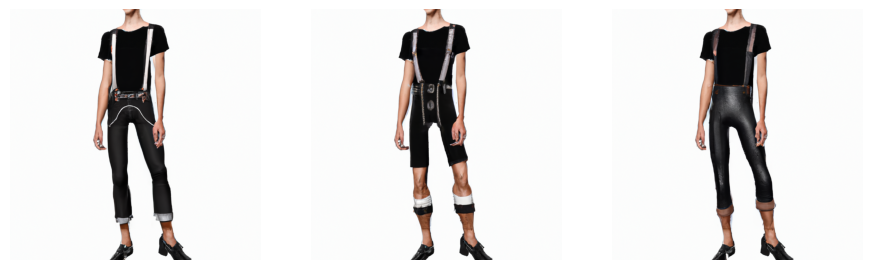
太棒了!
现在你也可以轻松地创建动态遮罩来扩展你的图像 - 享受这些API,并请分享你所构建的内容!