LeViT
概述
LeViT模型由Ben Graham、Alaaeldin El-Nouby、Hugo Touvron、Pierre Stock、Armand Joulin、Hervé Jégou和Matthijs Douze在LeViT: Introducing Convolutions to Vision Transformers中提出。LeViT通过一些架构上的改进,如Transformer中分辨率递减的激活图和引入注意力偏置以整合位置信息,提高了Vision Transformer (ViT)的性能和效率。
论文的摘要如下:
我们设计了一系列图像分类架构,以在高速状态下优化准确性和效率之间的权衡。我们的工作利用了基于注意力架构的最新发现,这些架构在高度并行的处理硬件上具有竞争力。我们重新审视了卷积神经网络广泛文献中的原则,将其应用于变压器,特别是具有递减分辨率的激活图。我们还引入了注意力偏差,这是一种在视觉变压器中集成位置信息的新方法。因此,我们提出了LeVIT:一种用于快速推理图像分类的混合神经网络。我们考虑了不同硬件平台上的不同效率度量,以最好地反映广泛的应用场景。我们的大量实验经验验证了我们的技术选择,并表明它们适用于大多数架构。总体而言,LeViT在速度/准确性权衡方面显著优于现有的卷积网络和视觉变压器。例如,在80%的ImageNet top-1准确率下,LeViT在CPU上比EfficientNet快5倍。
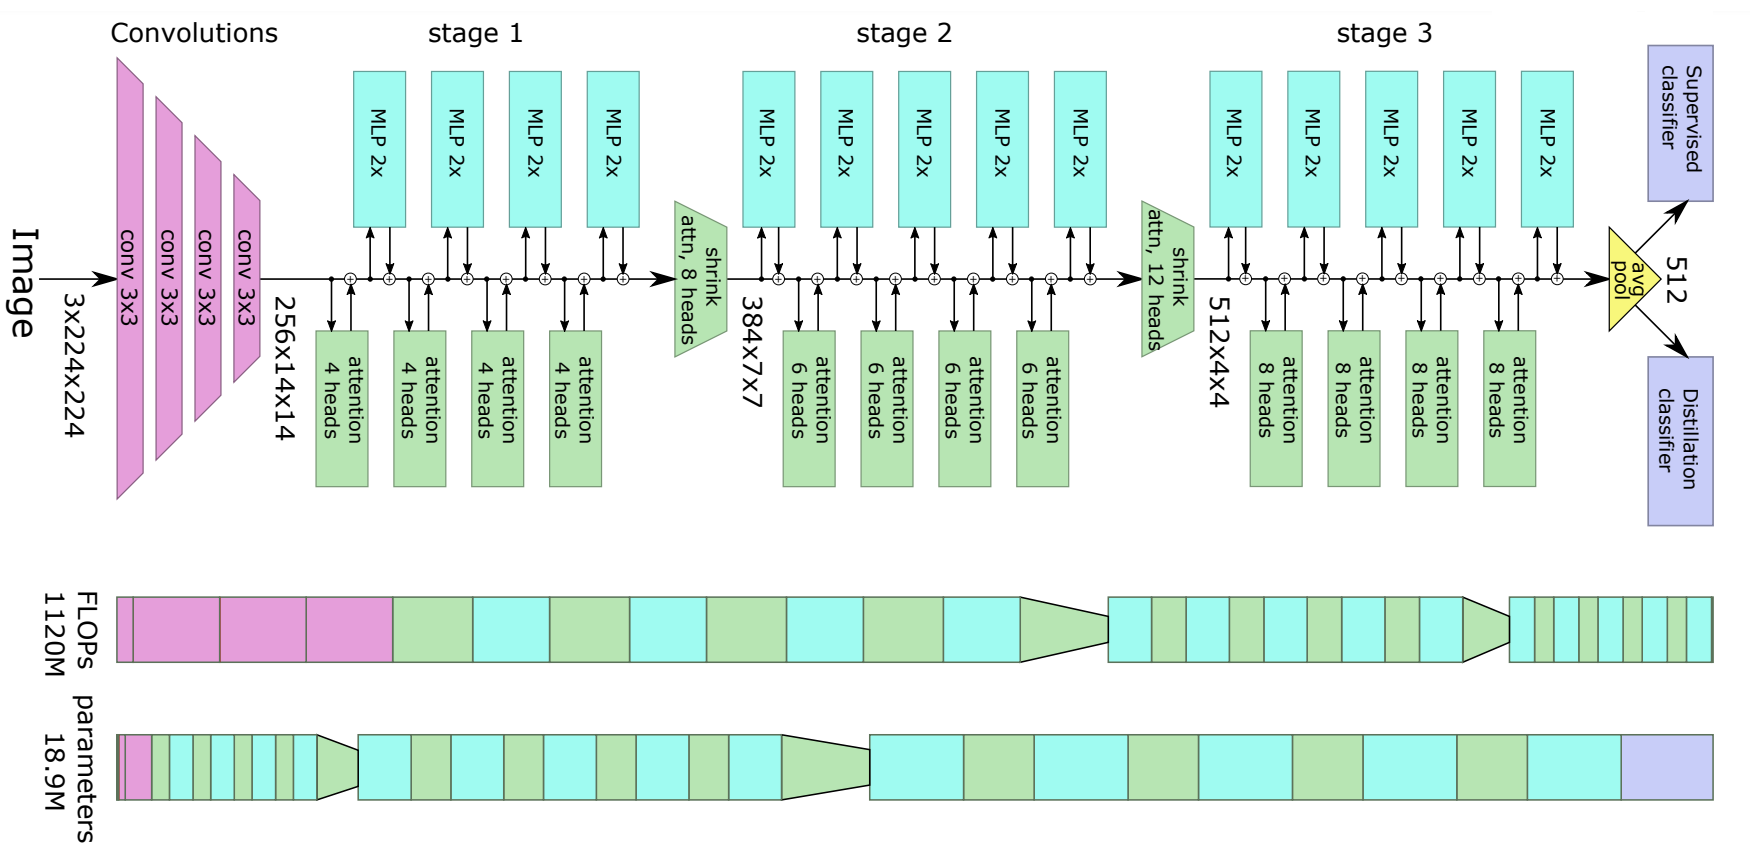 LeViT Architecture. Taken from the original paper.
 使用提示
- 与ViT相比,LeViT模型使用了一个额外的蒸馏头来有效地从教师模型(在LeViT论文中,是一个类似ResNet的模型)中学习。蒸馏头是在类似ResNet模型的监督下通过反向传播学习的。他们还从卷积神经网络中汲取灵感,使用分辨率递减的激活图来提高效率。
- 有两种方法可以对蒸馏模型进行微调,一种是(1)传统方式,仅在最终隐藏状态之上放置一个预测头,而不使用蒸馏头,或者(2)在最终隐藏状态之上同时放置一个预测头和一个蒸馏头。在这种情况下,预测头使用预测头与真实标签之间的常规交叉熵进行训练,而蒸馏预测头则使用硬蒸馏(蒸馏头的预测与教师预测的标签之间的交叉熵)进行训练。在推理时,取两个头的平均预测作为最终预测。(2)也被称为“带蒸馏的微调”,因为依赖于已经在下游数据集上微调过的教师模型。就模型而言,(1)对应于LevitForImageClassification,(2)对应于LevitForImageClassificationWithTeacher。
- 所有发布的检查点都是在ImageNet-1k(也称为ILSVRC 2012,包含130万张图像和1000个类别)上进行预训练和微调的。仅使用了这些数据,没有使用外部数据。这与原始的ViT模型形成对比,后者使用了如JFT-300M数据集/Imagenet-21k等外部数据进行预训练。
- LeViT的作者发布了5个训练好的LeViT模型,你可以直接将其插入LevitModel或LevitForImageClassification中。 为了模拟在更大数据集上的训练(仅使用ImageNet-1k进行预训练),使用了数据增强、优化和正则化等技术。可用的5个变体(均在224x224大小的图像上训练)为: facebook/levit-128S, facebook/levit-128, facebook/levit-192, facebook/levit-256 和 facebook/levit-384。请注意,应该使用LevitImageProcessor来为模型准备图像。
- LevitForImageClassificationWithTeacher 目前仅支持推理,不支持训练或微调。
- 您可以查看关于推理以及在自定义数据上进行微调的演示笔记本 这里 (您只需将 ViTFeatureExtractor 替换为 LevitImageProcessor,并将 ViTForImageClassification 替换为 LevitForImageClassification 或 LevitForImageClassificationWithTeacher)。
资源
一份官方的Hugging Face和社区(由🌎表示)资源列表,帮助您开始使用LeViT。
- LevitForImageClassification 由这个 示例脚本 和 笔记本 支持。
- 另请参阅:图像分类任务指南
如果您有兴趣提交资源以包含在此处,请随时打开一个 Pull Request,我们将进行审核!理想情况下,资源应展示一些新内容,而不是重复现有资源。
LevitConfig
类 transformers.LevitConfig
< source >( image_size = 224 num_channels = 3 kernel_size = 3 stride = 2 padding = 1 patch_size = 16 hidden_sizes = [128, 256, 384] num_attention_heads = [4, 8, 12] depths = [4, 4, 4] key_dim = [16, 16, 16] drop_path_rate = 0 mlp_ratio = [2, 2, 2] attention_ratio = [2, 2, 2] initializer_range = 0.02 **kwargs )
参数
- image_size (
int, optional, 默认为 224) — 输入图像的大小。 - num_channels (
int, optional, defaults to 3) — 输入图像中的通道数。 - kernel_size (
int, optional, defaults to 3) — 用于补丁嵌入的初始卷积层的核大小。 - stride (
int, optional, defaults to 2) — 用于补丁嵌入的初始卷积层的步幅大小。 - padding (
int, optional, 默认为 1) — 用于初始卷积层的填充大小,用于补丁嵌入。 - patch_size (
int, optional, defaults to 16) — 嵌入的补丁大小。 - hidden_sizes (
List[int], 可选, 默认为[128, 256, 384]) — 每个编码器块的维度。 - num_attention_heads (
List[int], optional, defaults to[4, 8, 12]) — Transformer编码器每个块中每个注意力层的注意力头数。 - depths (
List[int], 可选, 默认为[4, 4, 4]) — 每个编码器块中的层数。 - key_dim (
List[int], 可选, 默认为[16, 16, 16]) — 每个编码器块中键的大小. - drop_path_rate (
int, optional, 默认为 0) — 用于Transformer编码器块中的随机深度的丢弃概率。 - mlp_ratios (
List[int], 可选, 默认为[2, 2, 2]) — 编码器块中Mix FFNs的隐藏层大小与输入层大小的比率。 - attention_ratios (
List[int], 可选, 默认为[2, 2, 2]) — 注意力层输出维度与输入维度大小的比率。 - initializer_range (
float, optional, 默认为 0.02) — 用于初始化所有权重矩阵的 truncated_normal_initializer 的标准差。
这是用于存储LevitModel配置的配置类。它用于根据指定的参数实例化一个LeViT模型,定义模型架构。使用默认值实例化配置将产生类似于LeViT facebook/levit-128S架构的配置。
配置对象继承自PretrainedConfig,可用于控制模型输出。阅读PretrainedConfig的文档以获取更多信息。
示例:
>>> from transformers import LevitConfig, LevitModel

>>> # Initializing a LeViT levit-128S style configuration
>>> configuration = LevitConfig()

>>> # Initializing a model (with random weights) from the levit-128S style configuration
>>> model = LevitModel(configuration)

>>> # Accessing the model configuration
>>> configuration = model.config
LevitFeatureExtractor
预处理一张图像或一批图像。
LevitImageProcessor
类 transformers.LevitImageProcessor
< source >( do_resize: bool = True size: typing.Dict[str, int] = None resample: Resampling =
参数
- do_resize (
bool, 可选, 默认为True) — 是否将输入的最短边调整为 int(256/224 *size)。可以在preprocess方法中通过do_resize参数覆盖此设置。 - size (
Dict[str, int], 可选, 默认为{"shortest_edge" -- 224}): 调整大小后输出图像的尺寸。如果 size 是一个包含“width”和“height”键的字典,图像将被调整为(size["height"], size["width"])。如果 size 是一个包含“shortest_edge”键的字典,最短边值c将被重新缩放为int(c * (256/224))。图像的较小边将与此值匹配,即如果高度 > 宽度,则图像将被重新缩放为(size["shortest_egde"] * height / width, size["shortest_egde"])。可以在preprocess方法中通过size参数覆盖此设置。 - resample (
PILImageResampling, 可选, 默认为Resampling.BICUBIC) — 如果调整图像大小,则使用的重采样过滤器。可以在preprocess方法中通过resample参数覆盖。 - do_center_crop (
bool, 可选, 默认为True) — 是否将输入中心裁剪为(crop_size["height"], crop_size["width"])。可以通过preprocess方法中的do_center_crop参数进行覆盖。 - crop_size (
Dict, 可选, 默认为{"height" -- 224, "width": 224}): 在center_crop之后所需的图像大小。可以在preprocess方法中通过crop_size参数覆盖。 - do_rescale (
bool, 可选, 默认为True) — 控制是否通过指定的比例rescale_factor重新缩放图像。可以在preprocess方法中通过do_rescale参数覆盖此设置。 - rescale_factor (
int或float, 可选, 默认为1/255) — 如果重新缩放图像,则使用的缩放因子。可以在preprocess方法中通过rescale_factor参数覆盖此值。 - do_normalize (
bool, 可选, 默认为True) — 控制是否对图像进行归一化。可以在preprocess方法中通过do_normalize参数进行覆盖。 - image_mean (
List[int], 可选, 默认为[0.485, 0.456, 0.406]) — 如果对图像进行归一化,则使用的均值。这是一个浮点数或与图像通道数长度相同的浮点数列表。可以通过preprocess方法中的image_mean参数进行覆盖。 - image_std (
List[int], 可选, 默认为[0.229, 0.224, 0.225]) — 如果对图像进行归一化,则使用的标准差。这是一个浮点数或与图像通道数长度相同的浮点数列表。可以在preprocess方法中通过image_std参数覆盖此值。
构建一个LeViT图像处理器。
预处理
< source >( images: typing.Union[ForwardRef('PIL.Image.Image'), numpy.ndarray, ForwardRef('torch.Tensor'), typing.List[ForwardRef('PIL.Image.Image')], typing.List[numpy.ndarray], typing.List[ForwardRef('torch.Tensor')]] do_resize: typing.Optional[bool] = None size: typing.Optional[typing.Dict[str, int]] = None resample: Resampling = None do_center_crop: typing.Optional[bool] = None crop_size: typing.Optional[typing.Dict[str, int]] = None do_rescale: typing.Optional[bool] = None rescale_factor: typing.Optional[float] = None do_normalize: typing.Optional[bool] = None image_mean: typing.Union[float, typing.Iterable[float], NoneType] = None image_std: typing.Union[float, typing.Iterable[float], NoneType] = None return_tensors: typing.Optional[transformers.utils.generic.TensorType] = None data_format: ChannelDimension =
参数
- 图像 (
ImageInput) — 要预处理的图像或图像批次。期望输入单个或批次的图像,像素值范围为0到255。如果传入的图像的像素值在0到1之间,请设置do_rescale=False. - do_resize (
bool, optional, defaults toself.do_resize) — 是否调整图像大小. - size (
Dict[str, int], 可选, 默认为self.size) — 调整大小后输出图像的尺寸。如果 size 是一个包含键“width”和“height”的字典,图像 将被调整为 (height, width)。如果 size 是一个包含键“shortest_edge”的字典,最短边的值c将被重新缩放为 int(c(256/224))。图像的较小边将与此值匹配 即,如果 height > width,则图像将被重新缩放为 (size height / width, size)。 - resample (
PILImageResampling, 可选, 默认为PILImageResampling.BICUBIC) — 调整图像大小时使用的重采样过滤器。 - do_center_crop (
bool, optional, defaults toself.do_center_crop) — 是否对图像进行中心裁剪. - crop_size (
Dict[str, int], 可选, 默认为self.crop_size) — 输出图像在中心裁剪后的大小。将图像裁剪为 (crop_size[“height”], crop_size[“width”])。 - do_rescale (
bool, 可选, 默认为self.do_rescale) — 是否通过rescaling_factor重新缩放图像像素值 - 通常缩放到0到1之间的值. - rescale_factor (
float, optional, defaults toself.rescale_factor) — 用于重新缩放图像像素值的因子。 - do_normalize (
bool, optional, defaults toself.do_normalize) — 是否通过image_mean和image_std来归一化图像像素值. - image_mean (
floatorList[float], optional, defaults toself.image_mean) — 用于归一化图像像素值的均值。 - image_std (
float或List[float], 可选, 默认为self.image_std) — 用于标准化图像像素值的标准差. - return_tensors (
str或TensorType, 可选) — 返回的张量类型。可以是以下之一:- 未设置:返回一个
np.ndarray列表。 TensorType.TENSORFLOW或'tf':返回一个类型为tf.Tensor的批次。TensorType.PYTORCH或'pt':返回一个类型为torch.Tensor的批次。TensorType.NUMPY或'np':返回一个类型为np.ndarray的批次。TensorType.JAX或'jax':返回一个类型为jax.numpy.ndarray的批次。
- 未设置:返回一个
- data_format (
str或ChannelDimension, 可选, 默认为ChannelDimension.FIRST) — 输出图像的通道维度格式。如果未设置,则使用输入图像的通道维度格式。可以是以下之一:"channels_first"或ChannelDimension.FIRST: 图像格式为 (num_channels, height, width)。"channels_last"或ChannelDimension.LAST: 图像格式为 (height, width, num_channels)。
- input_data_format (
ChannelDimension或str, 可选) — 输入图像的通道维度格式。如果未设置,则从输入图像推断通道维度格式。可以是以下之一:"channels_first"或ChannelDimension.FIRST: 图像格式为 (num_channels, height, width)。"channels_last"或ChannelDimension.LAST: 图像格式为 (height, width, num_channels)。"none"或ChannelDimension.NONE: 图像格式为 (height, width)。
预处理一张或一批图像,以用作LeViT模型的输入。
LevitModel
类 transformers.LevitModel
< source >( config )
参数
- config (LevitConfig) — 包含模型所有参数的模型配置类。 使用配置文件初始化不会加载与模型相关的权重,仅加载配置。查看 from_pretrained() 方法以加载模型权重。
裸的Levit模型输出原始特征,没有任何特定的头部。 该模型是PyTorch torch.nn.Module 的子类。将其 作为常规的PyTorch模块使用,并参考PyTorch文档以获取与一般使用和行为相关的所有信息。
前进
< source >( pixel_values: FloatTensor = None output_hidden_states: typing.Optional[bool] = None return_dict: typing.Optional[bool] = None ) → transformers.modeling_outputs.BaseModelOutputWithPoolingAndNoAttention 或 tuple(torch.FloatTensor)
参数
- pixel_values (
torch.FloatTensorof shape(batch_size, num_channels, height, width)) — 像素值。像素值可以使用AutoImageProcessor获取。详情请参见 LevitImageProcessor.call(). - output_hidden_states (
bool, 可选) — 是否返回所有层的隐藏状态。有关更多详细信息,请参见返回张量下的hidden_states。 - return_dict (
bool, optional) — 是否返回一个ModelOutput而不是一个普通的元组。
返回
transformers.modeling_outputs.BaseModelOutputWithPoolingAndNoAttention 或 tuple(torch.FloatTensor)
一个 transformers.modeling_outputs.BaseModelOutputWithPoolingAndNoAttention 或一个由
torch.FloatTensor 组成的元组(如果传递了 return_dict=False 或当 config.return_dict=False 时),包含各种
元素,具体取决于配置(LevitConfig)和输入。
-
last_hidden_state (
torch.FloatTensor形状为(batch_size, num_channels, height, width)) — 模型最后一层输出的隐藏状态序列。 -
pooler_output (
torch.FloatTensor形状为(batch_size, hidden_size)) — 在空间维度上进行池化操作后的最后一层隐藏状态。 -
hidden_states (
tuple(torch.FloatTensor), 可选, 当传递了output_hidden_states=True或当config.output_hidden_states=True时返回) — 由torch.FloatTensor组成的元组(一个用于嵌入层的输出,如果模型有嵌入层,+ 一个用于每一层的输出)形状为(batch_size, num_channels, height, width)。模型在每一层输出处的隐藏状态加上可选的初始嵌入输出。
LevitModel 的前向方法,重写了 __call__ 特殊方法。
尽管前向传递的配方需要在此函数内定义,但之后应该调用Module实例而不是这个,因为前者负责运行预处理和后处理步骤,而后者会默默地忽略它们。
示例:
>>> from transformers import AutoImageProcessor, LevitModel
>>> import torch
>>> from datasets import load_dataset

>>> dataset = load_dataset("huggingface/cats-image", trust_remote_code=True)
>>> image = dataset["test"]["image"][0]

>>> image_processor = AutoImageProcessor.from_pretrained("facebook/levit-128S")
>>> model = LevitModel.from_pretrained("facebook/levit-128S")

>>> inputs = image_processor(image, return_tensors="pt")

>>> with torch.no_grad():
...     outputs = model(**inputs)

>>> last_hidden_states = outputs.last_hidden_state
>>> list(last_hidden_states.shape)
[1, 16, 384]
LevitForImageClassification
类 transformers.LevitForImageClassification
< source >( config )
参数
- config (LevitConfig) — 包含模型所有参数的模型配置类。 使用配置文件初始化不会加载与模型相关的权重,只会加载配置。查看 from_pretrained() 方法以加载模型权重。
Levit 模型,顶部带有图像分类头(在池化特征之上的线性层),例如用于 ImageNet。
该模型是一个PyTorch torch.nn.Module 子类。将其用作常规的PyTorch模块,并参考PyTorch文档以获取与一般使用和行为相关的所有信息。
前进
< source >( pixel_values: FloatTensor = None labels: typing.Optional[torch.LongTensor] = None output_hidden_states: typing.Optional[bool] = None return_dict: typing.Optional[bool] = None ) → transformers.modeling_outputs.ImageClassifierOutputWithNoAttention 或 tuple(torch.FloatTensor)
参数
- pixel_values (
torch.FloatTensorof shape(batch_size, num_channels, height, width)) — 像素值。像素值可以使用AutoImageProcessor获取。详情请参见 LevitImageProcessor.call(). - output_hidden_states (
bool, optional) — 是否返回所有层的隐藏状态。有关更多详细信息,请参见返回张量下的hidden_states。 - return_dict (
bool, 可选) — 是否返回一个ModelOutput而不是一个普通的元组。 - labels (
torch.LongTensor形状为(batch_size,), 可选) — 用于计算图像分类/回归损失的标签。索引应在[0, ..., config.num_labels - 1]范围内。如果config.num_labels == 1,则计算回归损失(均方损失),如果config.num_labels > 1,则计算分类损失(交叉熵)。
返回
transformers.modeling_outputs.ImageClassifierOutputWithNoAttention 或 tuple(torch.FloatTensor)
一个 transformers.modeling_outputs.ImageClassifierOutputWithNoAttention 或一个由
torch.FloatTensor 组成的元组(如果传递了 return_dict=False 或当 config.return_dict=False 时),包含各种
元素,具体取决于配置(LevitConfig)和输入。
- loss (
torch.FloatTensor形状为(1,),可选,当提供labels时返回) — 分类(或回归,如果 config.num_labels==1)损失。 - logits (
torch.FloatTensor形状为(batch_size, config.num_labels)) — 分类(或回归,如果 config.num_labels==1)得分(在 SoftMax 之前)。 - hidden_states (
tuple(torch.FloatTensor),可选,当传递output_hidden_states=True或当config.output_hidden_states=True时返回) — 由torch.FloatTensor组成的元组(一个用于嵌入层的输出,如果模型有嵌入层,+ 一个用于每个阶段的输出)形状为(batch_size, num_channels, height, width)。模型在每个阶段输出的隐藏状态(也称为特征图)。
LevitForImageClassification 的前向方法,重写了 __call__ 特殊方法。
尽管前向传递的配方需要在此函数内定义,但之后应该调用Module实例而不是这个,因为前者负责运行预处理和后处理步骤,而后者会默默地忽略它们。
示例:
>>> from transformers import AutoImageProcessor, LevitForImageClassification
>>> import torch
>>> from datasets import load_dataset

>>> dataset = load_dataset("huggingface/cats-image", trust_remote_code=True)
>>> image = dataset["test"]["image"][0]

>>> image_processor = AutoImageProcessor.from_pretrained("facebook/levit-128S")
>>> model = LevitForImageClassification.from_pretrained("facebook/levit-128S")

>>> inputs = image_processor(image, return_tensors="pt")

>>> with torch.no_grad():
...     logits = model(**inputs).logits

>>> # model predicts one of the 1000 ImageNet classes
>>> predicted_label = logits.argmax(-1).item()
>>> print(model.config.id2label[predicted_label])
tabby, tabby cat
LevitForImageClassificationWithTeacher
类 transformers.LevitForImageClassificationWithTeacher
< source >( config )
参数
- config (LevitConfig) — 包含模型所有参数的模型配置类。 使用配置文件初始化不会加载与模型相关的权重,只会加载配置。查看 from_pretrained() 方法以加载模型权重。
LeViT 模型转换器,顶部带有图像分类头(在最终隐藏状态顶部的线性层和在蒸馏令牌的最终隐藏状态顶部的线性层),例如用于 ImageNet。 .. 警告:: 此模型仅支持推理。尚不支持使用蒸馏(即与教师模型一起)进行微调。
该模型是一个PyTorch torch.nn.Module 子类。将其用作常规的PyTorch模块,并参考PyTorch文档以获取与一般使用和行为相关的所有信息。
前进
< source >( pixel_values: FloatTensor = None output_hidden_states: typing.Optional[bool] = None return_dict: typing.Optional[bool] = None ) → transformers.models.levit.modeling_levit.LevitForImageClassificationWithTeacherOutput 或 tuple(torch.FloatTensor)
参数
- pixel_values (
torch.FloatTensorof shape(batch_size, num_channels, height, width)) — 像素值。像素值可以使用AutoImageProcessor获取。详情请参见 LevitImageProcessor.call(). - output_hidden_states (
bool, optional) — 是否返回所有层的隐藏状态。有关更多详细信息,请参见返回张量下的hidden_states。 - return_dict (
bool, 可选) — 是否返回一个ModelOutput而不是一个普通的元组。
返回
transformers.models.levit.modeling_levit.LevitForImageClassificationWithTeacherOutput 或 tuple(torch.FloatTensor)
一个 transformers.models.levit.modeling_levit.LevitForImageClassificationWithTeacherOutput 或一个由
torch.FloatTensor 组成的元组(如果传递了 return_dict=False 或当 config.return_dict=False 时),包含各种
元素,具体取决于配置(LevitConfig)和输入。
- logits (
torch.FloatTensor形状为(batch_size, config.num_labels)) — 预测分数,作为cls_logits和distillation_logits的平均值。 - cls_logits (
torch.FloatTensor形状为(batch_size, config.num_labels)) — 分类头的预测分数(即类标记的最终隐藏状态顶部的线性层)。 - distillation_logits (
torch.FloatTensor形状为(batch_size, config.num_labels)) — 蒸馏头的预测分数(即蒸馏标记的最终隐藏状态顶部的线性层)。 - hidden_states (
tuple(torch.FloatTensor), 可选, 当传递output_hidden_states=True或当config.output_hidden_states=True时返回) — 由torch.FloatTensor组成的元组(一个用于嵌入的输出 + 一个用于每一层的输出),形状为(batch_size, sequence_length, hidden_size)。模型在每一层输出处的隐藏状态加上初始嵌入输出。
LevitForImageClassificationWithTeacher 的前向方法,重写了 __call__ 特殊方法。
尽管前向传递的配方需要在此函数内定义,但之后应该调用Module实例而不是这个,因为前者负责运行预处理和后处理步骤,而后者会默默地忽略它们。
示例:
>>> from transformers import AutoImageProcessor, LevitForImageClassificationWithTeacher
>>> import torch
>>> from datasets import load_dataset

>>> dataset = load_dataset("huggingface/cats-image", trust_remote_code=True)
>>> image = dataset["test"]["image"][0]

>>> image_processor = AutoImageProcessor.from_pretrained("facebook/levit-128S")
>>> model = LevitForImageClassificationWithTeacher.from_pretrained("facebook/levit-128S")

>>> inputs = image_processor(image, return_tensors="pt")

>>> with torch.no_grad():
...     logits = model(**inputs).logits

>>> # model predicts one of the 1000 ImageNet classes
>>> predicted_label = logits.argmax(-1).item()
>>> print(model.config.id2label[predicted_label])
tabby, tabby cat