LLaVA-NeXT
概述
LLaVA-NeXT模型由Haotian Liu、Chunyuan Li、Yuheng Li、Bo Li、Yuanhan Zhang、Sheng Shen和Yong Jae Lee在LLaVA-NeXT: Improved reasoning, OCR, and world knowledge中提出。LLaVa-NeXT(也称为LLaVa-1.6)通过增加输入图像分辨率并在改进的视觉指令调优数据集上进行训练,以提高OCR和常识推理能力,从而改进了LLaVa。
博客的介绍如下:
*2023年10月,我们发布了LLaVA-1.5,其设计简单高效,在12个数据集的基准测试中表现出色。自发布以来,它已成为许多关于数据、模型和大规模多模态模型(LMM)能力的综合研究的基础,并推动了各种新应用的发展。
今天,我们非常高兴地推出LLaVA-NeXT,它在推理、OCR和世界知识方面都有所提升。LLaVA-NeXT甚至在一些基准测试中超过了Gemini Pro。
与LLaVA-1.5相比,LLaVA-NeXT有几项改进:
将输入图像分辨率提高到4倍像素。这使得它能够捕捉更多的视觉细节。它支持三种宽高比,最高可达672x672、336x1344、1344x336分辨率。 通过改进的视觉指令调优数据混合,具有更好的视觉推理和OCR能力。 为更多场景提供更好的视觉对话,涵盖不同的应用。更好的世界知识和逻辑推理。 使用SGLang进行高效的部署和推理。 在性能改进的同时,LLaVA-NeXT保持了LLaVA-1.5的简约设计和数据效率。它重用了LLaVA-1.5的预训练连接器,并且仍然使用不到100万个视觉指令调优样本。最大的34B变体在32个A100上完成训练大约需要1天。*
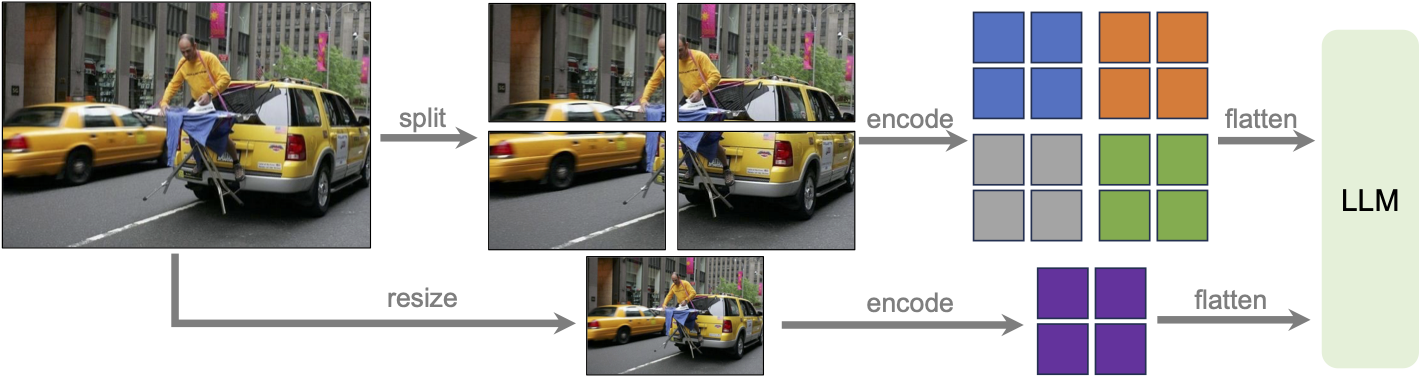 LLaVa-NeXT incorporates a higher input resolution by encoding various patches of the input image. Taken from the original paper.
 使用提示
- 我们建议用户在计算批量生成时使用
padding_side="left",因为它会带来更准确的结果。只需确保在生成之前调用processor.tokenizer.padding_side = "left"。
- Llava-Next 对图像使用不同数量的补丁,因此除了在处理输入时进行的填充外,还必须在建模代码中对输入进行填充。如果模型处于
eval()模式,则默认设置为“左填充”,否则为“右填充”。
[!注意] LLaVA模型在发布v4.46版本后,将会发出关于添加
processor.patch_size = {{patch_size}}、processor.num_additional_image_tokens = {{num_additional_image_tokens}}和processor.vision_feature_select_strategy = {{vision_feature_select_strategy}}的警告。强烈建议如果您拥有模型检查点,请将这些属性添加到处理器中,或者如果不是您拥有的,请提交一个PR。添加这些属性意味着LLaVA将尝试推断每张图像所需的图像令牌数量,并使用尽可能多的占位符扩展文本。通常每张图像大约有500个令牌,因此请确保文本没有被截断,否则在合并嵌入时会出现失败。这些属性可以从模型配置中获取,如model.config.vision_config.patch_size或model.config.vision_feature_select_strategy。如果视觉骨干添加了CLS令牌,则num_additional_image_tokens应为1,如果没有向视觉补丁添加额外内容,则应为0`。
- 请注意,每个检查点都是使用特定的提示格式进行训练的,这取决于使用了哪个大型语言模型(LLM)。您可以使用处理器的
apply_chat_template来正确格式化您的提示。为此,您必须构建一个对话历史记录,传递纯字符串将不会格式化您的提示。聊天模板的对话历史记录中的每条消息都是一个带有“role”和“content”键的字典。“content”应该是一个字典列表,用于“text”和“image”模式。以下是如何执行此操作的示例以及每个检查点接受的格式列表。
我们将使用 llava-v1.6-mistral-7b-hf 和一段包含文本和图像的对话历史。每个内容字段必须是一个字典列表,如下所示:
from transformers import LlavaNextProcessor

processor = LlavaNextProcessor.from_pretrained("llava-hf/llava-v1.6-mistral-7b-hf")

conversation = [
    {
        "role": "user",
        "content": [
            {"type": "image"},
            {"type": "text", "text": "What’s shown in this image?"},
        ],
    },
    {
        "role": "assistant",
        "content": [{"type": "text", "text": "This image shows a red stop sign."},]
    },
    {

        "role": "user",
        "content": [
            {"type": "text", "text": "Describe the image in more details."},
        ],
    },
]

text_prompt = processor.apply_chat_template(conversation, add_generation_prompt=True)

# Note that the template simply formats your prompt, you still have to tokenize it and obtain pixel values for your images
print(text_prompt)
>>> "[INST] <image>\nWhat's shown in this image? [/INST] This image shows a red stop sign. [INST] Describe the image in more details. [/INST]"- 如果你想自己构建一个聊天提示,以下是可能的格式列表。 llava-v1.6-mistral-7b-hf 需要以下格式:
"[INST] <image>\nWhat is shown in this image? [/INST]"llava-v1.6-vicuna-7b-hf 和 llava-v1.6-vicuna-13b-hf 需要以下格式:
"A chat between a curious human and an artificial intelligence assistant. The assistant gives helpful, detailed, and polite answers to the human's questions. USER: <image>\nWhat is shown in this image? ASSISTANT:"llava-v1.6-34b-hf 需要以下格式:
"<|im_start|>system\nAnswer the questions.<|im_end|><|im_start|>user\n<image>\nWhat is shown in this image?<|im_end|><|im_start|>assistant\n"llama3-llava-next-8b-hf 需要以下格式:
"<|start_header_id|>system<|end_header_id|>\n\nYou are a helpful language and vision assistant. You are able to understand the visual content that the user provides, and assist the user with a variety of tasks using natural language.<|eot_id|><|start_header_id|><|start_header_id|>user<|end_header_id|>\n\n<image>\nWhat is shown in this image?<|eot_id|><|start_header_id|>assistant<|end_header_id|>\n\n"llava-next-72b-hf 和 llava-next-110b-hf 需要以下格式:
"<|im_start|>system\nYou are a helpful assistant.<|im_end|>\n<|im_start|>user\n<image>\nWhat is shown in this image?<|im_end|>\n<|im_start|>assistant\n"使用示例
单张图像推理
以下是如何以半精度(torch.float16)加载模型并执行推理:
from transformers import LlavaNextProcessor, LlavaNextForConditionalGeneration
import torch
from PIL import Image
import requests

processor = LlavaNextProcessor.from_pretrained("llava-hf/llava-v1.6-mistral-7b-hf")

model = LlavaNextForConditionalGeneration.from_pretrained("llava-hf/llava-v1.6-mistral-7b-hf", torch_dtype=torch.float16, low_cpu_mem_usage=True)
model.to("cuda:0")

# prepare image and text prompt, using the appropriate prompt template
url = "https://github.com/haotian-liu/LLaVA/blob/1a91fc274d7c35a9b50b3cb29c4247ae5837ce39/images/llava_v1_5_radar.jpg?raw=true"
image = Image.open(requests.get(url, stream=True).raw)

conversation = [
    {
        "role": "user",
        "content": [
            {"type": "image"},
            {"type": "text", "text": "What is shown in this image?"},
        ],
    },
]
prompt = processor.apply_chat_template(conversation, add_generation_prompt=True)
inputs = processor(image, prompt, return_tensors="pt").to("cuda:0")

# autoregressively complete prompt
output = model.generate(**inputs, max_new_tokens=100)

print(processor.decode(output[0], skip_special_tokens=True))
多图像推理
LLaVa-Next 可以使用多张图像作为输入进行推理,这些图像可以属于同一个提示或不同的提示(在批量推理中)。以下是您可以如何操作的方法:
import requests
from PIL import Image
import torch
from transformers import AutoProcessor, AutoModelForImageTextToText

# Load the model in half-precision
model = AutoModelForImageTextToText.from_pretrained("llava-hf/llava-v1.6-mistral-7b-hf", torch_dtype=torch.float16, device_map="auto")
processor = AutoProcessor.from_pretrained("llava-hf/llava-v1.6-mistral-7b-hf")

# Get three different images
url = "https://www.ilankelman.org/stopsigns/australia.jpg"
image_stop = Image.open(requests.get(url, stream=True).raw)

url = "http://images.cocodataset.org/val2017/000000039769.jpg"
image_cats = Image.open(requests.get(url, stream=True).raw)

url = "https://huggingface.co/microsoft/kosmos-2-patch14-224/resolve/main/snowman.jpg"
image_snowman = Image.open(requests.get(url, stream=True).raw)

# Prepare a batch of two prompts, where the first one is a multi-turn conversation and the second is not
conversation_1 = [
    {
        "role": "user",
        "content": [
            {"type": "image"},
            {"type": "text", "text": "What is shown in this image?"},
            ],
    },
    {
        "role": "assistant",
        "content": [
            {"type": "text", "text": "There is a red stop sign in the image."},
            ],
    },
    {
        "role": "user",
        "content": [
            {"type": "image"},
            {"type": "text", "text": "What about this image? How many cats do you see?"},
            ],
    },
]

conversation_2 = [
    {
        "role": "user",
        "content": [
            {"type": "image"},
            {"type": "text", "text": "What is shown in this image?"},
            ],
    },
]

prompt_1 = processor.apply_chat_template(conversation_1, add_generation_prompt=True)
prompt_2 = processor.apply_chat_template(conversation_2, add_generation_prompt=True)
prompts = [prompt_1, prompt_2]

# We can simply feed images in the order they have to be used in the text prompt
# Each "<image>" token uses one image leaving the next for the subsequent "<image>" tokens
inputs = processor(images=[image_stop, image_cats, image_snowman], text=prompts, padding=True, return_tensors="pt").to(model.device)

# Generate
generate_ids = model.generate(**inputs, max_new_tokens=30)
processor.batch_decode(generate_ids, skip_special_tokens=True, clean_up_tokenization_spaces=False)
模型优化
使用Bitsandbytes进行量化
模型可以以8位或4位加载,大大减少内存需求,同时保持原始模型的性能。首先确保安装bitsandbytes,pip install bitsandbytes,并且能够访问该库支持的GPU/加速器。
bitsandbytes 正在进行重构,以支持除 CUDA 之外的多种后端。目前,ROCm(AMD GPU)和 Intel CPU 的实现已经成熟,Intel XPU 正在开发中,预计将在 Q4/Q1 支持 Apple Silicon。有关安装说明和最新后端更新,请访问 此链接。
我们重视您的反馈,以帮助在正式发布前识别错误!查看这些文档以获取更多详细信息和反馈链接。
只需将上面的代码片段更改为:
from transformers import AutoModelForImageTextToText, BitsAndBytesConfig

# specify how to quantize the model
quantization_config = BitsAndBytesConfig(
    load_in_4bit=True,
    bnb_4bit_quant_type="nf4",
    bnb_4bit_compute_dtype=torch.float16,
)

model = AutoModelForImageTextToText.from_pretrained("llava-hf/llava-v1.6-mistral-7b-hf", quantization_config=quantization_config, device_map="auto")
使用 Flash-Attention 2 进一步加速生成
首先确保安装flash-attn。关于该软件包的安装,请参考Flash Attention的原始仓库。只需将上面的代码片段更改为:
from transformers import AutoModelForImageTextToText

model = AutoModelForImageTextToText.from_pretrained(
    model_id,
    torch_dtype=torch.float16,
    low_cpu_mem_usage=True,
    use_flash_attention_2=True
).to(0)
LlavaNextConfig
类 transformers.LlavaNextConfig
< source >( vision_config = 无 text_config = 无 ignore_index = -100 image_token_index = 32000 projector_hidden_act = 'gelu' vision_feature_select_strategy = '默认' vision_feature_layer = -2 image_grid_pinpoints = 无 tie_word_embeddings = 假 image_seq_length = 576 **kwargs )
参数
- vision_config (
Union[AutoConfig, dict], optional, defaults toCLIPVisionConfig) — 视觉骨干的配置对象或字典。 - text_config (
Union[AutoConfig, dict], 可选, 默认为LlamaConfig) — 文本主干的配置对象或字典. - ignore_index (
int, 可选, 默认为 -100) — 损失函数的忽略索引。 - image_token_index (
int, optional, defaults to 32000) — 用于编码图像提示的图像令牌索引。 - projector_hidden_act (
str, optional, defaults to"gelu") — 多模态投影器使用的激活函数。 - vision_feature_select_strategy (
str, 可选, 默认为"default") — 用于从视觉骨干中选择视觉特征的特征选择策略。 可以是"default"或"full"。如果选择"default",则从视觉特征中移除 CLS 标记。 如果选择"full",则使用完整的视觉特征。 - vision_feature_layer (
int, optional, defaults to -2) — 选择视觉特征的层的索引。 - image_grid_pinpoints (
List, 可选, 默认值为[[336, 672], [672, 336], [672, 672], [1008, 336], [336, 1008]]) — 用于处理高分辨率图像的可能分辨率列表。列表中的每个项目应为形式为(height, width)的元组或列表。 - tie_word_embeddings (
bool, optional, defaults toFalse) — 是否应该将模型的输入和输出词嵌入绑定在一起。 - image_seq_length (
int, optional, 默认为 576) — 一张图片嵌入的序列长度。
这是用于存储LlavaNextForConditionalGeneration配置的配置类。它用于根据指定的参数实例化一个Llava-NeXT模型,定义模型架构。使用默认值实例化配置将产生类似于llava-hf/llava-v1.6-mistral-7b-hf模型的配置。
配置对象继承自PretrainedConfig,可用于控制模型输出。阅读PretrainedConfig的文档以获取更多信息。
示例:
>>> from transformers import LlavaNextForConditionalGeneration, LlavaNextConfig, CLIPVisionConfig, LlamaConfig

>>> # Initializing a CLIP-vision config
>>> vision_config = CLIPVisionConfig()

>>> # Initializing a Llama config
>>> text_config = LlamaConfig()

>>> # Initializing a Llava-Next llava-hf/llava-v1.6-mistral-7b-hf style configuration
>>> configuration = LlavaNextConfig(vision_config, text_config)

>>> # Initializing a model from the llava-hf/llava-v1.6-mistral-7b-hf style configuration
>>> model = LlavaNextForConditionalGeneration(configuration)

>>> # Accessing the model configuration
>>> configuration = model.config
LlavaNextImageProcessor
类 transformers.LlavaNextImageProcessor
< source >( do_resize: bool = True size: typing.Dict[str, int] = None image_grid_pinpoints: typing.List = None resample: Resampling =
参数
- do_resize (
bool, 可选, 默认为True) — 是否将图像的(高度,宽度)尺寸调整为指定的size。可以在preprocess方法中被do_resize覆盖。 - size (
Dict[str, int]可选, 默认为{"shortest_edge" -- 224}): 调整大小后的图像尺寸。图像的最短边将调整为size[“shortest_edge”],最长边将调整以保持输入的宽高比。可以在preprocess方法中通过size覆盖此设置。 - image_grid_pinpoints (
List可选, 默认为[[672, 336], [336, 672], [672, 672], [336, 1008], [1008, 336]]) — 用于处理高分辨率图像的可能分辨率列表。最佳分辨率是根据图像的原始大小选择的。可以在preprocess方法中通过image_grid_pinpoints覆盖此设置。 - resample (
PILImageResampling, 可选, 默认为Resampling.BICUBIC) — 如果调整图像大小,则使用的重采样过滤器。可以在preprocess方法中通过resample覆盖。 - do_center_crop (
bool, 可选, 默认为True) — 是否将图像中心裁剪到指定的crop_size。可以在preprocess方法中通过do_center_crop覆盖此设置。 - crop_size (
Dict[str, int]optional, 默认为 224) — 应用center_crop后输出图像的大小。可以在preprocess方法中通过crop_size覆盖此设置。 - do_rescale (
bool, 可选, 默认为True) — 是否通过指定的比例rescale_factor来重新缩放图像。可以在preprocess方法中被do_rescale覆盖。 - rescale_factor (
int或float, 可选, 默认为1/255) — 如果重新缩放图像,则使用的缩放因子。可以在preprocess方法中通过rescale_factor覆盖此值。 - do_normalize (
bool, 可选, 默认为True) — 是否对图像进行归一化。可以在preprocess方法中通过do_normalize进行覆盖。 - image_mean (
float或List[float], 可选, 默认为[0.48145466, 0.4578275, 0.40821073]) — 如果对图像进行归一化,则使用的均值。这是一个浮点数或浮点数列表,长度为图像中的通道数。可以通过preprocess方法中的image_mean参数进行覆盖。 - image_std (
float或List[float], 可选, 默认为[0.26862954, 0.26130258, 0.27577711]) — 如果对图像进行归一化,则使用的标准差。这是一个浮点数或与图像通道数长度相同的浮点数列表。可以在preprocess方法中通过image_std参数覆盖。 可以在preprocess方法中通过image_std参数覆盖。 - do_pad (
bool, 可选, 默认为True) — 是否对图像进行填充。如果为True,将会将批次中图像的补丁维度填充到批次中最大的补丁数量。填充将使用零值应用于图像的底部和右侧。 - do_convert_rgb (
bool, optional, defaults toTrue) — 是否将图像转换为RGB.
构建一个LLaVa-NeXT图像处理器。基于CLIPImageProcessor,并整合了额外的技术,用于处理高分辨率图像,如LLaVa论文中所述。
预处理
< source >( images: typing.Union[ForwardRef('PIL.Image.Image'), numpy.ndarray, ForwardRef('torch.Tensor'), typing.List[ForwardRef('PIL.Image.Image')], typing.List[numpy.ndarray], typing.List[ForwardRef('torch.Tensor')]] do_resize: bool = None size: typing.Dict[str, int] = None image_grid_pinpoints: typing.List = None resample: Resampling = None do_center_crop: bool = None crop_size: int = None do_rescale: bool = None rescale_factor: float = None do_normalize: bool = None image_mean: typing.Union[float, typing.List[float], NoneType] = None image_std: typing.Union[float, typing.List[float], NoneType] = None do_pad: typing.Optional[bool] = None do_convert_rgb: bool = None return_tensors: typing.Union[str, transformers.utils.generic.TensorType, NoneType] = None data_format: typing.Optional[transformers.image_utils.ChannelDimension] =
参数
- 图像 (
ImageInput) — 要预处理的图像。期望输入单个或批量的图像,像素值范围在0到255之间。如果传入的图像像素值在0到1之间,请设置do_rescale=False. - do_resize (
bool, optional, defaults toself.do_resize) — 是否调整图像大小. - size (
Dict[str, int], 可选, 默认为self.size) — 调整大小后图像的尺寸。图像的最短边将调整为size[“shortest_edge”],最长边将调整以保持输入的宽高比。 - image_grid_pinpoints (
List可选, 默认为self.image_grid_pinpoints) — 用于处理高分辨率图像的可能分辨率列表。最佳分辨率是根据图像的原始大小选择的。 - resample (
int, 可选, 默认为self.resample) — 如果调整图像大小,则使用的重采样过滤器。这可以是枚举PILImageResampling中的一个。只有在do_resize设置为True时才会生效。 - do_center_crop (
bool, optional, defaults toself.do_center_crop) — 是否对图像进行中心裁剪. - crop_size (
Dict[str, int], 可选, 默认为self.crop_size) — 中心裁剪的大小。仅在do_center_crop设置为True时有效。 - do_rescale (
bool, optional, defaults toself.do_rescale) — 是否对图像进行重新缩放. - rescale_factor (
float, optional, defaults toself.rescale_factor) — 如果do_rescale设置为True,则用于重新缩放图像的重新缩放因子。 - do_normalize (
bool, optional, defaults toself.do_normalize) — 是否对图像进行归一化处理。 - image_mean (
float或List[float], 可选, 默认为self.image_mean) — 用于归一化的图像均值。仅在do_normalize设置为True时有效。 - image_std (
float或List[float], 可选, 默认为self.image_std) — 用于归一化的图像标准差。仅在do_normalize设置为True时有效。 - do_pad (
bool, 可选, 默认为self.do_pad) — 是否对图像进行填充。如果为True,将会将批次中图像的补丁维度填充到批次中最大的补丁数量。填充将使用零值应用于图像的底部和右侧。 - do_convert_rgb (
bool, 可选, 默认为self.do_convert_rgb) — 是否将图像转换为RGB. - return_tensors (
str或TensorType, 可选) — 返回的张量类型。可以是以下之一:- 未设置:返回一个
np.ndarray列表。 TensorType.TENSORFLOW或'tf':返回一个类型为tf.Tensor的批次。TensorType.PYTORCH或'pt':返回一个类型为torch.Tensor的批次。TensorType.NUMPY或'np':返回一个类型为np.ndarray的批次。TensorType.JAX或'jax':返回一个类型为jax.numpy.ndarray的批次。
- 未设置:返回一个
- data_format (
ChannelDimension或str, 可选, 默认为ChannelDimension.FIRST) — 输出图像的通道维度格式。可以是以下之一:"channels_first"或ChannelDimension.FIRST: 图像格式为 (num_channels, height, width)。"channels_last"或ChannelDimension.LAST: 图像格式为 (height, width, num_channels)。- 未设置:使用输入图像的通道维度格式。
- input_data_format (
ChannelDimension或str, 可选) — 输入图像的通道维度格式。如果未设置,则从输入图像推断通道维度格式。可以是以下之一:"channels_first"或ChannelDimension.FIRST: 图像格式为 (num_channels, height, width)。"channels_last"或ChannelDimension.LAST: 图像格式为 (height, width, num_channels)。"none"或ChannelDimension.NONE: 图像格式为 (height, width)。
LlavaNextProcessor
类 transformers.LlavaNextProcessor
< source >( image_processor = 无 tokenizer = 无 patch_size = 无 vision_feature_select_strategy = 无 chat_template = 无 image_token = '' num_additional_image_tokens = 0 **kwargs )
参数
- image_processor (LlavaNextImageProcessor, optional) — 图像处理器是一个必需的输入。
- tokenizer (LlamaTokenizerFast, optional) — tokenizer 是一个必需的输入。
- patch_size (
int, optional) — 视觉塔中的补丁大小。 - vision_feature_select_strategy (
str, optional) — 用于从视觉骨干中选择视觉特征的特征选择策略。 应与模型配置中的相同 - chat_template (
str, optional) — 一个Jinja模板,用于将聊天中的消息列表转换为可标记的字符串。 - image_token (
str, 可选, 默认为") — 用于表示图像位置的特殊标记。"
- num_additional_image_tokens (
int, 可选, 默认为 0) — 添加到图像嵌入中的额外令牌数量,例如 CLS (+1)。如果骨干网络没有 CLS 或其他附加的额外令牌,则无需设置此参数。
构建一个LLaVa-NeXT处理器,它将LLaVa-NeXT图像处理器和LLaMa分词器封装到一个单一的处理器中。
LlavaNextProcessor 提供了 LlavaNextImageProcessor 和 LlamaTokenizerFast 的所有功能。更多信息请参见
__call__() 和 decode()。
此方法将其所有参数转发给LlamaTokenizerFast的batch_decode()。请参考该方法的文档字符串以获取更多信息。
此方法将其所有参数转发给LlamaTokenizerFast的decode()。请参考该方法的文档字符串以获取更多信息。
LlavaNextForConditionalGeneration
类 transformers.LlavaNextForConditionalGeneration
< source >( config: LlavaNextConfig )
参数
- config (LlavaNextConfig 或
LlavaNextVisionConfig) — 模型配置类,包含模型的所有参数。使用配置文件初始化时不会加载与模型相关的权重,仅加载配置。查看 from_pretrained() 方法以加载模型权重。
LLAVA-NeXT模型由视觉主干和语言模型组成。 该模型继承自PreTrainedModel。请查看超类文档以了解库为其所有模型实现的通用方法(如下载或保存、调整输入嵌入的大小、修剪头部等)。
该模型也是一个PyTorch torch.nn.Module 子类。 将其作为常规的PyTorch模块使用,并参考PyTorch文档以获取与一般使用和行为相关的所有信息。
前进
< source >( input_ids: LongTensor = None pixel_values: FloatTensor = None image_sizes: typing.Optional[torch.LongTensor] = None attention_mask: typing.Optional[torch.Tensor] = None position_ids: typing.Optional[torch.LongTensor] = None past_key_values: typing.Optional[typing.List[torch.FloatTensor]] = None inputs_embeds: typing.Optional[torch.FloatTensor] = None vision_feature_layer: typing.Optional[int] = None vision_feature_select_strategy: typing.Optional[str] = None labels: typing.Optional[torch.LongTensor] = None use_cache: typing.Optional[bool] = None output_attentions: typing.Optional[bool] = None output_hidden_states: typing.Optional[bool] = None return_dict: typing.Optional[bool] = None cache_position: typing.Optional[torch.LongTensor] = None num_logits_to_keep: int = 0 ) → transformers.models.llava_next.modeling_llava_next.LlavaNextCausalLMOutputWithPast 或 tuple(torch.FloatTensor)
参数
- input_ids (
torch.LongTensorof shape(batch_size, sequence_length)) — Indices of input sequence tokens in the vocabulary. Padding will be ignored by default should you provide it.可以使用AutoTokenizer获取索引。详情请参见PreTrainedTokenizer.encode()和 PreTrainedTokenizer.call()。
- pixel_values (
torch.FloatTensorof shape `(batch_size, num_channels, image_size, image_size)) — 对应于输入图像的张量。像素值可以使用 AutoImageProcessor获取。详情请参见LlavaNextImageProcessor.call()。LlavaProcessor使用 LlavaNextImageProcessor来处理图像。 - image_sizes (
torch.LongTensorof shape(batch_size, 2), optional) — 批次中图像的大小,每个图像的大小为(高度,宽度)。 - attention_mask (
torch.Tensorof shape(batch_size, sequence_length), optional) — Mask to avoid performing attention on padding token indices. Mask values selected in[0, 1]:- 1 for tokens that are not masked,
- 0 for tokens that are masked.
可以使用AutoTokenizer获取索引。详情请参见PreTrainedTokenizer.encode()和 PreTrainedTokenizer.call()。
如果使用了
past_key_values,则可以选择性地仅输入最后一个decoder_input_ids(参见past_key_values)。如果你想改变填充行为,你应该阅读
modeling_opt._prepare_decoder_attention_mask并根据你的需求进行修改。有关默认策略的更多信息,请参见论文中的图1。- 1 indicates the head is not masked,
- 0 indicates the head is masked.
- position_ids (
torch.LongTensorof shape(batch_size, sequence_length), 可选) — 每个输入序列标记在位置嵌入中的位置索引。选择范围在[0, config.n_positions - 1]内。什么是位置ID? - past_key_values (
tuple(tuple(torch.FloatTensor)), optional, returned whenuse_cache=Trueis passed or whenconfig.use_cache=True) — Tuple oftuple(torch.FloatTensor)of lengthconfig.n_layers, with each tuple having 2 tensors of shape(batch_size, num_heads, sequence_length, embed_size_per_head)) and 2 additional tensors of shape(batch_size, num_heads, encoder_sequence_length, embed_size_per_head).包含预先计算的隐藏状态(自注意力块和交叉注意力块中的键和值),这些状态可用于(参见
past_key_values输入)以加速顺序解码。如果使用了
past_key_values,用户可以选择只输入形状为(batch_size, 1)的最后一个decoder_input_ids(那些没有将其过去键值状态提供给此模型的),而不是形状为(batch_size, sequence_length)的所有decoder_input_ids。 - inputs_embeds (
torch.FloatTensorof shape(batch_size, sequence_length, hidden_size), optional) — 可选地,您可以选择直接传递嵌入表示,而不是传递input_ids。如果您希望对如何将input_ids索引转换为相关向量有更多控制,而不是使用模型的内部嵌入查找矩阵,这将非常有用。 - vision_feature_layer (
int, optional, defaults to -2) — 选择视觉特征的层的索引。 - vision_feature_select_strategy (
str, 可选, 默认为"default") — 用于从视觉骨干中选择视觉特征的特征选择策略。 可以是"default"或"full"之一。如果选择"default",则从视觉特征中移除 CLS 标记。 如果选择"full",则使用完整的视觉特征。 - use_cache (
bool, 可选) — 如果设置为True,past_key_values键值状态将被返回,并可用于加速解码(参见past_key_values)。 - output_attentions (
bool, 可选) — 是否返回所有注意力层的注意力张量。有关更多详细信息,请参见返回张量下的attentions。 - output_hidden_states (
bool, 可选) — 是否返回所有层的隐藏状态。有关更多详细信息,请参见返回张量下的hidden_states。 - return_dict (
bool, 可选) — 是否返回一个 ModelOutput 而不是一个普通的元组。 - cache_position (
torch.LongTensorof shape(sequence_length), optional) — 表示输入序列标记在序列中的位置的索引。与position_ids相反, 这个张量不受填充的影响。它用于在正确的位置更新缓存并推断 完整的序列长度。 - Args —
labels (
torch.LongTensorof shape(batch_size, sequence_length), optional): Labels for computing the masked language modeling loss. Indices should either be in[0, ..., config.vocab_size]or -100 (seeinput_idsdocstring). Tokens with indices set to-100are ignored (masked), the loss is only computed for the tokens with labels in[0, ..., config.vocab_size].num_logits_to_keep (
int, 可选): 计算最后num_logits_to_keep个token的logits。如果为0,则计算所有input_ids的logits(特殊情况)。生成时只需要最后一个token的logits,仅计算该token的logits可以节省内存,这对于长序列或大词汇量来说非常重要。
返回
transformers.models.llava_next.modeling_llava_next.LlavaNextCausalLMOutputWithPast 或 tuple(torch.FloatTensor)
一个 transformers.models.llava_next.modeling_llava_next.LlavaNextCausalLMOutputWithPast 或一个由
torch.FloatTensor 组成的元组(如果传递了 return_dict=False 或当 config.return_dict=False 时),包含各种
元素,具体取决于配置(LlavaNextConfig)和输入。
-
loss (
torch.FloatTensor形状为(1,),可选,当提供labels时返回) — 语言建模损失(用于下一个令牌预测)。 -
logits (
torch.FloatTensor形状为(batch_size, sequence_length, config.vocab_size)) — 语言建模头的预测分数(SoftMax 之前每个词汇令牌的分数)。 -
past_key_values (
tuple(tuple(torch.FloatTensor)),可选,当传递use_cache=True或当config.use_cache=True时返回) — 长度为config.n_layers的tuple(torch.FloatTensor)元组,每个元组包含 2 个形状为(batch_size, num_heads, sequence_length, embed_size_per_head)的张量。包含预计算的隐藏状态(自注意力块中的键和值),可用于(参见
past_key_values输入)加速顺序解码。 -
hidden_states (
tuple(torch.FloatTensor),可选,当传递output_hidden_states=True或当config.output_hidden_states=True时返回) — 由torch.FloatTensor组成的元组(一个用于嵌入层的输出,如果模型有嵌入层,+ 一个用于每层的输出)形状为(batch_size, sequence_length, hidden_size)。模型在每层输出处的隐藏状态加上可选的初始嵌入输出。
-
attentions (
tuple(torch.FloatTensor),可选,当传递output_attentions=True或当config.output_attentions=True时返回) — 由torch.FloatTensor组成的元组(每层一个)形状为(batch_size, num_heads, sequence_length, sequence_length)。注意力 softmax 后的注意力权重,用于计算自注意力头中的加权平均值。
-
image_hidden_states (
torch.FloatTensor,可选) — 一个形状为 (batch_size * num_patches, num_images, sequence_length, hidden_size)` 的torch.FloatTensor`。 由视觉编码器生成并在投影最后一个隐藏状态后的模型的 image_hidden_states。
LlavaNextForConditionalGeneration 的前向方法,重写了 __call__ 特殊方法。
尽管前向传递的配方需要在此函数内定义,但之后应该调用Module实例而不是这个,因为前者负责运行预处理和后处理步骤,而后者会默默地忽略它们。
示例:
>>> from PIL import Image
>>> import requests
>>> from transformers import AutoProcessor, LlavaNextForConditionalGeneration

>>> model = LlavaNextForConditionalGeneration.from_pretrained("llava-hf/llava-v1.6-mistral-7b-hf")
>>> processor = AutoProcessor.from_pretrained("llava-hf/llava-v1.6-mistral-7b-hf")

>>> prompt = "[INST] <image>\nWhat is shown in this image? [/INST]"
>>> url = "https://www.ilankelman.org/stopsigns/australia.jpg"
>>> image = Image.open(requests.get(url, stream=True).raw)

>>> inputs = processor(images=image, text=prompt, return_tensors="pt")

>>> # Generate
>>> generate_ids = model.generate(**inputs, max_length=30)
>>> processor.batch_decode(generate_ids, skip_special_tokens=True, clean_up_tokenization_spaces=False)[0]
"[INST]  \nWhat is shown in this image? [/INST] The image appears to be a radar chart, which is a type of multi-dimensional plot (...)"