基于种群的训练指南#
Tune 包含了对 基于种群的训练 (PBT) 的分布式实现,作为一个 调度器。
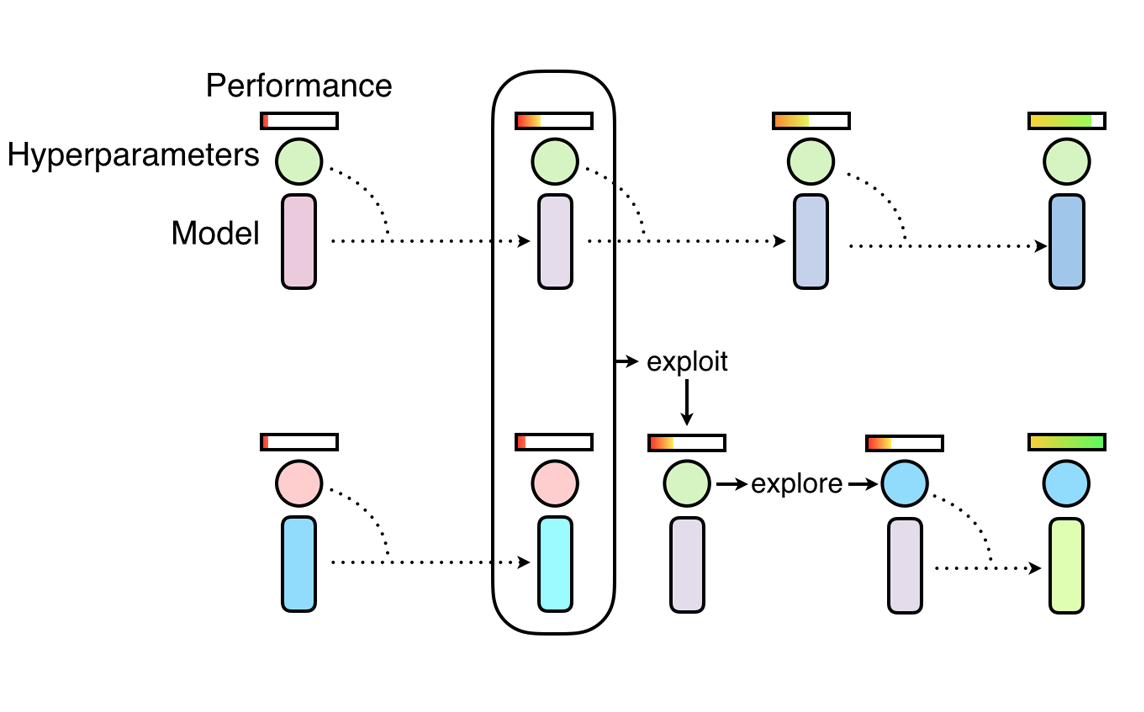
PBT 的开始是并行训练许多神经网络,使用随机超参数,并利用种群中其他成员的信息来优化这些超参数,并将资源分配给有前景的模型。让我们来看一下如何使用这个算法。
具有基于种群的训练的函数 API#
PBT 的灵感来源于遗传算法,其中表现不佳的种群成员可以利用来自表现最佳成员的信息。在我们的案例中,种群是指并行运行的 Tune 试验集合,试验性能由用户指定的指标决定,例如 mean_accuracy。
PBT 主要有两个步骤:利用 和 探索。 利用的一个例子是一个试验从表现更好的试验复制模型参数。 探索的一个例子是通过随机扰动当前值生成新的超参数配置。
随着神经网络种群的训练进展,这种利用和探索的过程会定期进行,确保种群中所有工作者都有良好的基础性能,并且不断探索新的超参数配置。 这意味着 PBT 可以快速利用好的超参数,将更多训练时间投入到有前景的模型中,并且关键的是,在训练过程中变异超参数值,从而学习最佳的自适应超参数调度。
在这里,我们将通过一个 MNIST ConvNet 训练示例来介绍如何使用 PBT。首先,我们定义一个训练函数,使用 SGD 训练一个 ConvNet 模型。
!pip install "ray[tune]"
import os
import tempfile

import torch
import torch.optim as optim

import ray
from ray import train, tune
from ray.train import Checkpoint
from ray.tune.examples.mnist_pytorch import ConvNet, get_data_loaders, test_func
from ray.tune.schedulers import PopulationBasedTraining


def train_convnet(config):
    # 创建我们的数据加载器、模型和优化器。
    step = 1
    train_loader, test_loader = get_data_loaders()
    model = ConvNet()
    optimizer = optim.SGD(
        model.parameters(),
        lr=config.get("lr", 0.01),
        momentum=config.get("momentum", 0.9),
    )

    # 如果 `train.get_checkpoint()` 有值,则表示我们正在从检查点恢复训练。
    checkpoint = train.get_checkpoint()
    if checkpoint:
        with checkpoint.as_directory() as checkpoint_dir:
            checkpoint_dict = torch.load(os.path.join(checkpoint_dir, "checkpoint.pt"))

        # 从检查点加载模型状态和迭代步骤。
        model.load_state_dict(checkpoint_dict["model_state_dict"])
        # 加载优化器状态(由于我们使用了动量,这是必要的),
        # 然后根据配置设置`lr`和`momentum`。
        optimizer.load_state_dict(checkpoint_dict["optimizer_state_dict"])
        for param_group in optimizer.param_groups:
            if "lr" in config:
                param_group["lr"] = config["lr"]
            if "momentum" in config:
                param_group["momentum"] = config["momentum"]

        # 注意:确保将检查点步骤加1以获取当前步骤。
        last_step = checkpoint_dict["step"]
        step = last_step + 1

    while True:
        ray.tune.examples.mnist_pytorch.train_func(model, optimizer, train_loader)
        acc = test_func(model, test_loader)
        metrics = {"mean_accuracy": acc, "lr": config["lr"]}

        # 每 `checkpoint_interval` 步,保存当前状态的检查点。
        if step % config["checkpoint_interval"] == 0:
            with tempfile.TemporaryDirectory() as tmpdir:
                torch.save(
                    {
                        "step": step,
                        "model_state_dict": model.state_dict(),
                        "optimizer_state_dict": optimizer.state_dict(),
                    },
                    os.path.join(tmpdir, "checkpoint.pt"),
                )
                train.report(metrics, checkpoint=Checkpoint.from_directory(tmpdir))
        else:
            train.report(metrics)

        step += 1
该示例重用了 ray/tune/examples/mnist_pytorch.py 中的一些函数:这也是一个很好的演示,展示了如何解耦调优逻辑和原始训练代码。
PBT 需要进行检查点的保存和加载,因此我们必须在通过 train.get_checkpoint() 提供检查点时加载该检查点,并定期通过 train.report(...) 保存我们的模型状态到检查点 - 在这种情况下,每 checkpoint_interval 次迭代,这是一项我们稍后设置的配置。
然后,我们定义一个 PBT 调度程序:
perturbation_interval = 5
scheduler = PopulationBasedTraining(
    time_attr="training_iteration",
    perturbation_interval=perturbation_interval,
    metric="mean_accuracy",
    mode="max",
    hyperparam_mutations={
        # 重采样分布
        "lr": tune.uniform(0.0001, 1),
        # 允许在此类别值集合内进行扰动
        "momentum": [0.8, 0.9, 0.99],
    },
)
一些最重要的参数包括:
hyperparam_mutations和custom_explore_fn用于突变超参数。hyperparam_mutations是一个字典,其中的每个键/值对指定了超参数的候选项或函数。custom_explore_fn在应用hyperparam_mutations中的内置扰动后进行应用,并应根据需要返回更新后的配置。resample_probability:在应用hyperparam_mutations时,从原始分布中重新采样的概率。如果未进行重新采样,值将按连续情况下的1.2或0.8的因子进行扰动,或者在离散情况下更改为相邻值。请注意,resample_probability默认值为0.25,因此具有分布的超参数可能超出特定范围。
现在我们可以通过调用 Tuner.fit() 来启动调优过程:
if ray.is_initialized():
    ray.shutdown()
ray.init()

tuner = tune.Tuner(
    train_convnet,
    run_config=train.RunConfig(
        name="pbt_test",
        # 当我们达到一个阈值精度,或一个最大值时停止。
        # 训练迭代次数或达到指定次数,以先到者为准
        stop={"mean_accuracy": 0.96, "training_iteration": 50},
        checkpoint_config=train.CheckpointConfig(
            checkpoint_score_attribute="mean_accuracy",
            num_to_keep=4,
        ),
        storage_path="/tmp/ray_results",
    ),
    tune_config=tune.TuneConfig(
        scheduler=scheduler,
        num_samples=4,
    ),
    param_space={
        "lr": tune.uniform(0.001, 1),
        "momentum": tune.uniform(0.001, 1),
        "checkpoint_interval": perturbation_interval,
    },
)

results_grid = tuner.fit()
备注
我们建议将 checkpoint_interval 与 PBT 配置中的 perturbation_interval 匹配。
这确保了 PBT 算法实际上利用了最近一次迭代中的试验。
如果您的 perturbation_interval 较大且希望更频繁地进行检查点,请将 perturbation_interval 设置为 checkpoint_interval 的倍数(例如,每 2 个步骤进行一次检查点,每 4 个步骤进行一次扰动)。
在 {LOG_DIR}/{MY_EXPERIMENT_NAME}/ 中,所有变异记录在 pbt_global.txt 中,单个策略扰动记录在 pbt_policy_{i}.txt 中。每个扰动步骤的调优日志记录以下信息:目标试验标签、克隆试验标签、目标试验迭代、克隆试验迭代、旧配置、新配置。
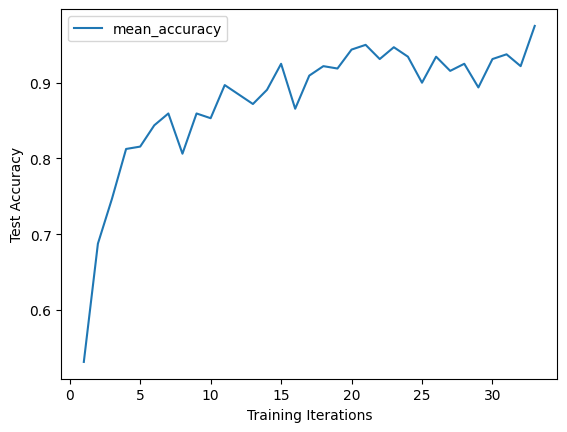
检查准确性:
import matplotlib.pyplot as plt
import os

# 获得最佳试验结果
best_result = results_grid.get_best_result(metric="mean_accuracy", mode="max")

# 打印存储检查点的路径
print('Best result path:', best_result.path)

# 打印在最后一次迭代中报告的最佳试验配置
# 注意:此配置仅是试验在最后一次迭代中得出的结果。
# 请参阅下一节以了解如何重放整个配置历史记录。
print("Best final iteration hyperparameter config:\n", best_result.config)

# 绘制最佳试验的学习曲线
df = best_result.metrics_dataframe
# 去重,因为PBT可能会引入重复数据
df = df.drop_duplicates(subset="training_iteration", keep="last")
df.plot("training_iteration", "mean_accuracy")
plt.xlabel("Training Iterations")
plt.ylabel("Test Accuracy")
plt.show()
Best result logdir: /tmp/ray_results/pbt_test/train_convnet_69158_00000_0_lr=0.0701,momentum=0.1774_2022-10-20_11-31-32
Best final iteration hyperparameter config:
 {'lr': 0.07008752890101211, 'momentum': 0.17736213114751204, 'checkpoint_interval': 5}
重放 PBT 运行#
人口基础训练的运行以完全训练的模型结束。然而,有时您可能希望从头开始训练模型,但使用从 PBT 获得的相同超参数计划。Ray Tune 提供了一个重放工具来实现这一点。
您需要做的就是传递您想重放的试验的策略日志文件。该文件通常存储在实验目录中,例如
~/ray_results/pbt_test/pbt_policy_ba982_00000.txt.
重放工具会读取该试验的原始配置,并在每次它最初被扰动时更新它。因此,您可以(并且应该)使用相同的 Trainable 来进行重放运行。请注意,最终结果可能不会完全相同,因为只有超参数配置更改会被重放,而不会从其他样本加载检查点。
import glob

from ray import tune
from ray.tune.schedulers import PopulationBasedTrainingReplay

# 从我们刚刚进行的实验中获取一个随机的重放策略
sample_pbt_trial_log = glob.glob(
    os.path.expanduser("/tmp/ray_results/pbt_test/pbt_policy*.txt")
)[0]
replay = PopulationBasedTrainingReplay(sample_pbt_trial_log)

tuner = tune.Tuner(
    train_convnet,
    tune_config=tune.TuneConfig(scheduler=replay),
    run_config=train.RunConfig(stop={"training_iteration": 50}),
)
results_grid = tuner.fit()
Tune Status
| Current time: | 2022-10-20 11:32:49 |
| Running for: | 00:00:30.39 |
| Memory: | 3.8/62.0 GiB |
System Info
PopulationBasedTraining replay: Step 39, perturb 2Resources requested: 0/16 CPUs, 0/0 GPUs, 0.0/34.21 GiB heap, 0.0/17.1 GiB objects
Trial Status
| Trial name | status | loc | acc | iter | total time (s) | lr |
|---|---|---|---|---|---|---|
| train_convnet_87836_00000 | TERMINATED | 172.31.111.100:18021 | 0.93125 | 100 | 21.0994 | 0.00720379 |
Trial Progress
| Trial name | date | done | episodes_total | experiment_id | hostname | iterations_since_restore | lr | mean_accuracy | node_ip | pid | time_since_restore | time_this_iter_s | time_total_s | timestamp | timesteps_since_restore | timesteps_total | training_iteration | trial_id | warmup_time |
|---|---|---|---|---|---|---|---|---|---|---|---|---|---|---|---|---|---|---|---|
| train_convnet_87836_00000 | 2022-10-20_11-32-49 | True | 2a88b6f21b54451aa81c935c77ffbce5 | ip-172-31-111-100 | 61 | 0.00720379 | 0.93125 | 172.31.111.100 | 18021 | 12.787 | 0.196162 | 21.0994 | 1666290769 | 0 | 100 | 87836_00000 | 0.00894547 |
2022-10-20 11:32:28,900	INFO pbt.py:1085 -- Population Based Training replay is now at step 32. Configuration will be changed to {'lr': 0.08410503468121452, 'momentum': 0.99, 'checkpoint_interval': 5}.
(train_convnet pid=17974) 2022-10-20 11:32:32,098	INFO trainable.py:772 -- Restored on 172.31.111.100 from checkpoint: /home/ray/ray_results/train_convnet_2022-10-20_11-32-19/train_convnet_87836_00000_0_2022-10-20_11-32-19/checkpoint_tmp4ab367
(train_convnet pid=17974) 2022-10-20 11:32:32,098	INFO trainable.py:781 -- Current state after restoring: {'_iteration': 32, '_timesteps_total': None, '_time_total': 6.83707332611084, '_episodes_total': None}
2022-10-20 11:32:33,575	INFO pbt.py:1085 -- Population Based Training replay is now at step 39. Configuration will be changed to {'lr': 0.007203792764253441, 'momentum': 0.9, 'checkpoint_interval': 5}.
(train_convnet pid=18021) 2022-10-20 11:32:36,764	INFO trainable.py:772 -- Restored on 172.31.111.100 from checkpoint: /home/ray/ray_results/train_convnet_2022-10-20_11-32-19/train_convnet_87836_00000_0_2022-10-20_11-32-19/checkpoint_tmpb82652
(train_convnet pid=18021) 2022-10-20 11:32:36,765	INFO trainable.py:781 -- Current state after restoring: {'_iteration': 39, '_timesteps_total': None, '_time_total': 8.312420129776001, '_episodes_total': None}
2022-10-20 11:32:49,668	INFO tune.py:787 -- Total run time: 30.50 seconds (30.38 seconds for the tuning loop).
示例:带有PBT的DCGAN#
让我们看一个更复杂的例子:训练生成对抗网络(GAN)(Goodfellow et al., 2014)。 GAN框架通过由两个竞争模块——生成器和判别器——组成的训练范式来学习生成模型。 GAN训练在面对不理想的超参数选择时可能非常脆弱和不稳定,生成器常常会崩溃到单一模式或完全发散。
正如在基于人群的训练(PBT)中所呈现的,PBT可以帮助DCGAN的训练。我们将逐步介绍如何在Tune中实现这一点。完整的代码示例在Github上。
我们使用标准的Pytorch API定义生成器和判别器:
# custom weights initialization called on netG and netD
def weights_init(m):
    classname = m.__class__.__name__
    if classname.find("Conv") != -1:
        nn.init.normal_(m.weight.data, 0.0, 0.02)
    elif classname.find("BatchNorm") != -1:
        nn.init.normal_(m.weight.data, 1.0, 0.02)
        nn.init.constant_(m.bias.data, 0)


# Generator Code
class Generator(nn.Module):
    def __init__(self):
        super(Generator, self).__init__()
        self.main = nn.Sequential(
            # input is Z, going into a convolution
            nn.ConvTranspose2d(nz, ngf * 4, 4, 1, 0, bias=False),
            nn.BatchNorm2d(ngf * 4),
            nn.ReLU(True),
            nn.ConvTranspose2d(ngf * 4, ngf * 2, 4, 2, 1, bias=False),
            nn.BatchNorm2d(ngf * 2),
            nn.ReLU(True),
            nn.ConvTranspose2d(ngf * 2, ngf, 4, 2, 1, bias=False),
            nn.BatchNorm2d(ngf),
            nn.ReLU(True),
            nn.ConvTranspose2d(ngf, nc, 4, 2, 1, bias=False),
            nn.Tanh(),
        )

    def forward(self, input):
        return self.main(input)


class Discriminator(nn.Module):
    def __init__(self):
        super(Discriminator, self).__init__()
        self.main = nn.Sequential(
            nn.Conv2d(nc, ndf, 4, 2, 1, bias=False),
            nn.LeakyReLU(0.2, inplace=True),
            nn.Conv2d(ndf, ndf * 2, 4, 2, 1, bias=False),
            nn.BatchNorm2d(ndf * 2),
            nn.LeakyReLU(0.2, inplace=True),
            nn.Conv2d(ndf * 2, ndf * 4, 4, 2, 1, bias=False),
            nn.BatchNorm2d(ndf * 4),
            nn.LeakyReLU(0.2, inplace=True),
            nn.Conv2d(ndf * 4, 1, 4, 1, 0, bias=False),
            nn.Sigmoid(),
        )

    def forward(self, input):
        return self.main(input)
为了通过PBT训练模型,我们需要定义一个度量标准供调度器评估模型候选者。对于GAN网络,像素评分无疑是最常用的度量标准。我们训练了一个mnist分类模型(LeNet),并用它对生成的图像进行推断,以评估图像质量。
小技巧
像素评分使用一个训练好的分类模型,我们将其保存在对象存储中,并作为对象引用传递给inception_score函数。
class Net(nn.Module):
    """
    LeNet for MNist classification, used for inception_score
    """

    def __init__(self):
        super(Net, self).__init__()
        self.conv1 = nn.Conv2d(1, 10, kernel_size=5)
        self.conv2 = nn.Conv2d(10, 20, kernel_size=5)
        self.conv2_drop = nn.Dropout2d()
        self.fc1 = nn.Linear(320, 50)
        self.fc2 = nn.Linear(50, 10)

    def forward(self, x):
        x = F.relu(F.max_pool2d(self.conv1(x), 2))
        x = F.relu(F.max_pool2d(self.conv2_drop(self.conv2(x)), 2))
        x = x.view(-1, 320)
        x = F.relu(self.fc1(x))
        x = F.dropout(x, training=self.training)
        x = self.fc2(x)
        return F.log_softmax(x, dim=1)


def inception_score(imgs, mnist_model_ref, batch_size=32, splits=1):
    N = len(imgs)
    dtype = torch.FloatTensor
    dataloader = torch.utils.data.DataLoader(imgs, batch_size=batch_size)
    cm = ray.get(mnist_model_ref)  # Get the mnist model from Ray object store.
    up = nn.Upsample(size=(28, 28), mode="bilinear").type(dtype)

    def get_pred(x):
        x = up(x)
        x = cm(x)
        return F.softmax(x).data.cpu().numpy()

    preds = np.zeros((N, 10))
    for i, batch in enumerate(dataloader, 0):
        batch = batch.type(dtype)
        batchv = Variable(batch)
        batch_size_i = batch.size()[0]
        preds[i * batch_size : i * batch_size + batch_size_i] = get_pred(batchv)

    # Now compute the mean kl-div
    split_scores = []
    for k in range(splits):
        part = preds[k * (N // splits) : (k + 1) * (N // splits), :]
        py = np.mean(part, axis=0)
        scores = []
        for i in range(part.shape[0]):
            pyx = part[i, :]
            scores.append(entropy(pyx, py))
        split_scores.append(np.exp(np.mean(scores)))

    return np.mean(split_scores), np.std(split_scores)
我们定义了一个训练函数,其中包含一个生成器和一个判别器,每个都有独立的学习率和优化器。我们确保在训练中实现检查点。特别注意,我们需要在从检查点加载后设置优化器学习率,因为我们希望使用在config中传递给我们的扰动配置,而不是我们正在利用的试验的确切配置。
def dcgan_train(config):
    use_cuda = config.get("use_gpu") and torch.cuda.is_available()
    device = torch.device("cuda" if use_cuda else "cpu")
    netD = Discriminator().to(device)
    netD.apply(weights_init)
    netG = Generator().to(device)
    netG.apply(weights_init)
    criterion = nn.BCELoss()
    optimizerD = optim.Adam(
        netD.parameters(), lr=config.get("lr", 0.01), betas=(beta1, 0.999)
    )
    optimizerG = optim.Adam(
        netG.parameters(), lr=config.get("lr", 0.01), betas=(beta1, 0.999)
    )
    with FileLock(os.path.expanduser("~/ray_results/.data.lock")):
        dataloader = get_data_loader()

    step = 1
    checkpoint = train.get_checkpoint()
    if checkpoint:
        with checkpoint.as_directory() as checkpoint_dir:
            checkpoint_dict = torch.load(os.path.join(checkpoint_dir, "checkpoint.pt"))
        netD.load_state_dict(checkpoint_dict["netDmodel"])
        netG.load_state_dict(checkpoint_dict["netGmodel"])
        optimizerD.load_state_dict(checkpoint_dict["optimD"])
        optimizerG.load_state_dict(checkpoint_dict["optimG"])
        # Note: Make sure to increment the loaded step by 1 to get the
        # current step.
        last_step = checkpoint_dict["step"]
        step = last_step + 1

        # NOTE: It's important to set the optimizer learning rates
        # again, since we want to explore the parameters passed in by PBT.
        # Without this, we would continue using the exact same
        # configuration as the trial whose checkpoint we are exploiting.
        if "netD_lr" in config:
            for param_group in optimizerD.param_groups:
                param_group["lr"] = config["netD_lr"]
        if "netG_lr" in config:
            for param_group in optimizerG.param_groups:
                param_group["lr"] = config["netG_lr"]

    while True:
        lossG, lossD, is_score = train_func(
            netD,
            netG,
            optimizerG,
            optimizerD,
            criterion,
            dataloader,
            step,
            device,
            config["mnist_model_ref"],
        )
        metrics = {"lossg": lossG, "lossd": lossD, "is_score": is_score}

        if step % config["checkpoint_interval"] == 0:
            with tempfile.TemporaryDirectory() as tmpdir:
                torch.save(
                    {
                        "netDmodel": netD.state_dict(),
                        "netGmodel": netG.state_dict(),
                        "optimD": optimizerD.state_dict(),
                        "optimG": optimizerG.state_dict(),
                        "step": step,
                    },
                    os.path.join(tmpdir, "checkpoint.pt"),
                )
                train.report(metrics, checkpoint=Checkpoint.from_directory(tmpdir))
        else:
            train.report(metrics)

        step += 1
我们将开始调整,指定 inception score 作为指标:
import torch
import ray
from ray import train, tune
from ray.tune.schedulers import PopulationBasedTraining

from ray.tune.examples.pbt_dcgan_mnist.common import Net
from ray.tune.examples.pbt_dcgan_mnist.pbt_dcgan_mnist_func import (
    dcgan_train,
    download_mnist_cnn,
)

# 加载预训练的MNIST分类模型以进行inception_score计算
mnist_cnn = Net()
model_path = download_mnist_cnn()
mnist_cnn.load_state_dict(torch.load(model_path))
mnist_cnn.eval()
# 将模型放入Ray对象存储中。
mnist_model_ref = ray.put(mnist_cnn)

perturbation_interval = 5
scheduler = PopulationBasedTraining(
    perturbation_interval=perturbation_interval,
    hyperparam_mutations={
        # 重采样分布
        "netG_lr": tune.uniform(1e-2, 1e-5),
        "netD_lr": tune.uniform(1e-2, 1e-5),
    },
)

smoke_test = True  # 出于测试目的:将此项设置为 False 以运行完整实验
tuner = tune.Tuner(
    dcgan_train,
    run_config=train.RunConfig(
        name="pbt_dcgan_mnist_tutorial",
        stop={"training_iteration": 5 if smoke_test else 150},
    ),
    tune_config=tune.TuneConfig(
        metric="is_score",
        mode="max",
        num_samples=2 if smoke_test else 8,
        scheduler=scheduler,
    ),
    param_space={
        # 定义如何选择学习率的初始值。
        "netG_lr": tune.choice([0.0001, 0.0002, 0.0005]),
        "netD_lr": tune.choice([0.0001, 0.0002, 0.0005]),
        "mnist_model_ref": mnist_model_ref,
        "checkpoint_interval": perturbation_interval,
    },
)
results_grid = tuner.fit()
训练好的生成器模型可以从检查点加载,以从噪声信号生成数字图像。
可视化#
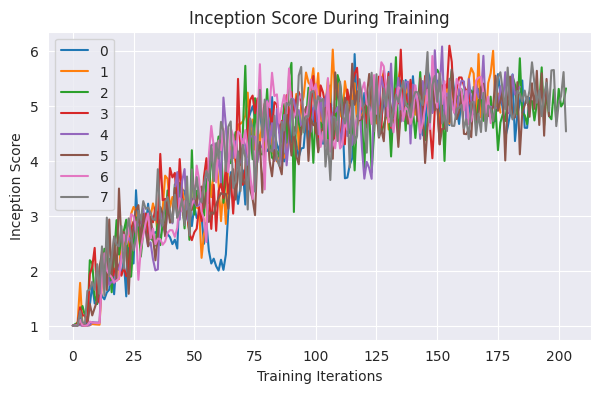
下面,我们可视化训练日志中逐渐增加的起始分数。
import matplotlib.pyplot as plt

# 取消注释以应用绘图样式
# !pip install seaborn
# import seaborn as sns
# sns.set_style("darkgrid")

result_dfs = [result.metrics_dataframe for result in results_grid]
best_result = results_grid.get_best_result(metric="is_score", mode="max")

plt.figure(figsize=(7, 4))
for i, df in enumerate(result_dfs):
    plt.plot(df["is_score"], label=i)
plt.legend()
plt.title("Inception Score During Training")
plt.xlabel("Training Iterations")
plt.ylabel("Inception Score")
plt.show()
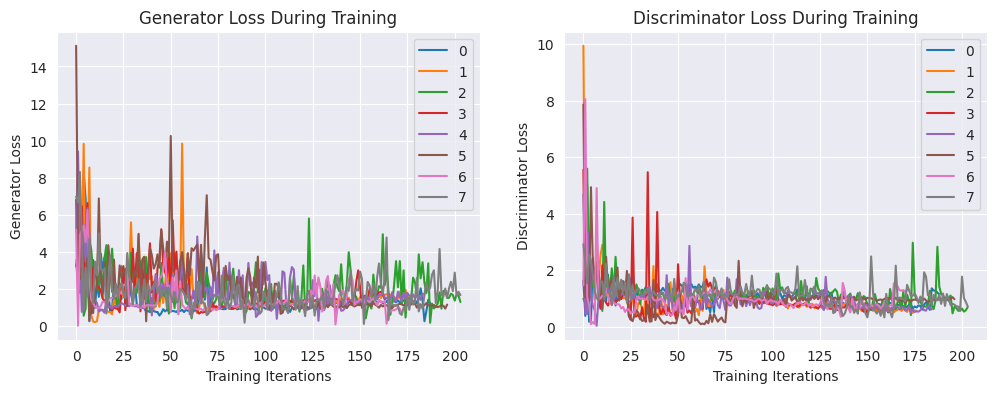
接下来,让我们来看一下生成器和判别器的损失:
fig, axs = plt.subplots(1, 2, figsize=(12, 4))

for i, df in enumerate(result_dfs):
    axs[0].plot(df["lossg"], label=i)
axs[0].legend()
axs[0].set_title("Generator Loss During Training")
axs[0].set_xlabel("Training Iterations")
axs[0].set_ylabel("Generator Loss")

for i, df in enumerate(result_dfs):
    axs[1].plot(df["lossd"], label=i)
axs[1].legend()
axs[1].set_title("Discriminator Loss During Training")
axs[1].set_xlabel("Training Iterations")
axs[1].set_ylabel("Discriminator Loss")

plt.show()
from ray.tune.examples.pbt_dcgan_mnist.common import demo_gan

with best_result.checkpoint.as_directory() as best_checkpoint:
    demo_gan([best_checkpoint])
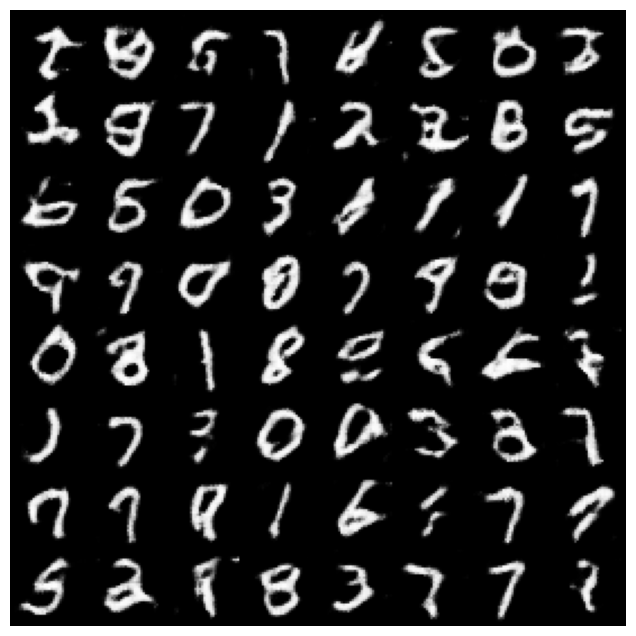
MNIST生成器的训练应该需要几分钟的时间。这个示例可以很容易地修改以生成其他数据集的图像,例如cifar10或LSUN。
摘要#
本教程涵盖了:
两个示例,使用基于种群的训练来调整深度学习超参数(CNN和GAN训练)
保存和加载检查点,确保所有超参数都被使用(例如:优化器状态)
训练后可视化报告的指标
要了解更多,请查看下一个教程 可视化基于人群的训练 (PBT) 超参数优化,以获取理解基于种群的训练及其潜在行为的可视化指南。