备注
前往结尾 下载完整示例代码。或者通过 Binder 在浏览器中运行此示例。
使用局部特征和随机森林的可训练分割#
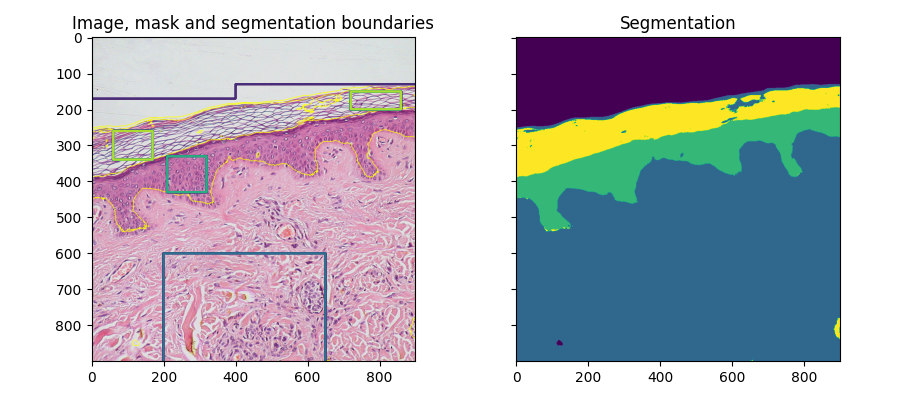
这里使用基于局部强度、边缘和不同尺度的纹理的局部特征来计算基于像素的分割。用户提供的掩码用于识别不同区域。掩码的像素用于从scikit-learn训练一个随机森林分类器 [1] 。然后,未标记的像素根据分类器的预测进行标记。
这种分割算法在其他软件如 ilastik [2] 或 ImageJ [3] 中被称为可训练分割(在 ImageJ 中也称为“weka 分割”)。
import numpy as np
import matplotlib.pyplot as plt
from skimage import data, segmentation, feature, future
from sklearn.ensemble import RandomForestClassifier
from functools import partial

full_img = data.skin()

img = full_img[:900, :900]

# Build an array of labels for training the segmentation.
# Here we use rectangles but visualization libraries such as plotly
# (and napari?) can be used to draw a mask on the image.
training_labels = np.zeros(img.shape[:2], dtype=np.uint8)
training_labels[:130] = 1
training_labels[:170, :400] = 1
training_labels[600:900, 200:650] = 2
training_labels[330:430, 210:320] = 3
training_labels[260:340, 60:170] = 4
training_labels[150:200, 720:860] = 4

sigma_min = 1
sigma_max = 16
features_func = partial(
    feature.multiscale_basic_features,
    intensity=True,
    edges=False,
    texture=True,
    sigma_min=sigma_min,
    sigma_max=sigma_max,
    channel_axis=-1,
)
features = features_func(img)
clf = RandomForestClassifier(n_estimators=50, n_jobs=-1, max_depth=10, max_samples=0.05)
clf = future.fit_segmenter(training_labels, features, clf)
result = future.predict_segmenter(features, clf)

fig, ax = plt.subplots(1, 2, sharex=True, sharey=True, figsize=(9, 4))
ax[0].imshow(segmentation.mark_boundaries(img, result, mode='thick'))
ax[0].contour(training_labels)
ax[0].set_title('Image, mask and segmentation boundaries')
ax[1].imshow(result)
ax[1].set_title('Segmentation')
fig.tight_layout()

特征重要性#
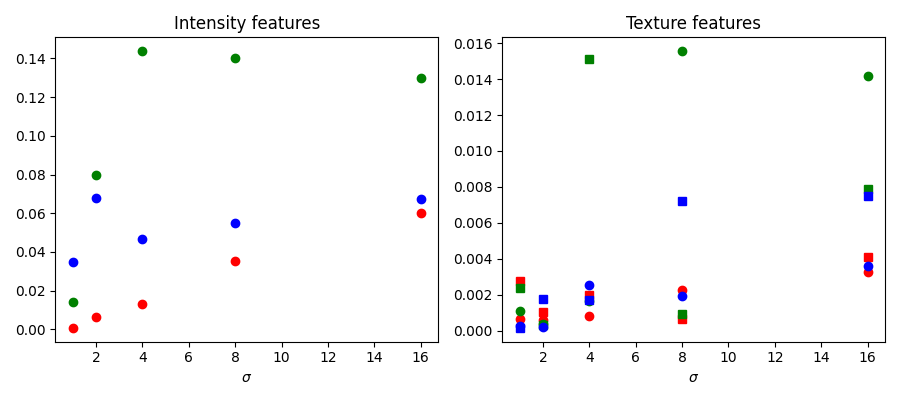
我们下面检查由scikit-learn计算的不同特征的重要性。强度特征的重要性远高于纹理特征。使用这些信息来减少提供给分类器的特征数量,以减少计算时间,这可能很诱人。然而,这可能导致过拟合,并在区域边界处导致结果退化。
fig, ax = plt.subplots(1, 2, figsize=(9, 4))
l = len(clf.feature_importances_)
feature_importance = (
    clf.feature_importances_[: l // 3],
    clf.feature_importances_[l // 3 : 2 * l // 3],
    clf.feature_importances_[2 * l // 3 :],
)
sigmas = np.logspace(
    np.log2(sigma_min),
    np.log2(sigma_max),
    num=int(np.log2(sigma_max) - np.log2(sigma_min) + 1),
    base=2,
    endpoint=True,
)
for ch, color in zip(range(3), ['r', 'g', 'b']):
    ax[0].plot(sigmas, feature_importance[ch][::3], 'o', color=color)
    ax[0].set_title("Intensity features")
    ax[0].set_xlabel("$\\sigma$")
for ch, color in zip(range(3), ['r', 'g', 'b']):
    ax[1].plot(sigmas, feature_importance[ch][1::3], 'o', color=color)
    ax[1].plot(sigmas, feature_importance[ch][2::3], 's', color=color)
    ax[1].set_title("Texture features")
    ax[1].set_xlabel("$\\sigma$")

fig.tight_layout()

拟合新图像#
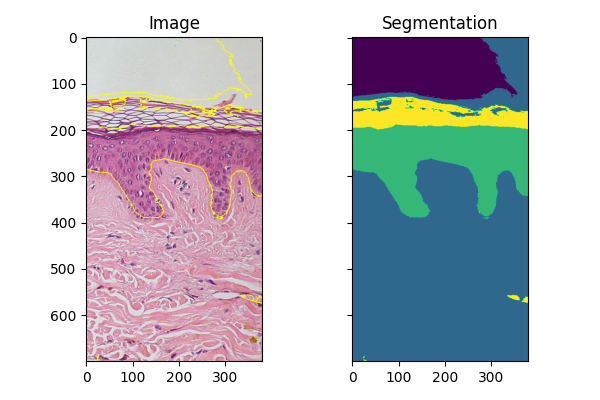
如果你有几张在相似条件下获取的相似物体的图像,你可以使用通过 fit_segmenter 训练的分类器来分割其他图像。在下面的例子中,我们只是使用了图像的不同部分。
img_new = full_img[:700, 900:]

features_new = features_func(img_new)
result_new = future.predict_segmenter(features_new, clf)
fig, ax = plt.subplots(1, 2, sharex=True, sharey=True, figsize=(6, 4))
ax[0].imshow(segmentation.mark_boundaries(img_new, result_new, mode='thick'))
ax[0].set_title('Image')
ax[1].imshow(result_new)
ax[1].set_title('Segmentation')
fig.tight_layout()

plt.show()

脚本总运行时间: (0 分钟 2.224 秒)
