开发容器命令行界面
本主题涵盖了开发容器命令行界面(dev container CLI),它允许您构建和管理开发容器,并且是开发容器规范的配套工具。
开发容器
一个一致、可预测的环境是提高生产力和享受软件开发体验的关键。
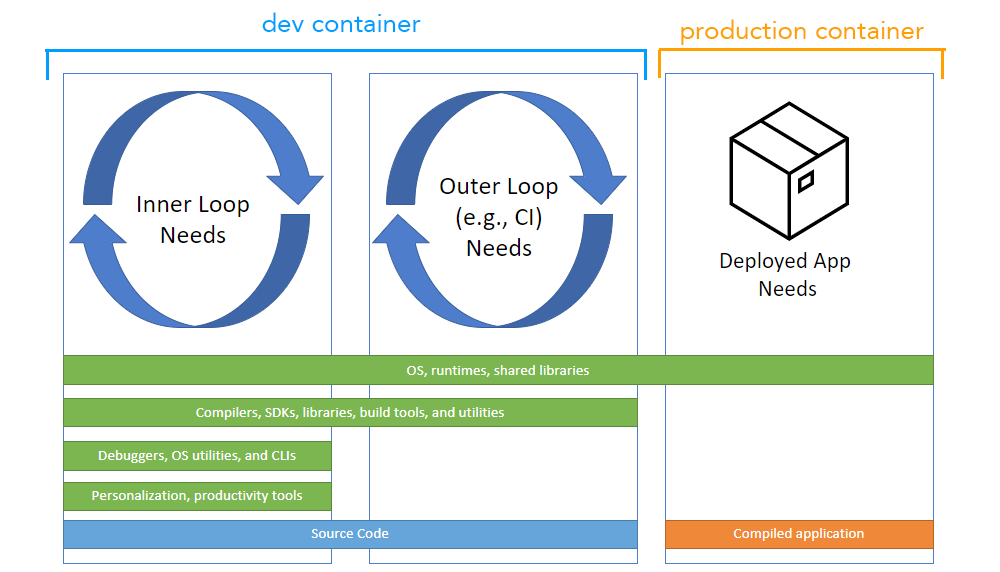
容器(例如Docker容器)历来用于在部署应用程序时进行标准化,但支持其他场景(包括持续集成(CI)、测试自动化和功能齐全的编码环境)有很大的机会。开发容器提供了这种工作环境,并确保您的项目拥有所需的工具和软件,无论它是复杂且分布式的,还是只有一些简单的要求。

开发容器在Visual Studio Code中通过Dev Containers扩展和在GitHub Codespaces中得到支持。这种支持由devcontainer.json提供支持,这是一种结构化的带有注释的JSON(jsonc)元数据格式,用于配置容器化环境。
随着容器化生产工作负载变得普遍,开发容器在VS Code之外的场景中也变得广泛有用。为了在任何环境中推广开发容器,已经开始着手制定开发容器规范,该规范使任何工具中的任何人都能配置一致的开发环境。开源的dev container CLI作为该规范的参考实现。
开发容器命令行界面
当像VS Code和Codespaces这样的工具检测到用户项目中的devcontainer.json文件时,它们会使用CLI来配置开发容器。开发容器CLI是一个参考实现,以便个人用户和其他工具可以读取devcontainer.json元数据并从中创建开发容器。
此CLI可以直接使用,也可以集成到产品体验中,类似于今天它与Dev Containers和Codespaces的集成方式。它目前支持简单的单容器选项,并与Docker Compose集成,适用于多容器场景。
CLI 可在 devcontainers/cli 仓库中找到。
安装
您可以通过Dev Containers扩展快速尝试CLI。从命令面板中选择Dev Containers: 安装devcontainer CLI命令(F1)。
替代安装
在其他地方使用CLI还有额外的选项:
- 安装其 npm 包
- 使用 GitHub Action 或 Azure DevOps 任务
- 您可以在 devcontainers/ci 中找到这些内容
- 从源代码构建CLI仓库
- 您可以在CLI仓库的README中了解更多关于从源代码构建的信息
在本页中,我们将重点介绍如何使用 npm 包。
npm 安装
要安装npm包,您需要安装Python、Node.js(版本14或更高)以及C/C++来构建其中一个依赖项。VS Code的如何贡献wiki提供了有关推荐工具集的详细信息。
npm install -g @devcontainers/cli
验证您可以运行CLI并查看其帮助文本:
devcontainer <command>

Commands:
  devcontainer up                   Create and run dev container
  devcontainer build [path]         Build a dev container image
  devcontainer run-user-commands    Run user commands
  devcontainer read-configuration   Read configuration
  devcontainer features             Features commands
  devcontainer templates            Templates commands
  devcontainer exec <cmd> [args..]  Execute a command on a running dev container

Options:
  --help     Show help                                                 [boolean]
  --version  Show version number                                       [boolean]
注意: 如果您通过 VS Code 安装了 CLI,将会列出用于打开开发容器的
open命令。
运行CLI
一旦你有了CLI,你可以尝试使用一个示例项目,比如这个Rust示例。
将Rust示例克隆到您的机器上,并使用CLI的up命令启动开发容器:
git clone https://github.com/microsoft/vscode-remote-try-rust
devcontainer up --workspace-folder <path-to-vscode-remote-try-rust>
这将从容器注册表下载容器镜像并启动容器。您的 Rust 容器现在应该正在运行:
[88 ms] dev-containers-cli 0.1.0.
[165 ms] Start: Run: docker build -f /home/node/vscode-remote-try-rust/.devcontainer/Dockerfile -t vsc-vscode-remote-try-rust-89420ad7399ba74f55921e49cc3ecfd2 --build-arg VARIANT=bullseye /home/node/vscode-remote-try-rust/.devcontainer
[+] Building 0.5s (5/5) FINISHED
 => [internal] load build definition from Dockerfile                       0.0s
 => => transferring dockerfile: 38B                                        0.0s
 => [internal] load .dockerignore                                          0.0s
 => => transferring context: 2B                                            0.0s
 => [internal] load metadata for mcr.microsoft.com/vscode/devcontainers/r  0.4s
 => CACHED [1/1] FROM mcr.microsoft.com/vscode/devcontainers/rust:1-bulls  0.0s
 => exporting to image                                                     0.0s
 => => exporting layers                                                    0.0s
 => => writing image sha256:39873ccb81e6fb613975e11e37438eee1d49c963a436d  0.0s
 => => naming to docker.io/library/vsc-vscode-remote-try-rust-89420ad7399  0.0s
[1640 ms] Start: Run: docker run --sig-proxy=false -a STDOUT -a STDERR --mount type=bind,source=/home/node/vscode-remote-try-rust,target=/workspaces/vscode-remote-try-rust -l devcontainer.local_folder=/home/node/vscode-remote-try-rust --cap-add=SYS_PTRACE --security-opt seccomp=unconfined --entrypoint /bin/sh vsc-vscode-remote-try-rust-89420ad7399ba74f55921e49cc3ecfd2-uid -c echo Container started
Container started
{"outcome":"success","containerId":"f0a055ff056c1c1bb99cc09930efbf3a0437c54d9b4644695aa23c1d57b4bd11","remoteUser":"vscode","remoteWorkspaceFolder":"/workspaces/vscode-remote-try-rust"}
然后你可以在这个开发容器中运行命令:
devcontainer exec --workspace-folder <path-to-vscode-remote-try-rust> cargo run
这将编译并运行Rust示例,输出:
[33 ms] dev-containers-cli 0.1.0.
   Compiling hello_remote_world v0.1.0 (/workspaces/vscode-remote-try-rust)
    Finished dev [unoptimized + debuginfo] target(s) in 1.06s
     Running `target/debug/hello_remote_world`
Hello, VS Code Dev Containers!
{"outcome":"success"}
上述步骤也在CLI仓库的README中提供。
自动化
如果您想在CI/CD构建或测试自动化中使用开发容器CLI,您可以在devcontainers/ci仓库中找到GitHub Actions和Azure DevOps Tasks的示例。
预构建
devcontainer build 命令允许您快速构建一个开发容器镜像,遵循与 Dev Containers 扩展或 GitHub Codespaces 相同的步骤。这在您希望使用像 GitHub Actions 这样的 CI 或 DevOps 产品预构建开发容器镜像时特别有用。
build 接受包含 .devcontainer 文件夹或 .devcontainer.json 文件的文件夹路径。例如,devcontainer build --workspace-folder 将为 my_repo 构建容器镜像。
构建和发布镜像的示例
例如,您可能希望预先构建一些镜像,然后在多个项目或仓库中重复使用。为此,请按照以下步骤操作:
-
Create 一个源代码仓库。
-
为您想要预构建的每个镜像创建开发容器配置,并根据您的需求进行自定义(包括开发容器功能)。例如,考虑这个
devcontainer.json文件:{ "build": { "dockerfile": "Dockerfile" }, "features": { "ghcr.io/devcontainers/features/docker-in-docker:1": { "version": "latest" } } } -
使用
devcontainer build命令构建镜像并将其推送到您的镜像注册表。请参阅您的镜像注册表(如Azure 容器注册表、GitHub 容器注册表或Docker Hub)的文档,了解镜像命名和身份验证等额外步骤的信息。devcontainer build --workspace-folder <my_repo> --push true --image-name <my_image_name>:<optional_image_version>
避免使用Docker构建镜像时出现的问题
给定的Dockerfiles和Docker Compose文件可以在没有VS Code或devcontainer CLI的情况下使用,您可能希望让用户知道他们不应该直接尝试构建镜像。您可以在高级开发容器文档中了解更多信息。
模板和功能
您可以使用开发容器CLI来处理模板和功能。在创建和使用模板时,您可能希望发布它们供他人使用,您可以在开发容器规范中了解更多信息。
反馈
开发容器CLI和规范正在积极开发中,我们欢迎您提供反馈,您可以在此问题中提供反馈,或通过devcontainers/cli仓库中的新问题和拉取请求提供反馈。
下一步
- Dev container specification repository - 阅读并为开放规范做出贡献。
- devcontainer.json 参考 - 查看
devcontainer.json模式。 - 创建开发容器 - 为你的工作环境创建一个自定义容器。
- 高级容器 - 寻找高级容器场景的解决方案。