Note
Go to the end to download the full example code. or to run this example in your browser via Binder
二分 K-Means 和常规 K-Means 性能比较#
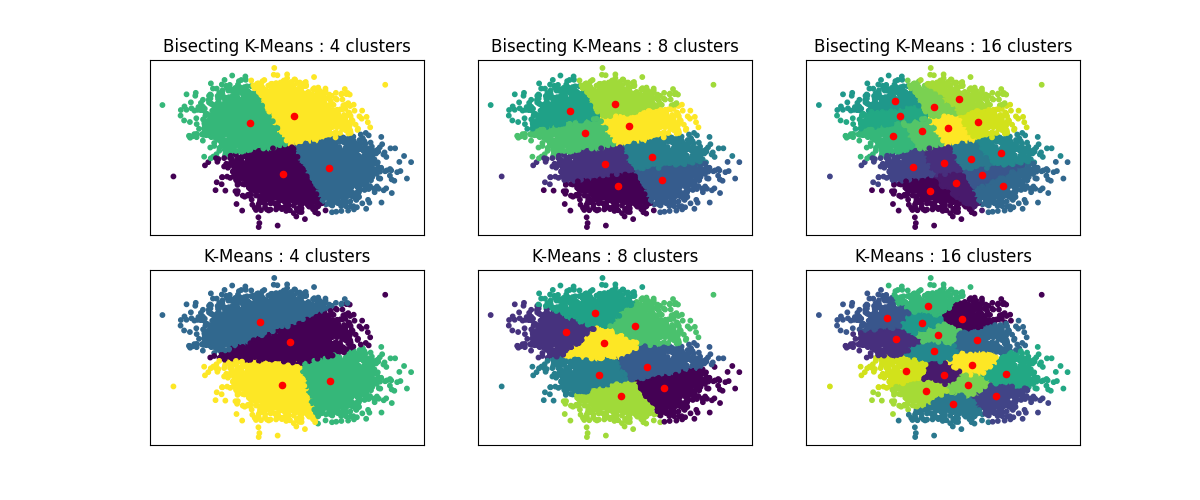
此示例展示了常规 K-Means 算法和二分 K-Means 之间的差异。
当增加 n_clusters 时,K-Means 聚类会有所不同,而二分 K-Means 聚类则建立在之前的聚类基础上。因此,它往往会创建具有更规则的大规模结构的聚类。这种差异可以直观地观察到:对于所有数量的聚类,二分 K-Means 都会有一条将整体数据云分成两部分的分割线,而常规 K-Means 则没有。
import matplotlib.pyplot as plt

from sklearn.cluster import BisectingKMeans, KMeans
from sklearn.datasets import make_blobs

print(__doc__)


# 生成样本数据
n_samples = 10000
random_state = 0

X, _ = make_blobs(n_samples=n_samples, centers=2, random_state=random_state)

# KMeans 和 BisectingKMeans 的聚类中心数量
n_clusters_list = [4, 8, 16]

# 算法比较
clustering_algorithms = {
    "Bisecting K-Means": BisectingKMeans,
    "K-Means": KMeans,
}

# 为每个变体制作子图
fig, axs = plt.subplots(
    len(clustering_algorithms), len(n_clusters_list), figsize=(12, 5)
)

axs = axs.T

for i, (algorithm_name, Algorithm) in enumerate(clustering_algorithms.items()):
    for j, n_clusters in enumerate(n_clusters_list):
        algo = Algorithm(n_clusters=n_clusters, random_state=random_state, n_init=3)
        algo.fit(X)
        centers = algo.cluster_centers_

        axs[j, i].scatter(X[:, 0], X[:, 1], s=10, c=algo.labels_)
        axs[j, i].scatter(centers[:, 0], centers[:, 1], c="r", s=20)

        axs[j, i].set_title(f"{algorithm_name} : {n_clusters} clusters")


# 隐藏顶部图的 x 标签和刻度标签以及右侧图的 y 刻度。
for ax in axs.flat:
    ax.label_outer()
    ax.set_xticks([])
    ax.set_yticks([])

plt.show()
Total running time of the script: (0 minutes 0.841 seconds)
Related examples

