Note
Go to the end to download the full example code. or to run this example in your browser via Binder
核密度估计#
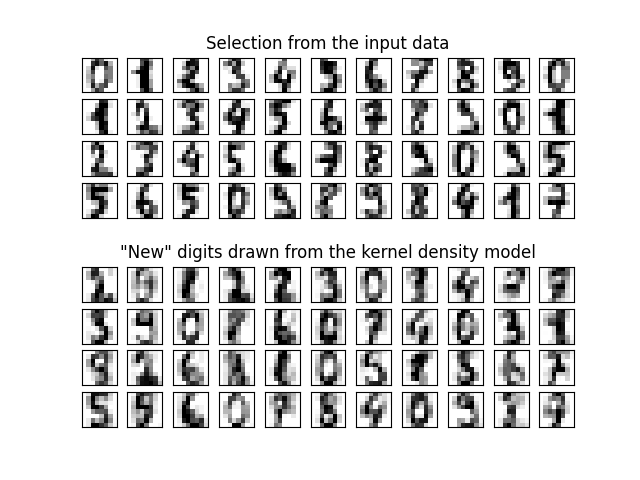
这个例子展示了如何使用核密度估计(KDE),一种强大的非参数密度估计技术,来学习数据集的生成模型。有了这个生成模型,就可以绘制新的样本。这些新样本反映了数据的潜在模型。

best bandwidth: 3.79269019073225
import matplotlib.pyplot as plt
import numpy as np

from sklearn.datasets import load_digits
from sklearn.decomposition import PCA
from sklearn.model_selection import GridSearchCV
from sklearn.neighbors import KernelDensity

# 加载数据
#
#
digits = load_digits()

# 将64维数据投影到更低维度
pca = PCA(n_components=15, whiten=False)
data = pca.fit_transform(digits.data)

# 使用网格搜索交叉验证来优化带宽
params = {"bandwidth": np.logspace(-1, 1, 20)}
grid = GridSearchCV(KernelDensity(), params)
grid.fit(data)

print("best bandwidth: {0}".format(grid.best_estimator_.bandwidth))

# 使用最佳估计器计算核密度估计
kde = grid.best_estimator_

# 从数据中抽取44个新点
new_data = kde.sample(44, random_state=0)
new_data = pca.inverse_transform(new_data)

# 将数据转换为4x11的网格
new_data = new_data.reshape((4, 11, -1))
real_data = digits.data[:44].reshape((4, 11, -1))

# 绘制真实数字和重采样数字
fig, ax = plt.subplots(9, 11, subplot_kw=dict(xticks=[], yticks=[]))
for j in range(11):
    ax[4, j].set_visible(False)
    for i in range(4):
        im = ax[i, j].imshow(
            real_data[i, j].reshape((8, 8)), cmap=plt.cm.binary, interpolation="nearest"
        )
        im.set_clim(0, 16)
        im = ax[i + 5, j].imshow(
            new_data[i, j].reshape((8, 8)), cmap=plt.cm.binary, interpolation="nearest"
        )
        im.set_clim(0, 16)

ax[0, 5].set_title("Selection from the input data")
ax[5, 5].set_title('"New" digits drawn from the kernel density model')

plt.show()
Total running time of the script: (0 minutes 4.740 seconds)
Related examples


