Note
Go to the end to download the full example code. or to run this example in your browser via Binder
手写数字数据上的K-Means聚类演示#
在这个示例中,我们比较了K-means的各种初始化策略在运行时间和结果质量方面的表现。
由于这里已知真实情况,我们还应用了不同的聚类质量指标来判断聚类标签与真实情况的拟合优度。
评估的聚类质量指标(有关指标的定义和讨论,请参见 clustering_evaluation ):
缩写 |
全名 |
|---|---|
homo |
同质性得分 |
compl |
完整性得分 |
v-meas |
V测量 |
ARI |
调整兰德指数 |
AMI |
调整互信息 |
silhouette |
轮廓系数 |
加载数据集#
我们将从加载 digits 数据集开始。该数据集包含从 0 到 9 的手写数字。在聚类的背景下,人们希望将图像分组,使得图像上的手写数字相同。
import numpy as np

from sklearn.datasets import load_digits

data, labels = load_digits(return_X_y=True)
(n_samples, n_features), n_digits = data.shape, np.unique(labels).size

print(f"# digits: {n_digits}; # samples: {n_samples}; # features {n_features}")
# digits: 10; # samples: 1797; # features 64
定义我们的评估基准#
我们将首先进行评估基准测试。在此基准测试期间,我们打算比较KMeans的不同初始化方法。我们的基准测试将:
创建一个使用
StandardScaler对数据进行缩放的管道;训练并计时管道拟合过程;
通过不同的指标衡量聚类性能。
from time import time

from sklearn import metrics
from sklearn.pipeline import make_pipeline
from sklearn.preprocessing import StandardScaler


def bench_k_means(kmeans, name, data, labels):
    """基准测试以评估KMeans初始化方法。

Parameters
----------
kmeans : KMeans实例
    一个已设置初始化的 :class:`~sklearn.cluster.KMeans` 实例。
name : str
    给策略指定的名称。它将用于在表格中显示结果。
data : 形状为 (n_samples, n_features) 的 ndarray
    要进行聚类的数据。
labels : 形状为 (n_samples,) 的 ndarray
    用于计算需要一定监督的聚类指标的标签。
"""
    t0 = time()
    estimator = make_pipeline(StandardScaler(), kmeans).fit(data)
    fit_time = time() - t0
    results = [name, fit_time, estimator[-1].inertia_]

    # 定义仅需要真实标签和估计器标签的度量标准
    clustering_metrics = [
        metrics.homogeneity_score,
        metrics.completeness_score,
        metrics.v_measure_score,
        metrics.adjusted_rand_score,
        metrics.adjusted_mutual_info_score,
    ]
    results += [m(labels, estimator[-1].labels_) for m in clustering_metrics]

    # 轮廓系数需要完整的数据集
    results += [
        metrics.silhouette_score(
            data,
            estimator[-1].labels_,
            metric="euclidean",
            sample_size=300,
        )
    ]

    # 显示结果
    formatter_result = (
        "{:9s}\t{:.3f}s\t{:.0f}\t{:.3f}\t{:.3f}\t{:.3f}\t{:.3f}\t{:.3f}\t{:.3f}"
    )
    print(formatter_result.format(*results))
运行基准测试#
我们将比较三种方法:
使用
k-means++进行初始化。此方法是随机的,我们将运行初始化4次;随机初始化。此方法也是随机的,我们将运行初始化4次;
基于
PCA投影的初始化。实际上,我们将使用PCA的组件来初始化 KMeans。此方法是确定性的,一次初始化就足够了。
from sklearn.cluster import KMeans
from sklearn.decomposition import PCA

print(82 * "_")
print("init\t\ttime\tinertia\thomo\tcompl\tv-meas\tARI\tAMI\tsilhouette")

kmeans = KMeans(init="k-means++", n_clusters=n_digits, n_init=4, random_state=0)
bench_k_means(kmeans=kmeans, name="k-means++", data=data, labels=labels)

kmeans = KMeans(init="random", n_clusters=n_digits, n_init=4, random_state=0)
bench_k_means(kmeans=kmeans, name="random", data=data, labels=labels)

pca = PCA(n_components=n_digits).fit(data)
kmeans = KMeans(init=pca.components_, n_clusters=n_digits, n_init=1)
bench_k_means(kmeans=kmeans, name="PCA-based", data=data, labels=labels)

print(82 * "_")
__________________________________________________________________________________
init            time    inertia homo    compl   v-meas  ARI     AMI     silhouette
k-means++       0.031s  69545   0.598   0.645   0.621   0.469   0.617   0.148
random          0.121s  69735   0.681   0.723   0.701   0.574   0.698   0.183
PCA-based       0.059s  69513   0.600   0.647   0.622   0.468   0.618   0.163
__________________________________________________________________________________
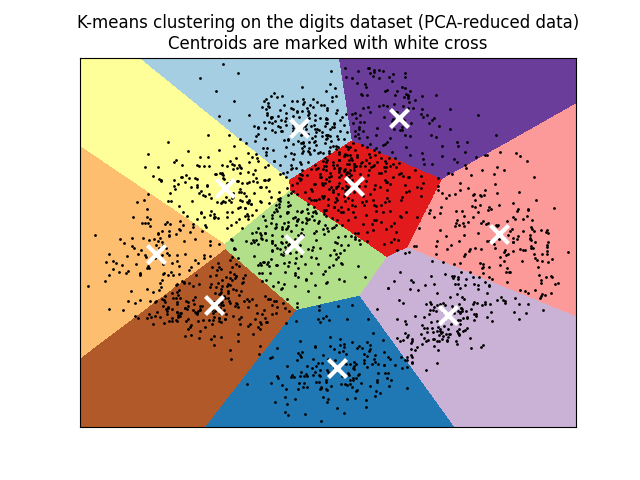
在PCA降维数据上可视化结果#
PCA 允许将数据从原始的64维空间投影到低维空间。随后,我们可以使用 PCA 将数据投影到二维空间,并在这个新空间中绘制数据和聚类。
import matplotlib.pyplot as plt

reduced_data = PCA(n_components=2).fit_transform(data)
kmeans = KMeans(init="k-means++", n_clusters=n_digits, n_init=4)
kmeans.fit(reduced_data)

# 网格的步长。减少以提高VQ的质量。
h = 0.02  # point in the mesh [x_min, x_max]x[y_min, y_max].

# 绘制决策边界。为此,我们将为每个点分配一种颜色
x_min, x_max = reduced_data[:, 0].min() - 1, reduced_data[:, 0].max() + 1
y_min, y_max = reduced_data[:, 1].min() - 1, reduced_data[:, 1].max() + 1
xx, yy = np.meshgrid(np.arange(x_min, x_max, h), np.arange(y_min, y_max, h))

# 获取网格中每个点的标签。使用最后训练的模型。
Z = kmeans.predict(np.c_[xx.ravel(), yy.ravel()])

# 将结果放入彩色图中
Z = Z.reshape(xx.shape)
plt.figure(1)
plt.clf()
plt.imshow(
    Z,
    interpolation="nearest",
    extent=(xx.min(), xx.max(), yy.min(), yy.max()),
    cmap=plt.cm.Paired,
    aspect="auto",
    origin="lower",
)

plt.plot(reduced_data[:, 0], reduced_data[:, 1], "k.", markersize=2)
# 将质心绘制为白色的 X
centroids = kmeans.cluster_centers_
plt.scatter(
    centroids[:, 0],
    centroids[:, 1],
    marker="x",
    s=169,
    linewidths=3,
    color="w",
    zorder=10,
)
plt.title(
    "K-means clustering on the digits dataset (PCA-reduced data)\n"
    "Centroids are marked with white cross"
)
plt.xlim(x_min, x_max)
plt.ylim(y_min, y_max)
plt.xticks(())
plt.yticks(())
plt.show()

Total running time of the script: (0 minutes 0.980 seconds)
Related examples


