Note
Go to the end to download the full example code. or to run this example in your browser via Binder
通过排列检验分类评分的显著性#
本示例演示了如何使用 permutation_test_score 通过排列来评估交叉验证评分的显著性。
# 作者:scikit-learn 开发者
# SPDX 许可证标识符:BSD-3-Clause
Dataset#
我们将使用 Iris plants dataset ,该数据集包含从3种鸢尾花中获取的测量值。
我们还将生成一些随机特征数据(即20个特征),这些特征与鸢尾花数据集中的类别标签不相关。
import numpy as np

n_uncorrelated_features = 20
rng = np.random.RandomState(seed=0)
# 使用与鸢尾花数据集相同数量的样本和20个特征
X_rand = rng.normal(size=(X.shape[0], n_uncorrelated_features))
置换检验得分#
接下来,我们使用原始的鸢尾花数据集计算 permutation_test_score ,该数据集可以很好地预测标签;同时使用随机生成的特征和鸢尾花标签进行计算,这些特征和标签之间不应有任何依赖关系。我们使用 SVC 分类器和 准确率分数 在每一轮中评估模型。
permutation_test_score 通过计算分类器在数据集的1000种不同排列上的准确率来生成一个零分布,其中特征保持不变但标签进行不同的排列。这是零假设的分布,零假设认为特征和标签之间没有依赖关系。然后计算一个经验p值,即在多少百分比的排列中获得的分数大于使用原始数据获得的分数。
from sklearn.model_selection import StratifiedKFold, permutation_test_score
from sklearn.svm import SVC

clf = SVC(kernel="linear", random_state=7)
cv = StratifiedKFold(2, shuffle=True, random_state=0)

score_iris, perm_scores_iris, pvalue_iris = permutation_test_score(
    clf, X, y, scoring="accuracy", cv=cv, n_permutations=1000
)

score_rand, perm_scores_rand, pvalue_rand = permutation_test_score(
    clf, X_rand, y, scoring="accuracy", cv=cv, n_permutations=1000
)
原始数据#
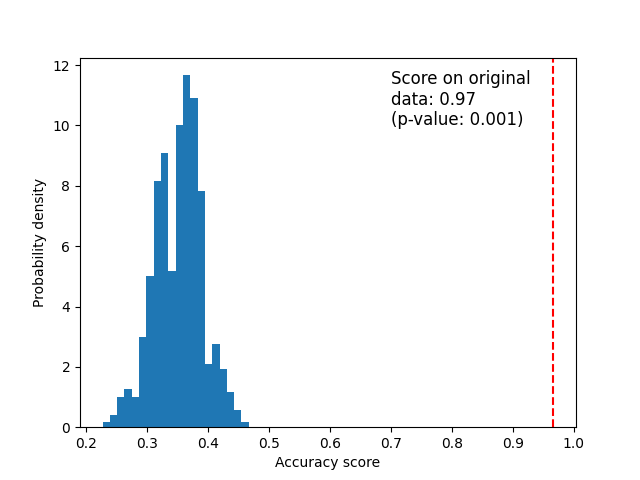
下面我们绘制了置换得分(原假设分布)的直方图。红线表示分类器在原始数据上获得的得分。该得分远高于使用置换数据获得的得分,因此 p 值非常低。这表明仅凭偶然性获得如此高得分的可能性很低。这证明了鸢尾花数据集在特征和标签之间存在真实的依赖关系,并且分类器能够利用这一点来获得良好的结果。
import matplotlib.pyplot as plt

fig, ax = plt.subplots()

ax.hist(perm_scores_iris, bins=20, density=True)
ax.axvline(score_iris, ls="--", color="r")
score_label = f"Score on original\ndata: {score_iris:.2f}\n(p-value: {pvalue_iris:.3f})"
ax.text(0.7, 10, score_label, fontsize=12)
ax.set_xlabel("Accuracy score")
_ = ax.set_ylabel("Probability density")
Random data#
下面我们绘制了随机数据的零分布。置换得分与使用原始鸢尾花数据集获得的得分相似,因为置换总是破坏任何存在的特征标签依赖性。然而,在这种情况下,原始随机数据上获得的得分非常差。这导致了一个很大的p值,证实了原始数据中没有特征标签依赖性。
fig, ax = plt.subplots()

ax.hist(perm_scores_rand, bins=20, density=True)
ax.set_xlim(0.13)
ax.axvline(score_rand, ls="--", color="r")
score_label = f"Score on original\ndata: {score_rand:.2f}\n(p-value: {pvalue_rand:.3f})"
ax.text(0.14, 7.5, score_label, fontsize=12)
ax.set_xlabel("Accuracy score")
ax.set_ylabel("Probability density")
plt.show()
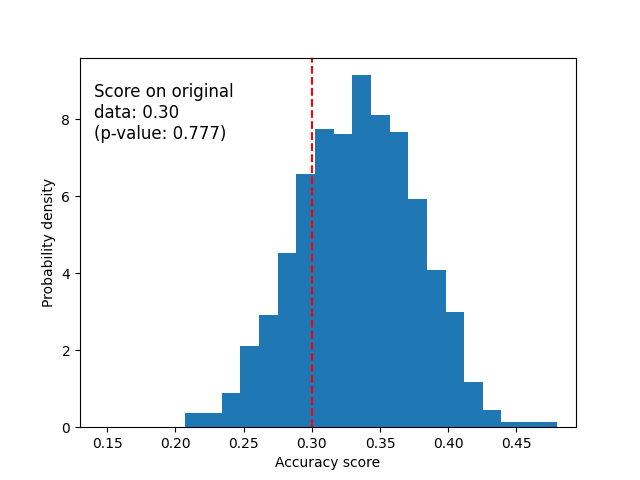
另一种可能导致高p值的原因是分类器无法利用数据中的结构。在这种情况下,只有能够利用现有依赖关系的分类器才会有低p值。在我们上面的例子中,由于数据是随机的,所有分类器的p值都会很高,因为数据中不存在结构。
最后请注意,即使数据中只有微弱的结构,该测试也已被证明会产生较低的p值[1]_。
References
<http://www.jmlr.org/papers/volume11/ojala10a/ojala10a.pdf>`_ . 《机器学习研究杂志》(2010) 第11卷
Total running time of the script: (0 minutes 6.144 seconds)
Related examples

